MSI Big Bang-XPower II X79 Review – A World of Novelty Heatsinks
by Ian Cutress on February 25, 2012 3:00 PM EST- Posted in
- Motherboards
- MSI
- X79
BIOS
If you cast your minds back to the P67 era last year, MSI had their first crack at graphical BIOSes. For the most part, it was extremely functional – settings were clear and well laid out. The main gripe I had with it however was the inclusion of so-called ‘games’ (a Breakout clone, the card game Pairs) which I learned were just low-resolution attempts to determine how capable the BIOS actually is. I also learned that the differing western and eastern markets are after different things in their products – whereas in NA/EU the drive is for more stability, functionality, and easy to use systems, in Asia the trend is for more gadget style trends or as one engineer put it, ‘cute’ systems. I am not sure how au fait that engineer was with the whole of MSI’s internal strategy, but that is what I was told.
Today, we have a very different system in front of us. The BIOS MSI has given us was the result of a design competition to find the best looking BIOS combined with ease-of-use and functionality. I have been told that the design we have actually came third in that competition, due to management looking at entries and also ability to program into a BIOS. Nevertheless it works extremely well and is as easy to use (if not easier) than some of the other top tier manufacturers.
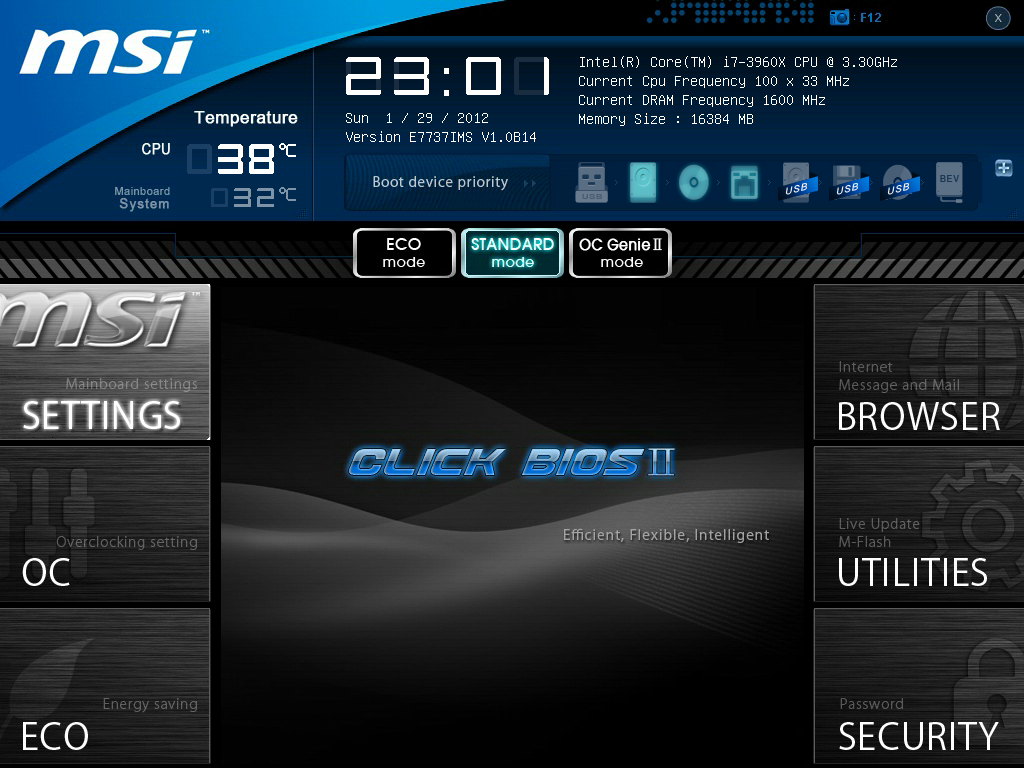
Along the top is a set of data every BIOS should have: CPU model and speed, BIOS version, memory size and speed, and CPU temperature, and these are constant throughout all the menus chosen. This is a shade away from ASUS’ implementation which includes fan speeds and voltages – both the ASUS and MSI also use a quick boot device priority selection.
Users have the choice of implementing ECO mode, which attempts to reduce power usage on the board, or OC Genie mode, which implements a MSI standard overclock (like the OC Genie button on the board). Alongside these options, enthusiasts wanting a larger overclock will keep it on Standard mode and use the various options as shown above.
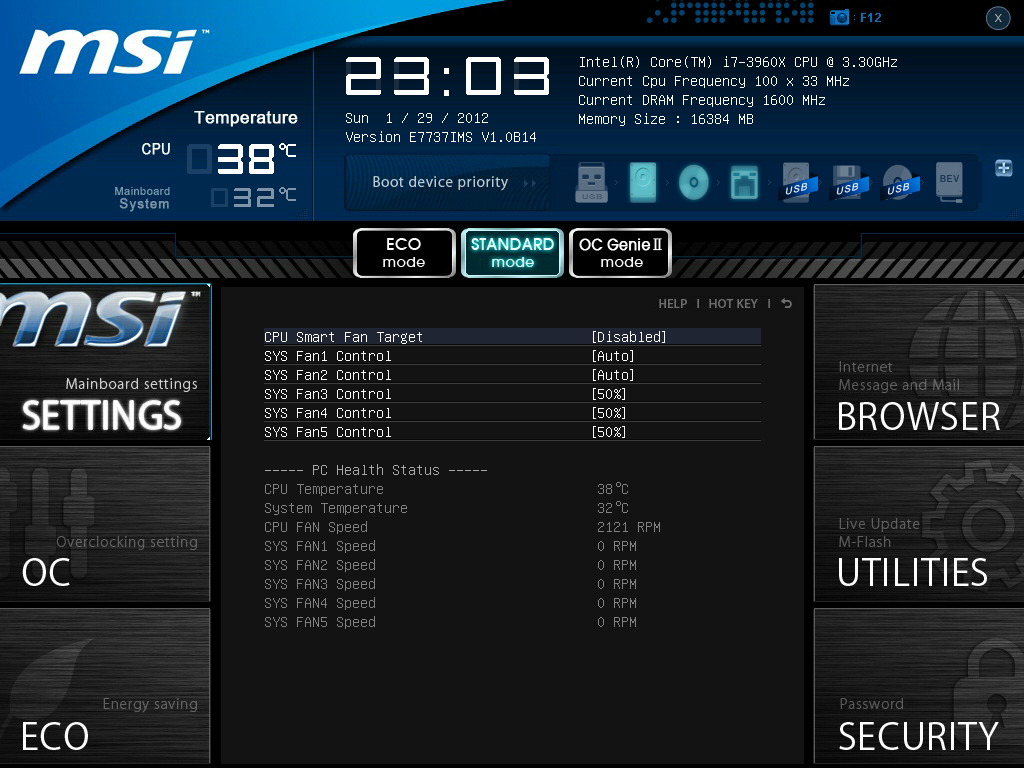
Fan controls are in the Hardware Monitor screen, where all the fan headers on board can be controlled. The options for fan controls are not as varied as we have seen on other vendor boards – only a simple percentage or auto setting is available, rather than the multi-ramp systems we have seen before. Usually, the level of control a manufacturer can give on a board is related to the fan controller used (and thus the price) and the speed at which the vendor can create applicable software for it. For a board that costs nearly $390, it is a shame that a better series of fan controllers were not used.
Updating the BIOS is relatively easy – insert any USB stick (FAT or NTFS) with the latest BIOS in the root folder, select Utilities -> MFlash -> USB -> BIOS file. The system will write the new BIOS over the BIOS selected with the BIOS Switch – not the BIOS the system was booted in to. So if a BIOS refuses to boot or reset, you can boot in the second, then while in the BIOS press the switch to select the first and overwrite the first BIOS with the MFlash tool. The system will power down, then the user has to power it up again – the new BIOS will then boot.
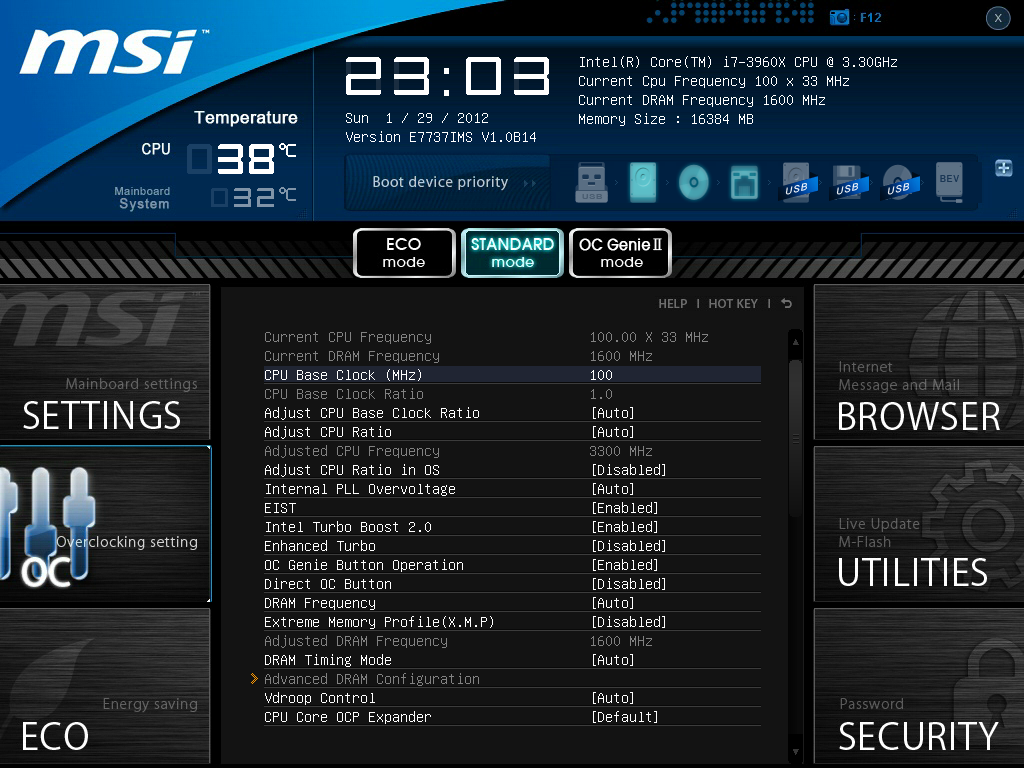
In terms of OC options, these are all bundled in the OC menu. If I was to be picky about any area of the BIOS, I would say that the OC options are not as neatly laid out as the rest of the BIOS. Nevertheless, the options are here, including base clock, CPU base clock ratio, CPU multiplier (ratio), memory frequency, memory timings, XMP, and voltages. One thing to note here is that if you change the CPU base clock ratio (i.e. the gear settings) to 1.25x, the base clock does not change with your setting – the base clock has to be manually adjusted to 125 MHz.
The Enhanced Turbo option in the OC menu may be enabled by default depending on the BIOS of the board. This setting in the BIOS gives the CPU an enhanced speed advantage at stock, by essentially overclocking the CPU to run at 3.9 GHz at any level of load (compared to Intel specifications of 3.6 GHz in full multi-threaded mode). For the purposes of the tests here, this setting was disabled, as it gives the board an unfair advantage in our tests, and with some BIOSes it is not enabled. However, this is just a CPU change – the OC Genie will give you that 4 GHz overclock and XMP settings with a single push of a button.
Overall, I am very impressed by this BIOS – it is easier to use than previous MSI iterations and performs well in comparison to other manufacturer implementations.


Overclocking
Given the build of the MSI Big Bang-XPower II, with its 22 phase power delivery, OC oriented options, and the price, I would expect some impressive overclocks from this board. The only obvious limitation from just looking at the board may be the design of those heatsinks, as they are not exactly the most efficient way of extracting heat from the area.
Automatic Overclock
With the OC Genie setting (either in ClickBIOS options, BIOS options or pressing the button on board) enabled, the board would default to a 4 GHz overclock on the CPU and XMP settings on the memory on the next boot. This sort of automatic overclock is rather conservative, considering other vendors have up to 4.5 GHz automatic overclock systems on their boards. But in this way, MSI are able to market the Big Bang-XPower II to system builders – 4.0 GHz is safe (you can pretty much guarantee all processors will do it if they can manage 3.9 GHz), and it is a one button solution. One thing to note is the voltage on this setting – the board set the CPU to 1.344 V, which is rather high. However the higher they set the voltage, the more processors will be stable, at the expense of increased heat and power draw.
Manual Overclock
As with previous reviews, our standard overclock methodology on X79 is to set the CPU VCore to 1.4 V, raise the power limitations where possible, and up the multiplier. The processor used in this test (i7-3960X) has previously seen 5125 MHz in extreme conditions, but in these reviews a target of 4.5-4.6 GHz at 1.4 V is often the standard.
With the MSI BBXP2, our limit was the 45x multiplier (4.5 GHz), which supplied 1.4 V constantly and hit 74ºC maximum during our Blender stability test – one of the lowest temperatures I have ever seen for this level of overclock. At the 46x multiplier, the system was stable during most tests, however would crash part way through the Blender stability test.
I then raised the base clock up to the 1.25x gear, to see if we could find any discrepancy. At this base clock, I was surprisingly able to push the CPU even further, as the 37x multiplier (37x and 125 MHz makes 4625 MHz) worked flawlessly at 1.4 V, with only 77ºC on the CPU during the Blender test. Though should users want to change the gear ratio, they should be careful to monitor what memory strap they are running, as 1.25x will apply a 25% overclock to the memory as well.
Memory Overclock
Using my G.Skill 16GB kit which is rated at DDR3-2400 9-11-11 at 1.65 V, I tested the level to which I could push the memory on this board at 1.65 V. The board is rated for DDR3-2400, which the board did perform when OC Genie was enabled. However, if I manually selected XMP in the BIOS (either XMP 1.2 or XMP 1.3), the board would not boot. By selecting the DDR3-2400 memory strap in the BIOS (and loose timings), again I was struggling to get into an OS. The DDR3-2133 setting did work though. This is a little surprising – I have seen boards rated to DDR3-2400 before but only for dual channel, and only DDR3-2133 in quad channel.
Just to confirm that XMP was working, I tried a different G.Skill 16GB kit rated at DDR3-1866 9-10-9 which performed flawlessly at XMP. This leads me to suggest that some optimization may need to be required for my higher rated memory kit to perform.
Extreme Overclock
In a new addition to my reviews, I will attempt to push the boards in terms of a more extreme overclock for most enthusiast users. Rather than a custom set up, I’m using off the shelf components – a Corsair H100 paired with a couple of Delta fans (AFB1212VHE) that I use for competitive air/water overclocking. While not the most extreme of liquid cooling setups, it actually does quite nicely.
Using an i7-3930K C2 processor, at 1.55V, I was able to achieve 5217 MHz on the CPU:
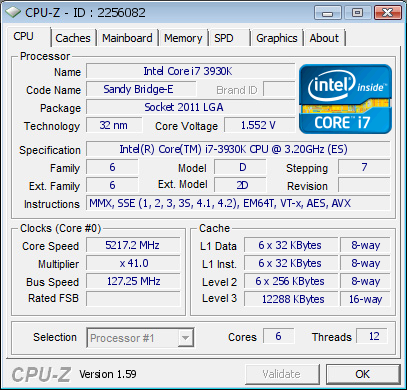
This setup was completely stable, although still a little warm on my setup, getting near 90ºC during the 3DPM test, where the CPU would start to throttle a little. For comparison, at 1.5 V I was able to achieve 5000 MHz (50x 100 MHz) with relative ease. The MSI BBXP2 has two advantages for this type of overclock – the voltage to the CPU is constant and accurate, and that the DirectOC buttons for adjusting the base clock help get those extra MHz without a reboot.


45 Comments
View All Comments
Operandi - Sunday, February 26, 2012 - link
"Giant fag" might be going a bit far but unless MSI is aiming for the immature 14 year old who lives their life through MW or BF I think they missed the mark big time with the design. Which is too bad because I otherwise I like the murdered out all black aesthetic.As it is Asus, Gigabyte are both making great boards that don't look stupid so I can easily skip this and look elsewhere.
leignheart - Wednesday, May 16, 2012 - link
nah it would only scream that if you owned it Ben90bobeedee - Sunday, February 26, 2012 - link
got to agree with physical-leave the stupid toys off of the motherboard.Bownce - Tuesday, February 28, 2012 - link
I think they're great. They should also include bandoleers for overclocking, a tiny lever action for resetting, and a D.B. icon for when it crashes.Oxford Guy - Saturday, February 25, 2012 - link
Isn't that exciting! Wow!Guys! Maybe think about cooling it with the exclamation point! Most of the review blurbs on the main page have them!
Oxford Guy - Saturday, February 25, 2012 - link
Probably the best PSU ever! Like O-My-Gosh!http://www.anandtech.com/show/5464/seasonic-platin...
coolhardware - Saturday, February 25, 2012 - link
I like all the exclamation points!PS Thanks for all the reviews and content lately, it is nice to see AnandTech updated so often...
Iketh - Saturday, February 25, 2012 - link
This particle article I didn't care to read in its entirety, so I glanced through hoping to find the few pieces of information I wanted. One was the MSRP... it's always listed at the bottom of the spec list in every other review on this site. Why omit it here? Please adhere to some of these simple standards so that your articles are less taxing on the reader.IanCutress - Saturday, February 25, 2012 - link
There are no official standards in motherboard reviewing, so unless you provide a list of official 'simple standards' then there is nothing to do apart from consider your request/command to have it exactly where you specifically want information XYZ. The MSRP is listed in a number of places throughout the review (and is consistent with previous reviews) - a link through on the product to a retailer on the test bed, and the last page in particular. It wouldn't be a proper review if we didn't talk about the price! For the record, it is currently $390.All the best,
Ian
Iketh - Saturday, February 25, 2012 - link
Sure there is. The articles on this site follow a similar pattern regardless of what they're about. After not finding the price in the introduction, I knew to jump to the page that introduces the board to find the spec sheet. Unfortunately, the price was not listed at the bottom as it normally is.Of course you talked about the price, I just didn't want to read the full article to find it as I alluded to in my first post. It's a request based on what I'm used to at this site, not a command.
And by the way, there are very few articles I rarely read from beginning to end here. It's just the theme of this board is childish, like a cheap toy when it's anything but.