ASUS Maximus V Gene vs. Gigabyte G1.Sniper M3 Review
by Ian Cutress on May 13, 2013 10:00 AM EST- Posted in
- Motherboards
- Gigabyte
- Asus
- MicroATX
- Z77
ASUS Maximus V Gene In The Box
Gaming motherboards have to have that something extra in the box that adds to the value of the purchase. It has to be something aside from the normal stuff that comes in the package – a gamer wants a little extra. Whether that is decals to spread around the case, or an additional feature or two, the package must feel like something worth a little bit more to give a sensation of ‘free’.
Inside the ASUS Maximus V Gene, we get:
Rear IO Shield
User Guide
Driver CD
Door Handle Sign that says “I’m gaming, do not disturb”
A set of labels for SATA cables
A mPCIe Combo Card
Six SATA Cables
ROG Connect Cable
A Flexi SLI Cable
Q-Connectors
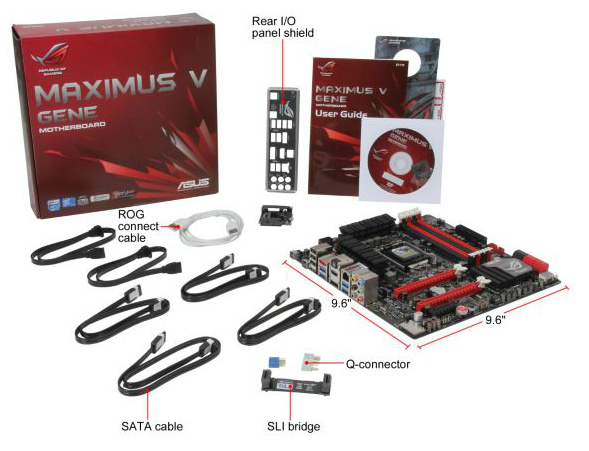
In terms of connectivity, ASUS has you covered – plenty of SATA cables in the box, with Q-Connectors to help with case switches. There is no USB 3.0 front panel as there is only one USB 3.0 header on board - this is typically taken by any modern case.
ASUS Maximus V Gene Overclocking
Note: Ivy Bridge does not overclock like Sandy Bridge. For a detailed report on the effect of voltage on Ivy Bridge (and thus temperatures and power draw), please read Undervolting and Overclocking on Ivy Bridge.
Experience with ASUS Maximus V Gene
Overclocking on ASUS motherboards has historically been rather good, given that it is one of the areas they focus on when designing a motherboard. The ROG range is the epitome of this effort of course, and the options available to users who wish to fiddle in the BIOS are both numerate and expansive.
For users wishing to automatic overclock, we have several options. In the OS, the TurboV Evo software part of AI Suite gives ‘CPU Level Up options for 4.2 GHz, 4.4 GHz and 4.6 GHz. Each of these is a one button click, accept and reboot. In the BIOS, users have the option of a ‘Gamer’s OC’, which boosts the CPU to a 48/47/46/45 multiplier depending on loading. All options affect the voltage applied of course, and our results are below.
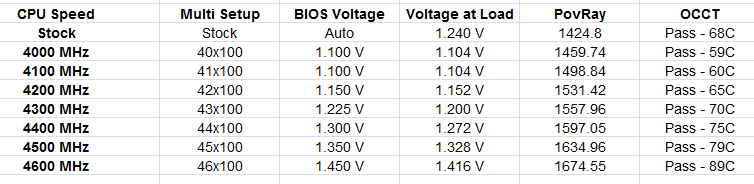
For manual overclocks, we took our base settings for our rather poor CPU (40x multiplier and 1.100 volts) and slowly raised the multiplier while trying to find the voltage at which each multiplier was stable. All other settings were left on auto, and compared to the Z77A-GD65 Gaming, almost all voltages the temperature reported by the CPU was a lot less, allowing us to get 4.6 GHz from the CPU, albeit at a rather wild 1.45 volts.
Methodology:
Our standard overclocking methodology is as follows. We select the automatic overclock options and test for stability with PovRay and OCCT to simulate high-end workloads. These stability tests aim to catch any immediate causes for memory or CPU errors.
For manual overclocks, based on the information gathered from previous testing, starts off at a nominal voltage and CPU multiplier, and the multiplier is increased until the stability tests are failed. The CPU voltage is increased gradually until the stability tests are passed, and the process repeated until the motherboard reduces the multiplier automatically (due to safety protocol) or the CPU temperature reaches a stupidly high level (100ºC+). Our test bed is not in a case, which should push overclocks higher with fresher (cooler) air.
Automatic Overclock:
For CPU Level 1, the system applied a 42x100 overclock, setting the CPU voltage at 1.275 volts. This gave 1.280 volts at load in the OS, with a PovRay score of 1523.17 and an OCCT load temperature of 72ºC.
For CPU Level 2, the system applied a 44x100 overclock, setting the CPU voltage at 1.325 volts. This gave 1.328 volts at load in the OS, with a PovRay score of 1601.70 and an OCCT load temperature of 74ºC.
For CPU Level 3, the system applied a 46x100 overclock, setting the CPU voltage at 1.330 volts. This gave 1.336 volts at load in the OS, but caused PovRay to crash with a memory error and OCCT to BSOD.
The Gamer’s OC Profile in the BIOS attempted to apply a 48/47/46/45x multiplier overclock based on loading, along with a CPU voltage of 1.350 volts and load line calibration set to high. This configuration caused the system to blue screen on boot.
Manual Overclock:
For our manual overclocks, we left LLC at automatic, as well as power/current settings. Here are our results:


31 Comments
View All Comments
Speedgod66 - Thursday, May 16, 2013 - link
as an owner of the g1 sniper m3 I have to say some of your comments are valid -should have more sata ports very annoying , pciex 8x x8 layout is brilliant no card overheating running 2 evga 680 classifieds -but the sound for gaming is underestimated it is fantastic and gives you positional awareness of your enemy better than the Asus I have the maximus 1V genieZ and Maximus 1V extreme Z in other systems -love the extra features -but still anyone looking the sniper is great for gaming -posters a waste of time