Thermalright HR-03 GT: Heavyweight GPU Cooling
by Matt Campbell on March 3, 2008 2:00 AM EST- Posted in
- Cases/Cooling/PSUs
HR-03 GT Installation
First, we must say that Thermalright's installation directions on their website are vastly superior to the black-and-white, small font instruction card they ship in the box. To their credit, they do direct you to the website on the card, and they can easily modify and/or improve the information there over time.
Once you apply the RAM sinks, you'll end up with something that looks like this.

This is where we first started to be annoyed. The adhesiveness of the RAM sinks is not that great, and a couple of them did not want to stay put. Make sure to use alcohol and clean any residue meticulously. This also seems to be a common problem, as it's listed as question two in Thermalright's Online FAQ. They claim with a proper cleaning the sinks will not be movable. If you're still worried and intend this as a long-term installation, you may want to consider the use of thermal epoxy. With that, they really will be immovable.
Next, install the heatsink. There are two methods for this: One wraps the heatsink behind the card, while the other curves it out front. We opted for option 2, as we didn't have enough clearance to the CPU cooler in our test system. Make sure to inspect your case clearances before selecting your install method.
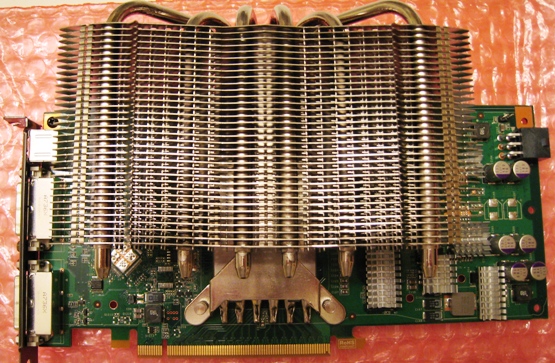
Yes, it's large. From the front of the heatsink to the rear of the card, it's exactly two inches. The screw caps protruding from the back add another 0.25". Add a 92x25mm fan to that, and the depth grows to 3" to the board, or 3.25" with the screw caps. For reference, an 8800 Ultra is only 1.625" thick at its deepest point.
When it comes to fans, there are a lot of options in the 92mm category. We've used Scythe and Panaflo in the past with good results; they provide good amount of airflow with very little noise. Either the Panaflo H1A or the Scythe Kama are a good choice; noise figures are not noted in this article as both were inaudible over ambient case noise. We used the Kama for temperature testing, with the fan mounted to blow air into the heatsink (towards the card).
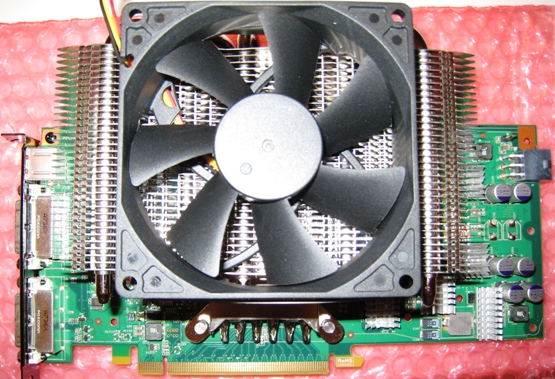
The fan clips are another area of annoyance - the mounting mechanism is not that intuitive, nor is it that secure in this product. With a bit of patience and perseverance, however, it's possible to mount a fan. Now let's look at the results of our effort.


43 Comments
View All Comments
axiomatic1 - Wednesday, March 5, 2008 - link
I had a similar problem with my Swiftech ram sinks for my 8800gt. The solution (given by swiftech when i called for help) worked like a charm. Essentially, IPA does not act as a degreasing agent. The reason that the sinks don't stick is because they can't. There is a residue of thermal grease on the chips. The way to remove this grease is to use a cleaner that removes grease. Acetone works wonders. When i used the acetone on my chips the ram sinks stuck very well. If this still doesn't work and you don't want the permanence of thermal epoxy there is another solution, also given by swiftech. You get a bottle of krazy glue and put a dab on a piece of paper. Take the pointy end of a paper clip and dip it in the glue and then dab the tip on the ram sink. This leaves enough glue on the sink to make the sink stick, but doesn't interfere with the thermal conductivity of the tape.Somewhat haphazard, but my ram sinks are still going strong.
7Enigma - Thursday, March 6, 2008 - link
Very interesting, thanks for the reply! I plan on building a system soon and will make sure to have both on hand when removing paste and reapplying better paste. I wonder if this holds true for all paste jobs (be it CPU, GPU, Northbridge,etc.). Might get a bit extra performance or at least be sure you have a clean starting point.Thorsson - Saturday, March 8, 2008 - link
Just be careful with Acetone, it's not like IPA that you can spill anywhere and will just quickly evaporate. Acetone is a strong solvent for most plastics and synthetic fibres. You don't want to see that headline, "Acetone ate my Mother....board".swing848 - Wednesday, August 4, 2010 - link
Although this thread is ancient, someone may find this useful.Another very good, and easily found, cleaner for computer components is ArctiClean 1 followed by ArctiClean 2.
ArctiClean 1 & 2 can be found as a package at newegg.com
Philscbx - Wednesday, June 2, 2010 - link
I'd like to recommend a safer degreasing agent used for twenty years.It's 'electronics contact cleaner' which is not acetone, and wont melt plastic.
We use acetone to deliberately melt plastics on aircraft interior repairs.
Also used for epoxy.
Acetone is not really a good degreaser where brake/contact cleaner is, and less damaging.
Smear axle grease sample on scrap anything, from aluminum foil - etc, and actually do the test with both solvents.
Brake/contact cleaner is highly used for final building of drag race engines.
It removes all trace of grease and oils holding fine grinding residue.
The difference using 'electronics labeled' contact cleaner is insurance it won't damage.
Cheers.
joeythecat - Wednesday, March 5, 2008 - link
I guess my first question would be does this cooling solution fit in a Antec P182 case?MamiyaOtaru - Tuesday, March 4, 2008 - link
I am loving this cooler. With my mobo I can wrap it around the back of the card without interfering with the cpu or northbridge tower coolers. It means I lose no expansion slots. It also puts the cooler right next to my case exhaust fan, so I don't need to mount a fan on the cooler.It's overkill, but I have it mounted on a 7900gt. Idles at around 33, loads at 39 (again, no fan on the cooler). The 7900gt isn't really a speed demon anymore, but I do get a decent peformer running very cool with no extra noise. It's very ideal for me.
7Enigma - Tuesday, March 4, 2008 - link
I am amazed at the results, truly amazed. Unfortunately this design has a crippling flaw that your test (as you mentioned in the article so I'm not faulting Anand) will not show. The hot air is still INSIDE the case!As the GPU is notorious for being the largest producer of heat in a case (barring some crazy OC'd quad-core), I don't want the product of that energy to be dissapated into my case, I want it going out the back!
During my last computer build (3 years ago) I was happy to see the Arctic Cooling VGA silencer (which I own) offer a way to keep temps lower, keep the noise quieter, but most importantly exhaust the heat directly out of the case.
With this cooler, however, you are at the mercy of your power supply/case fans. If they aren't great, the true benefit of this cooler (overclocking) will not be as good as it could be (noise will obviously be improved).
As an aside, since I've never owned the 8800GT, is the stock cooler exhausted out of the case or just inside like 99% of all stock graphics cards? From the pictures it looks like the latter and so I guess this cooler is better...but I would have loved to see a similar setup with some ducting to get the heat out of the case.
Sooticus - Monday, March 3, 2008 - link
Those stick on heat sinks are a real problem, especially on the mosfets at the end of the board. There is just too little surface area to stick to. I had one heat sink drop of onto the mainboard during opperation (luckily no damage). I found that a better heatsink for the mosfets could be made by cutting of the end of the old stock heatsink and screwing it on using the original mounting holes. (Anand, If your doing a round up, I'm using a Zalman VF900-Cu )BTW - did you end up using the GT's on board fan header or a seperate one?
KLC - Monday, March 3, 2008 - link
Great article, I'd love to actually see the product but all I see is text and blank spaces where pics should be. What is going on?