BitFenix Shinobi: The Budget Ninja
by Dustin Sklavos on June 22, 2011 12:45 AM EST- Posted in
- Cases/Cooling/PSUs
- mid-tower
- bitfenix
- shinobi
Assembling the BitFenix Shinobi
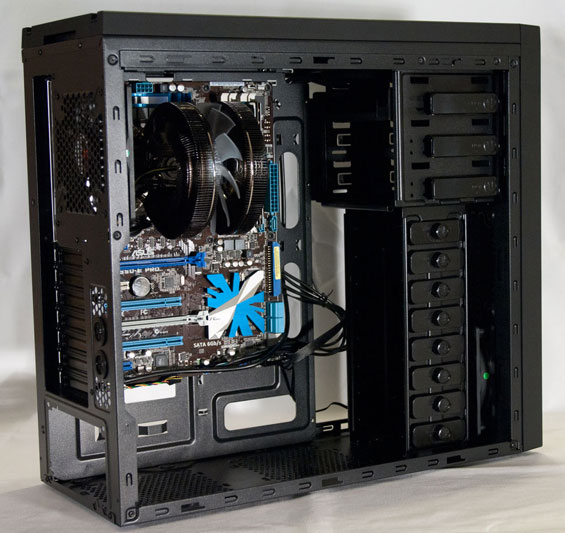
Actually building our testbed into the BitFenix Shinobi proved to be remarkably painless. Everything about the building experience from start to finish screamed polish, although there were hiccups here and there (nothing is ever trouble free). One thing I appreciated tremendously was the instruction manual included: it's not perfect, but for the most part instructions are clear, simple, detailed, and written in perfect English.
The side panels are affixed with thumbscrews and are easy enough to remove. You'll want to remove both, too, as there's a healthy amount of space behind the motherboard tray for routing cables and the tool-less hard disk mounting mechanisms need to be attached to both sides of the drive.

Installing the motherboard is the standard process, involving manually screwing standoffs into the tray. BitFenix only ships the Shinobi with two standoffs pre-installed, and I have to be honest here: this is one aspect of assembly where everything has largely standardized at this point. It's a small nuisance but a nuisance nonetheless. Nonetheless, once the standoffs are installed, putting the I/O shield and the motherboard in is painless and easy. You'll see that word "painless" come up again and again and that's because with the Shinobi it's true: this is an exceptionally easy case to work with.

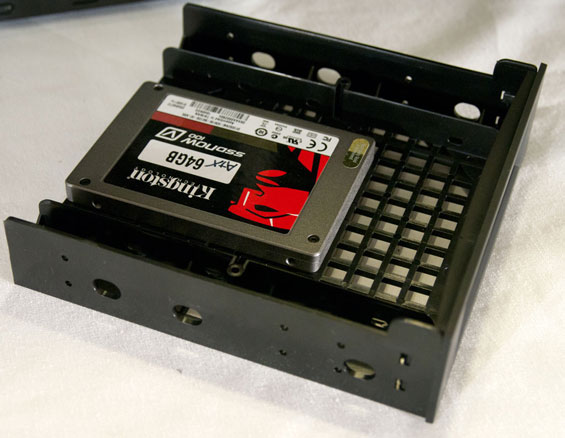
Things get a little bit confusing initially with the drive installation, but once you know what you're looking at, everything's right as rain again. The 5.25"-to-3.5"-to-2.5" adapter tray comes pre-installed behind the top 5.25" bay shield; to remove it you have to actually take the front of the case off. That's not too difficult and requires only a reasonable application of force. From there it just slides out. The adapter tray comes with two sets of screw notches: one for using it internally, and the second for using it externally. It's a slick solution; you can easily hide it behind a drive bay shield if you're just using it to mount an SSD. Plastic clasps are used on one side to secure 5.25" drives in place; I found the adapter to be a little too loose for my liking in its bay, but the optical drive we use didn't budge once the clasp was snapped in, and it lined up perfectly.
Installing 3.5" drives is incredibly simple. Twist the knob on the clamp and it pops off of the cage. Do the same to the clamp on the other side. Then slide your drive in, line it up with the screw holes, pop the clamp back in and twist it back to the "lock" position (helpfully marked on the clamp itself). Like the 5.25" adapter bay it's not 100% secure, but it's close enough not to worry about it or drive vibration creating noise or reducing the lifespan of the drive.

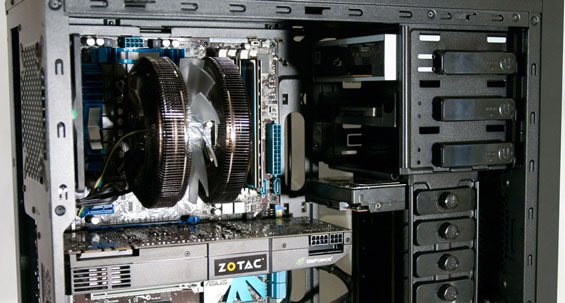
It's here that you'll discover the first potentially serious clearance problem of the BitFenix Shinobi, though. A high-end video card is liable to butt up against the back of a hard drive and prevent you from connecting the cables to it, so this means you'll lose at least one or two drive bays in the process. I also discovered that the way I'd installed the hard drive and the video card effectively created a barrier between the front intake fan and the rest of the components inside the case. This is the configuration I used for testing, and it might have been a little unfair since it's clearly not the ideal arrangement, but it's not an unusual one either: doing this allowed me to use just one power lead for connecting all of the drives, thus reducing cable clutter.
Speaking of which, is this case ever excellent for minimizing cable clutter. Installing the power supply and wiring everything was about as easy as I could expect, with the mounting holes in the motherboard tray working perfectly and a healthy amount of breathing room between the back of the tray and the side panel. I didn't actually even need to use the included zip-ties to keep everything in place.
Of course, there were still some hassles in the assembly. The AUX 12V line proved once again to be extremely difficult to connect; this is a situation where adding a half inch or so of height to the Shinobi would've given the top of the motherboard enough clearance for you to route that cable all the way up to the top, and also create enough clearance to use a 240mm radiator and water-cooling solution, something you can't do with the Shinobi as is.
Also, understanding the window on the case is to help you display your internals, coloring all of the case header leads black is nearly as ridiculous an idea here as it was in the NZXT H2. It's not worth it. I was able to get them connected and working properly on the first try, but I'd just as soon not play guessing games trying to figure out which side is the positive and which side is the ground.


26 Comments
View All Comments
IvanChess - Wednesday, June 22, 2011 - link
I know bottom mounted PSUs are all the rage but with two front 120s, a top mounted PSU would let this case have an intake inline with the CPU and another intake inline with the GPU. I wonder if that would help the thermals.Impulses - Wednesday, June 22, 2011 - link
That's one thing I like about the cheap Thermaltake M9 I'm using... PSU is in the traditional top location and the drive bays are ALL actually 5.25" bays top to bottom, it comes with a 3.5" drive cage that you can slide into any three of the 5.25" bays (or was it two, I forget) and the same cage mounts a 120mm fan up front...So I put a DVD burner and card reader up top in line with the PSU, and directly below those I placed the 3.5" drive cage with a fan, and no drives. Hence, I've got a 120mm intake there that blows right across the memory and into my tower HSF, which blows directly unto an exhaust.
I mounted my SSD into a 5.25" bay with a 2.5" to 5.25" adapter (holds two drives so I have the option of going RAID eventually), and I slapped my 3.5" data HDD unto a foam slab on the case floor on the last 5.25" bay, held in place with velcro straps (something I've been doing for years to decouple drives and minimize noise, works better than any grommets or stock soft mount).
I thought about getting another cage for an intake fan for the GPUs but instead I used the lower fan mount on the stock windowed panel of my case, which paces the fan right by the CF GPU's intakes anyway... Air travels in sort of an L from there thru the back GPU exhausts but it does that anyway within the heatshroud, so a front intake wouldn't be any more direct.
Impulses - Wednesday, June 22, 2011 - link
Nice review, but I don't understand why you chose to test it with the 3.5" drive where you did... It's a budget case, so most people are probably not gonna run SLI/CF on it, and you weren't doing so either so there was no need to have the hard drive blocking all airflow. Having in any of the lower slots would probably lead to significantly lower temps overall. Between that and no side intake or top exhaust (i understand they aren't included), it just seems like you decided to test the worst possible configuration imaginable. If I was BitFenix I definitely wouldn't be pleased...Impulses - Wednesday, June 22, 2011 - link
If you move the intake fan to the higher mounting position and/or place the hard drive in one of the bottom bays it'd definitely run cooler overall (looks like some airflow would leak to the top thru the gap left between the GPU and the bays), the hard drive wouldn't interfere with SLI/CF there and it's not gonna sit in a dead hot spot with the PSU pulling done air out right next to it.If you were to add fans you could just leave the hard drive and intake where they are (to help create two distinct zones), invert the rear fan into an intake, and add a top exhaust. Either way, you literally tested the worst possible configuration... Are we assuming that DIY builders are clueless and can't play around a little with fan/drive placement?
Don't get me wrong, the review was great overall, typical Anandtech (you go into way more detail about the product than 95% of sites out there), but I definitely find the tested config to be a poor choice.
Dustin Sklavos - Wednesday, June 22, 2011 - link
The reason why I tested it in this configuration was partly because it made the cabling a bit easier, but also because I deliberately did...maybe not want to handicap it necessarily...but produce a less than ideal scenario so that we could see how it might perform under those circumstances. Sort of like saying "this is as bad as it'll get." Even our thermal tests are a worst case scenario by running Prime95 and FurMark in tandem.I don't think the Shinobi performed that badly, either, honestly. The Antec Sonata IV was a disappointment; working with the Shinobi was a delight and with enough fans (and the right fans), it could be a stellar cool-and-quiet enclosure. I keep seriously considering moving my rig from my Corsair 600T into the Shinobi actually just because of how much I like how it looks and how easy it is to work with.
Lunyone - Wednesday, June 22, 2011 - link
I haven't read the other case reviews that your referring to, but did you/someone test with a similiar frame of mind (worst configuration possible)?? I hope the other cases were test in the similar way, otherwise I'd consider your methods to be a bit sketchy. I do like the subtle look myself and appreciate a case that is like that (CM 690 anyone?). I have worked with several different types of cases (mostly budget ones) and have grown to like tool-less ones for the most part. I like the way the CM 690 is (comes w/3 fans) and can be found for around $70 on sale. This BitFenix case seems like a pretty well built and if priced right will be one that I might purchase in the future. If this case can sell for around $50 on sale than I can see this flying off the shelves!Dustin Sklavos - Wednesday, June 22, 2011 - link
Part of the problem is that other enclosures can't really be handicapped as badly in this way either. I suggested to the BitFenix rep that the drive cages be rotated laterally, which would effiectively eliminate the clearance issue that blocks some of the airflow.In retrospect I do think I was a bit too harsh in testing this one, and part of that was in wanting to push it as hard as I could. I may wind up revisiting it in the future, as like I said before I'm very fond of what BitFenix has done here. This is a classy case and I don't doubt it can perform better than it did in this review and I'd be more than comfortable in recommending it. The windowless version sells for $59: you sacrifice the hard drive clamps and the side window (with vent), but at $59 I have a hard time thinking of a better deal.
Zoomer - Wednesday, June 22, 2011 - link
How about adding the Antec 300? It routinely sells for under $50; I got mine for $35. You'll have too add fans to the front though.dac7nco - Wednesday, June 22, 2011 - link
OK Dustin,I'll BUY you the BitFennix Shinobi, including shipping, with some nice quiet fans. You can send me your 600T in return.
Daimon
iuqiddis - Wednesday, June 22, 2011 - link
Is there any chance you can change the fan configuration or add a fan and redo some of the thermals? I'd be very curious to see whether inclusion of an extra fan would make a noticeable difference. Thanks.