Original Link: https://www.anandtech.com/show/3671/asus-m3e
ASUS Maximus III Extreme - P55 for $349
by Rajinder Gill on April 26, 2010 1:32 AM EST- Posted in
- Motherboards
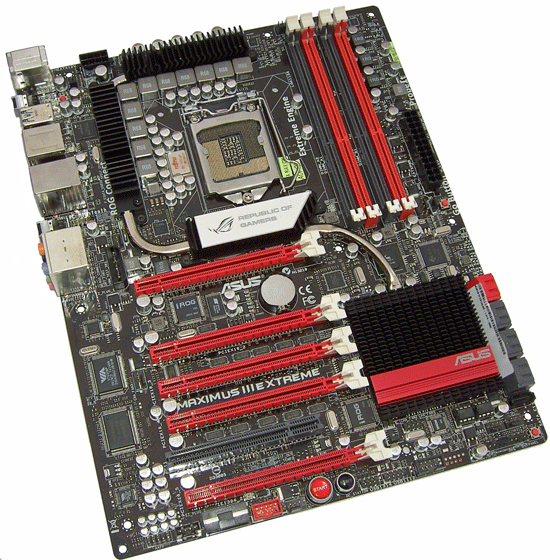
Uncharacteristically late for ASUS, the P55 based Maximus III Extreme was rolled out to retail a couple of weeks ago.
ASUS’s “M3E” follows in the footsteps of boards from EVGA and MSI, by teaming up nVidia’s NF200 chipset to multiplex sixteen native PCIe lanes out to provide additional front-end bandwidth for multiple graphics cards and other devices. Overall, it’s not a solution that ends up high on most enthusiast shortlists because Intel’s X58 seems to be the logical choice and offers superlative performance in almost every way over the “lesser” P55.
The truth is, we’re waiting on vendors to send us their second-gen X58 motherboards so that we can provide you with a round-up of which makes the best buy. As we’ve probably got a few weeks before things will be ready, a review of the M3E is the first of our time fillers, to be followed by a test of the mini-ITX ECS H55H-I next week. On top of that, Richard will be taking a look at Gigabyte's P55A-UD7 shortly, and we've also got AMD 890FX boards to squeeze in somewhere. Put simply, lots to do but so little time.
Back to what's going down today, given the limited demand for $349 P55 boards, we’ll spare you any further drivel and get down to the facts...
Summary/Overview
Our retail sample arrived pre-flashed to the public release 0606 BIOS. For the most part, overall compatibility is good barring an alarming tendency to set high DIMM voltage on Corsair Dominator GT modules if VDIMM is left on AUTO in BIOS. As part of our stock benchmark compares we use 4GB of Corsair memory at 1333MHz just as a starting point to see how boards measure up to one another. Setting primary memory timings, and the correct memory multiplier ratio and proceeding to reboot, we found the ASUS BIOS had seen fit to jam 1.82V into our favorite Corsair 2200 Dominator GT kit – eek! We’re told this has been fixed in the latest release BIOS, so just a heads-up not to leave things in the hands of AUTO settings on the shipping BIOS.
Other than that glitch, things are fairly rosy on the functionality front. Overclocking recovery is workable; at worst, we had to switch off at the PSU and reboot to encourage the board to POST in safe-mode so that we could enter BIOS and adjust settings. Peripheral compatibility is good, overclocking & stability are excellent and on-par with the very best P55 boards. S3 suspend/sleep resume works over 200 BCLK if need be, and you also get very comprehensive fan control spanning no fewer than eight headers. Bottom line is that the M3E is a well executed product, marred only by price of entry...
Nothing special to report against other P55 boards, we all know the drill by now:
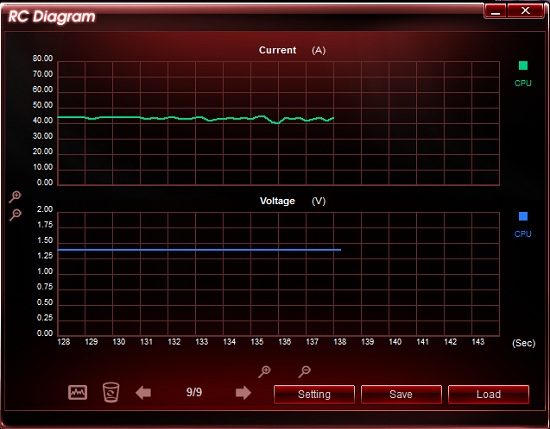
Power Consumption
Our power consumption testing utilizes the same batch of components under similar circumstances in a bid to monitor variances between idle and CPU load conditions. We install the vendor supplied power saving utilities on each board and enable power saving modes that don't involve any kind of underclocking or CPU core frequency modulation in order to run an apples to apples comparison.
ATX PSU switching losses are absent from our figures because we monitor power consumption directly at the DC rails of the PSU. These figures measure only the CPU, motherboard and memory DC power draw and exclude any other peripherals such as 12V ATX power draw for the graphics card, or any power for case cooling fans and hard drives etc. Actual AC power consumption for the motherboard will be anywhere from 15~40% higher than these figures depending upon the efficiency of your power supply.
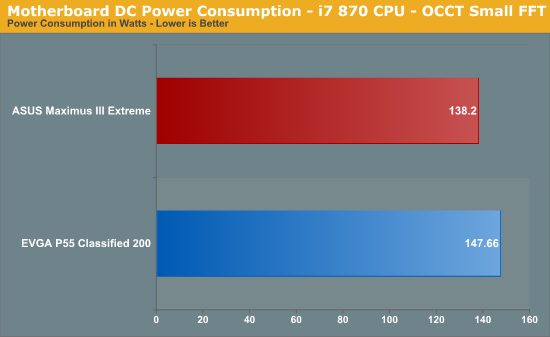
The ASUS M3E comes out on top in both idle and full load conditions due to a more efficient VRM for VCC. Minimum switching frequency on the ASUS board is 250KHz, compared to the Classified's 800KHz 10 phase Volterra solution.
Overclocking
Using air and water cooling, most P55 boards are on an even keel, it’s all about the CPU. Our retail i5-750 and i7 - 860 both reached the same frequencies on this board as they have on everything we’ve tried them on before:

The retail CPU’s aren’t that good, so we checked out what was possible with a good ES just to make sure everything is a-ok.

4.4GHz will pass Linpack under watercooling with this chip, and on the M3E we got that pretty easily, we’re limited by temps here because we’re hitting temps in the mid 80 Celsius region under full load.
We also made some compares using sub-zero cooling using a dual rotary cascade. The testing itself was just basic enough to find maximum frequencies in both heavy-load and light-load synthetic benchmarks. Like other boards out there, cold booting Clarkdale processors requires the modification of the onboard PEGR BIAS compensation resistor either by shorting it or replacing it with a potentiometer and dialling down to a usable value. This late in the game, we were expecting ASUS to have addressed this with a litte finesse or some kind of control via a GPIO. Be prepared to sue a little conductive ink if you want to benchmark this board below -100 Celsius.
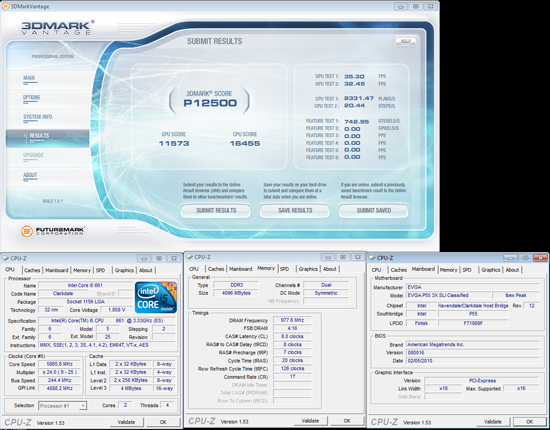
During heavy load benchmarks like Vantage, the EVGA scores slightly better in single card:
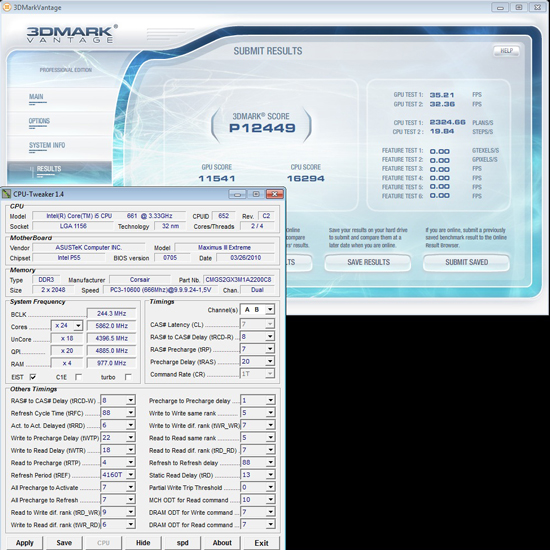
Super Pi 32M next:

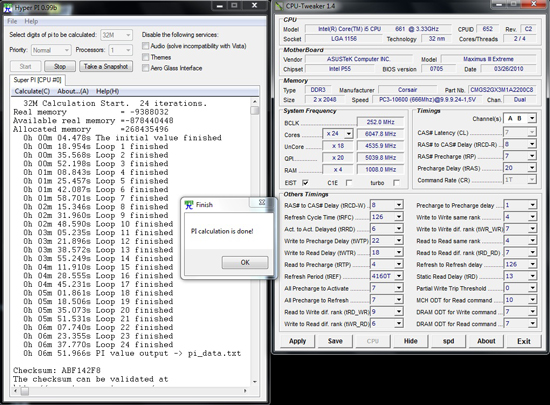
Where ASUS have got things right though is that it’s far easier maxing out a CPU on the M3E than it is on EVGA’s E659 Classified 200. The Classified 200 has a lot more hardware tweaks, but in this instance we found that we had to use those tweaks to keep up with the M£E rather thans surpass it. In fact, you have to take a lot more time making adjustments on the EVGA board to get the same clock speeds as the ASUS M3E in almost every bench. That's why the 32M scores are a little behind on the EVGA E659 - we tired out the OS trying to match the M3E's clock speed in Super Pi. Put simply, the M3E is easier to overclock in most areas.
There’s probably a little room for fine tuning of how the ASUS board posts over 220 BCLK when using higher QPI ratios; certain CPU multiplier ratio’s can’t be engaged from a power cycle, so its a case of setting a low CPU multiplier at first post, re-enering BIOS and then changing the ratio to suit your desired operating frequency. Still, it’s something that only manifests when pushing real hard, we’ve yet to come across a board that does not have some kind of quirk when it comes to increased QPI speeds and booting past 220 BCLK.
At $349, you expect to find the very best component choices...
What you get over previous ASUS P55 motherboard iterations is USB 3 and SATA 6G, both supplied by the current standard NEC and Marvell controllers. Unfortunately, ASUS have dropped their range of bundled plug-in soundcards for the ROG series and what we’re given instead is onboard audio using VIA’s VT2020 codec. It’s also a shame that we’re being passed a standard Marvell NIC, we were hoping ASUS would opt for one of the Intel models instead. The difference in performance is miniscule but the Intel drivers seem to be quite polished at present based upon what we've expereinced on our Biostar TPOWER I55.
For the M3E, ASUS’s focus seems to have shifted towards a higher quality VRM for CPU Vcore and also overclocking centric hardware features like the plug-in Bluetooth module supporting remote overclocking as well as ROG Connect (more on that lot later). We’re happy that ASUS have opted for higher quality VRM’s on their newer ROG boards rather than the ludicrously multiplexed solutions we've seen to date. That's the good part. The rest of ASUS's time seems to have been spent developing on-the-fly overclocking features and they've now got no fewer than four different ways of achieving the same goal. While some of the methods ASUS use to allow remote overclocking and monitoring are good, we think more time/money should be spent on providing a high quality NIC or soundcard. We're sure it would have helped bolster the M3E's appeal to a 'wider' enthusiast audience.
What’s in the box?
Included with the board, you get the following:
- 1 x ROG Connect Cable
- 1 x SLI Connector
- 1 x 3 Way SLI Connector
- 1 x Optional Fan
- 2 x SATA 6G Cables
- 6 x SATA 3G Cables
- 1 x USB 2.0 (two ports) + ESATA bracket
- 1 x RC Bluetooth Card
- 1 x I/O Shield
- 1 x Q-Connector
- 3 x Thermal Sensor Cables
- Cable Ties
- ROG Cable Labels
- ROG Case Label
Software
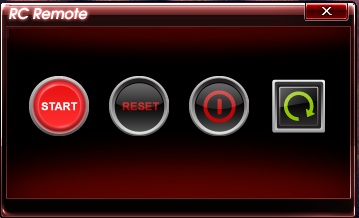
ROG connect is the most notable addition to ASUS’s software bundle. A dedicated USB to SMBUS port is provided allowing users to plug in a Windows based laptop and control/monitor bus speeds, voltages/current, turn the board on/off and to flash BIOS if required. It’s very slick, although long-term appeal is very limited unless you are a benchmarking fanatic.
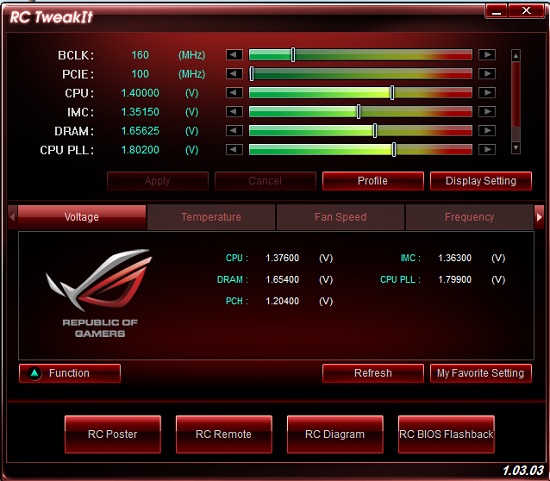
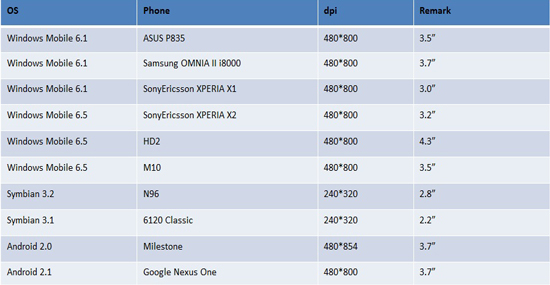
It doesn’t stop there; ASUS have also developed a plug-in Bluetooth module allowing on-the-fly adjustment of key voltages and BCLK. The list of supporting phones are as follows;
Again, it’s something that we’d see as more useful to someone who benchmarks competitively and wants to wring out every last MHz during various portions of a benchmark. You’ve also got ASUS’s Tubo-V to do most of what is needed on a 24/7 system when it comes to making changes to BIOS settings within the OS, so the remote utilities are not essential if you don’t have the hardware to make use of them.
BIOS
The BIOS is where ASUS are the market leaders right now. It’s easy to navigate and the overclocking section allows for novice and advanced users to tweak almost every setting available thanks to a simple input method for voltages and AUTO functions which give a good starting base (aside from the 0606 BIOS over-volting DRAM unnecessarily).
Fan control is first-class, a total of eight onboard headers are available, most can be controlled individually, while the Chassis fan headers are controlled as a group. You can also use the supplied thermal sensor cables to set up control thresholds for the three onboard OPT fan headers which is a nice touch. Each header can support a maximum current draw of up to two amps depending upon how many headers are populated - cumulative current draw is limited to 7 amps total at 12V when multiple fans are used. Either way, there are more than enough options on tap to keep most users happy.
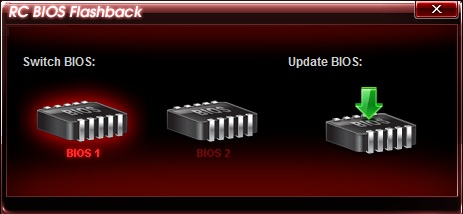
BIOS flashing is simple, a built in BIOS routine allows one to flash a new file from HDD or a USB pen drive easily enough. There are two onboard BIOS chips allowing for some redundancy if things go awry. Should both chips become corrupt and the board cannot post, there’s always the option of using ROG Connect to flash the BIOS remotely without having to power up the board first. Of course, that means you’ll need a working PC to do so, but it is better than shipping the board back for RMA.


In terms of layout this board is just a ‘souped-up’ Maximus III Formula. Careful inspection of both boards suggest that ASUS have not made any real adjustments other than to add a beefier VRM for the CPU and the addition of SATA 6G, USB 3 and the NF200 bridge chip. The positives are that the M3E should hit the floor running because it’ll use the same basic BIOS backbone of the M3F.
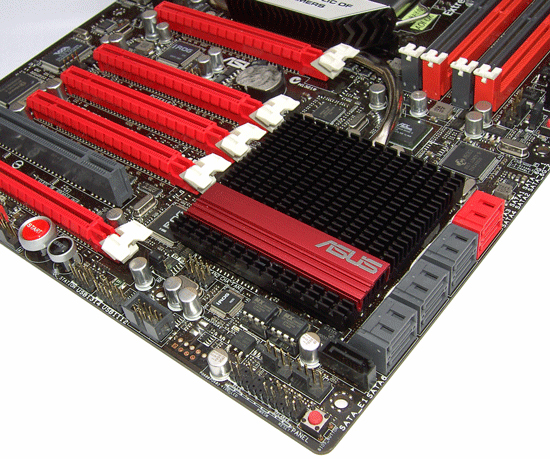
Some might be disappointed to find that the cooling assembly is a single unit – connecting the CPU VRM, NF200 bridge chip and the P55 PCH together with a heatpipe. We found that temps for all three areas are well controlled unless you ramp PWM switching frequency into the 800KHz~1Mz region. In such instances, the assembly does get hot although we did not have any problems with stability as a result. You can use a small latch-on fan to cool the assembly by a few degrees if need be.
The good news is that ASUS have used screw fittings rather than push-pins to attach the heatsink to the board. Although this is a step in the right direction, we’d liked to have seen the use of back plates behind the PWM FET’s to provide a little more rigidity and prevent the central FETs from pulling away when the board bows under pressure from some after-market coolers.
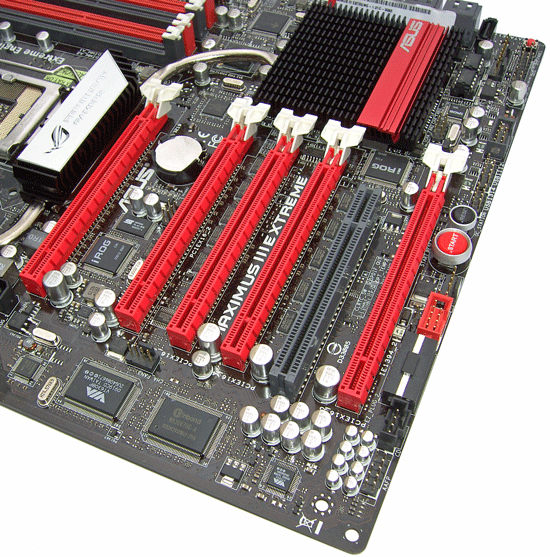
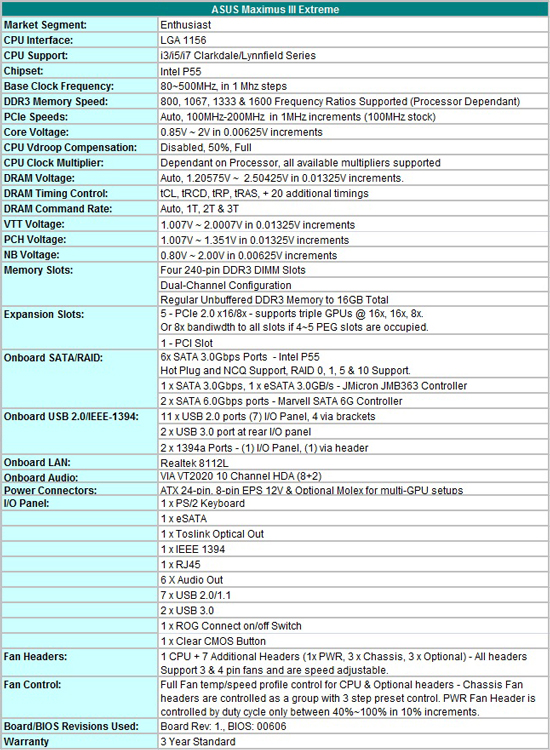
Slot spacing is geared for multi-GPU setups, with lane allocation divided to allow for quad SLI or CrossFire. A couple of Molex connectors are placed on the board to bolster PCIe voltage when all slots are loaded with high performance GPUs that are heavily overclocked.
A single PCI slot is available for older devices, and remains accessible in most configurations should you need to use it.
Nine SATA ports are placed in the lower right hand corner of the board, eight are right angled with one placed head on for easy access.
Two BIOS chips are utilized allowing users to flash different BIOS versions for comparison purposes and as a failsafe. Switching between both is done either via BIOS, ROG Connect or by using the red push-button at the lower right corner of the board (LEDs indicate which BIOS is in use).
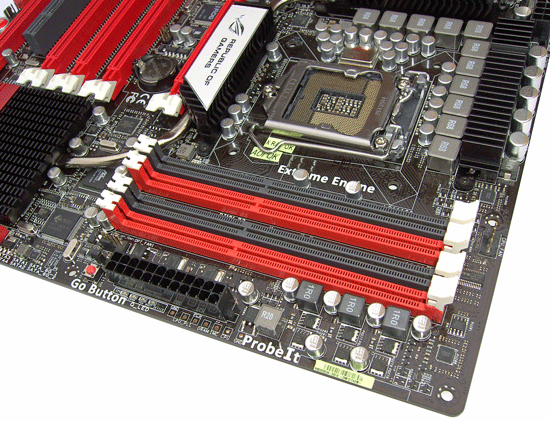
The DIMM slot area is surrounded by voltage measurement pads, ASUS’s GO button (to load saved profiles or to recover the board to safe mode and help it to post) and also an LN2 cooling mode jumper to help the board POST when processors are cooled with liquid nitrogen. We did try the LN2 jumper with our Clarkdale processors to see if they help the board to POST below -110 and found that it was not much help at all. Like other boards out there, we had to mod the 750 ohm PEGR BIAS compensation resistor to a lower value to alleviate cold-boot lock ups at low temperatures.
The onboard measurement points could do with being moved to a location where access is not hampered by cabling. Their current location is not ideal because the ATX 12V cable blocks access somewhat.
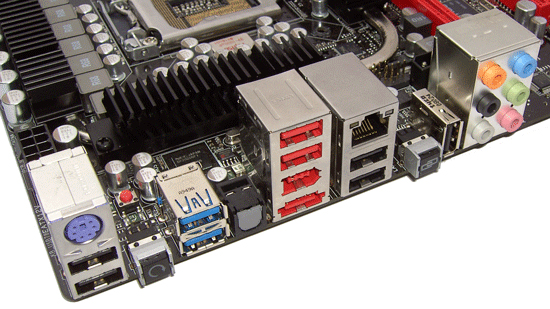
The rear panel I/O set is made up of 1 x PS2, 2 x USB 3.0 ports, 6 x USB ports, 1 x 1394, 1 x Optical S/PDIF, 1 x CMOS clear switch, 1 x ROG Connect switch, 1 x ROG USB port, 1 x RJ45 and six audio I/O connectors.
Testbed Setup
|
Testbed Setup Overclocking / Benchmark Testbed |
|
| Processor |
1 x Intel i5-870 ES CPU, 2.93GHz, 8 Threads, 8MB Cache Intel i5-750 Retail, 2.66GHz, 4 Threads, 8MB Cache Intel I7 920 D0, 2.66GHz, 8 Threads, 8MB Cache |
| CPU Voltage | Various |
| Cooling | Intel air cooler, Heatkiller 3.0 waterblock, PA120.2 radiator and DDC ultra pump (with Petra top). 1/2 ID tubing for watercooling. |
| Power Supply | Corsair HX950 |
| Memory |
Corsair Dominator GT 8-8-8-24 2200MHz 4GB kit (X2 for 8GB) G.Skill Perfect Storm 8-8-8-24 2200MHz 4GB kit |
| Memory Settings | Various |
| Video Cards | MSI 275 Lightning (stock clocks) |
| Video Drivers | nVidia 195.62 WHQL |
| Hard Drive |
Western Digital 7200RPM 1TB SATA 3/Gbps 32MB OCZ Vertex 120GB SSD |
| Optical Drives | Plextor PX-B900A, Toshiba SD-H802A |
| Case |
Open Test Bed - Dimastech Benching Station Lian-Li V2110 |
| Operating System | Windows 7 64-bit |
| . | |
We utilized memory kits from Corsair and G.Skill to verify memory compatibility on our test boards. Our OS and primary applications are loaded on the OCZ Vertex 120GB SSD drive and our games operate off the WD Caviar Black 1TB drive. We did a clean install of the OS and applications for each motherboard.
We used Intel's stock cooler for the stock comparison testing, while water-cooling via the superlative Heat Killer 3.0 water block was utilized for overclocking. For graphics duty, we used MSI's 275 Lighting GPUs to provide performance comparisons between boards and to test SLI scaling in our gaming benchmarks.
For our test results we set up each board as closely as possible in regards to memory timings. Otherwise all other settings are left on auto. The P55 utilized 8GB of DDR3, while the X58 platform contained 6GB. The P55 and X58 DDR3 timings were set to 7-7-7-20 1T at DDR3-1600 for the i7-920 and i7-870 processors at both stock and overclocked CPU settings.
We used DDR3-1333 6-6-6-18 1T timings for the i5-750 stock setup for all system benchmarks (non gaming tests) as DDR3-1600 is not natively supported at a stock BCLK setting of 133.
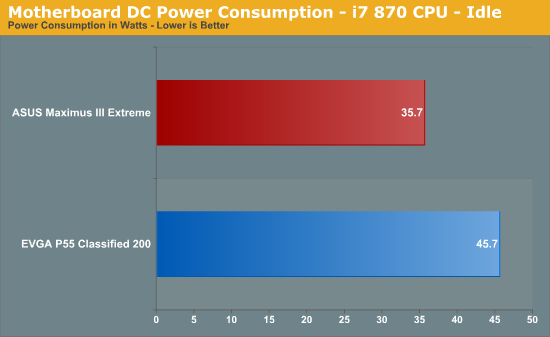
Power Consumption
Our power consumption testing utilizes the same batch of components under similar circumstances in a bid to monitor variances between idle and CPU load conditions. We install the vendor supplied power saving utilities on each board and enable power saving modes that don't involve any kind of underclocking or CPU core frequency modulation in order to run an apples to apples comparison.
ATX PSU switching losses are absent from our figures because we monitor power consumption directly at the DC rails of the PSU. These figures measure only the CPU, motherboard and memory DC power draw and exclude any other peripherals such as 12V ATX power draw for the graphics card, or any power for case cooling fans and hard drives etc. Actual AC power consumption for the motherboard will be anywhere from 15~40% higher than these figures depending upon the efficiency of your power supply.
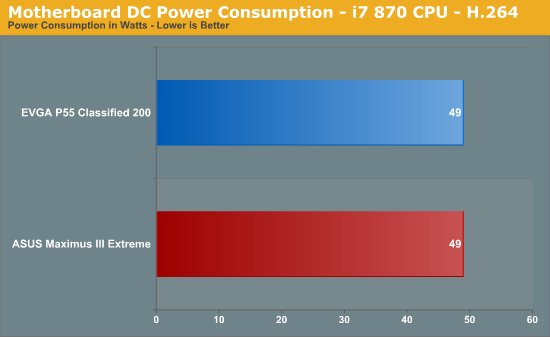
The M3E holds a 10 watt advantage at idle, but seems to draw more power than the EVGA Classified 200 when under full load.
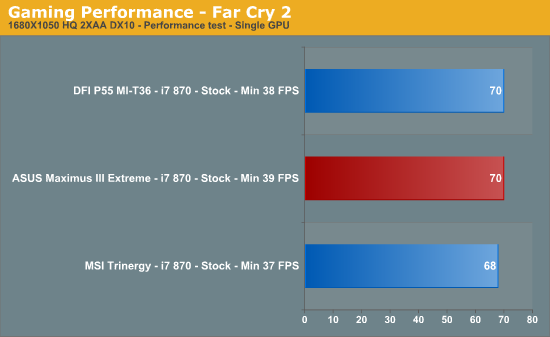
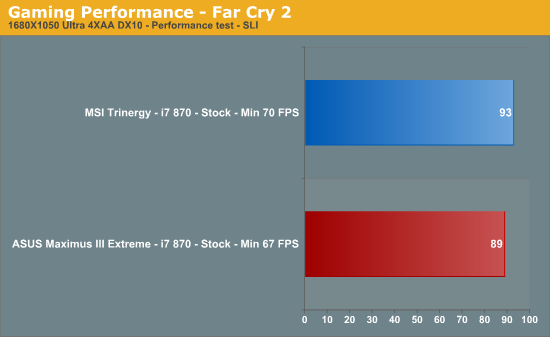
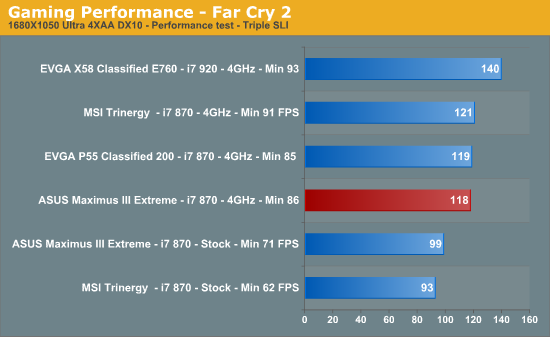
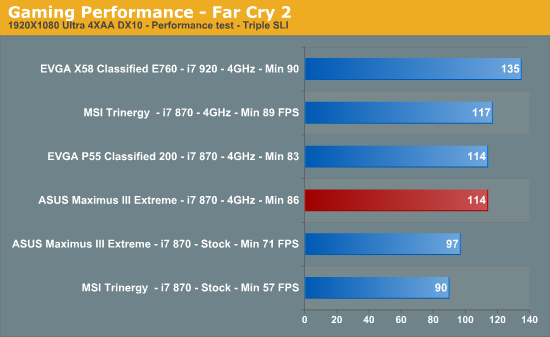
Far Cry 2
Featuring fantastic visuals courtesy of the Dunia Engine, this game also features one of the most impressive benchmark tools we have seen in a PC game.
Warhammer 40K: Dawn of War II
We are big fans of the Warhammer franchise, especially Dawn of War II. One of the latest RTS games in our library is also one of the more demanding titles on both the CPU and GPU. We crank all options to Ultra, enable AA, and then run the built-in performance benchmark for our result.
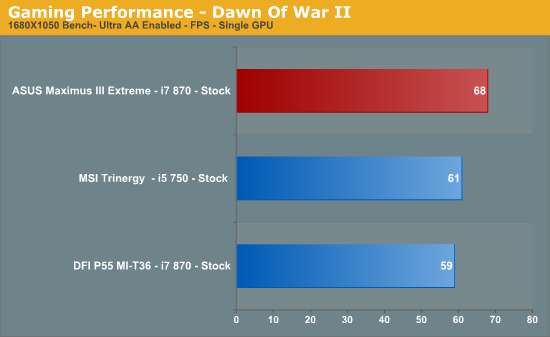
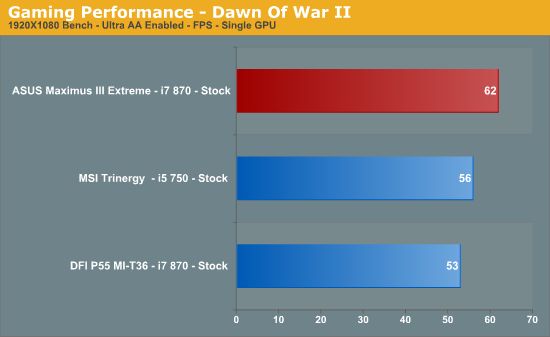

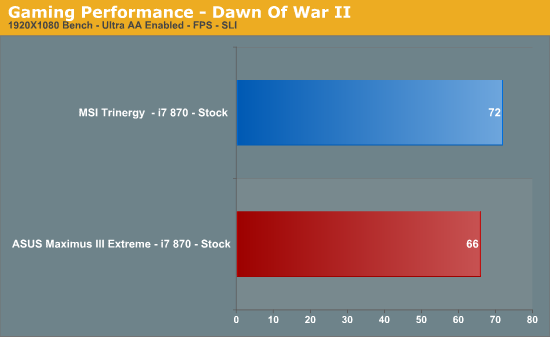
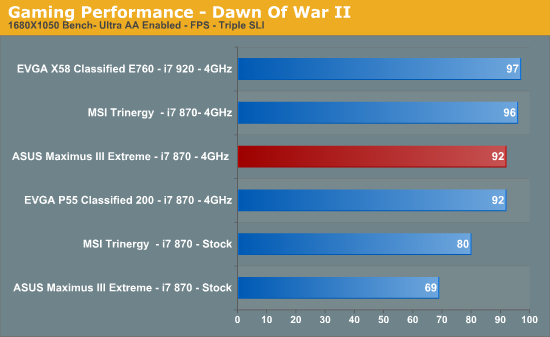
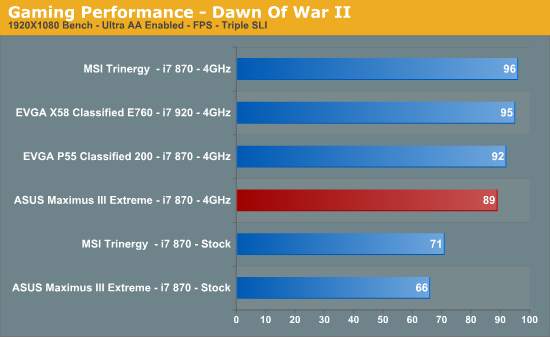
Single GPU performance on the M3E is good, but things fall back a bit when running multiple GPUs. Its hard to look beyond X58 for triple SLI if you must run it.
AutoCAD 2010 x64—Cadalyst 2008
We utilize AutoCAD 2010 x64 and the Cadalyst Labs 5 benchmark.
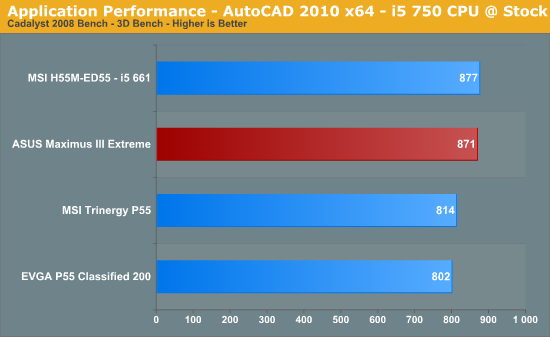
A good show in the Cadalyst benchmark for the M3E, not quite enough to topple the little MSI though.
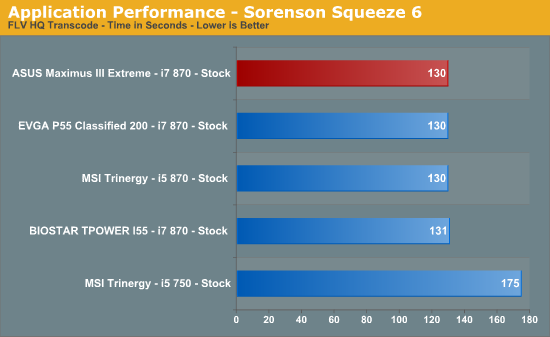
Sorenson Squeeze 6
We are using Sorenson Squeeze to convert eight AVCHD videos into HD Flash videos for use on websites. This application heavily favors physical core count and processor clock speed.
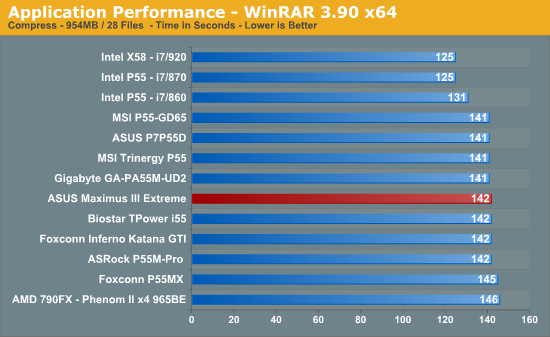
WinRAR 3.9 x64
This benchmark compresses our AT workload consisting of a main folder that contains 954MB of files in 15 subfolders. The result is a file approximately 829MB in size.
Bibble 5.0
We utilize Bibble Labs' Bibble 5 v2 to convert 50 RAW image files into full size JPEG images with the program's default settings. This program is fully multithreaded and multi-core aware.
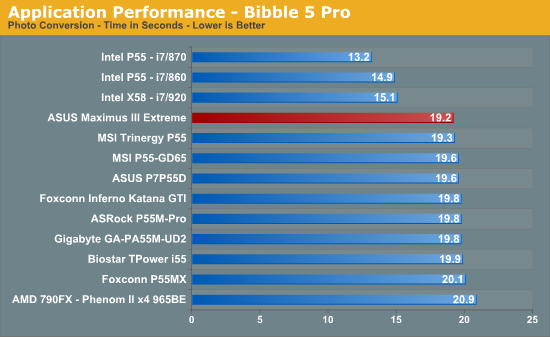
There's nothing special to report when it comes to general applciation performance.
We have to say, we’ve found the Maximus III Extreme a pleasure to use. It’s got stability in abundance, keeps up with the likes of EVGA when overclocked and then goes further in the ease of use department by offering a comprehensive and well-polished BIOS (0705 release). Of course, there’s still room for improvement in areas like overclock recovery and such, but as it stands right now, this is probably the most polished P55 board we’ve had through the labs when we look at its all- round capabilities.
![]()
That all being said, the M3E will set you back $349 (that's only $30 shy of the X58 based ASUS Rampage III Extreme), and no matter how hard we try, there’s really only one context we can see that might “justify” the purchase of a board like this – sub-zero benchmarking. Even then, the margin of overhead versus boards costing a lot less is very small. The only separating factor from direct competitors like EVGA is that it’s easier to max out our processors on the M3E – the EVGA boards can require a little more effort, although the end results are nigh-on identical.
A potential lifeline could be provided to boards like these by Intel this summer when they release a new stepping and also add a few models to the Clarkdale/Lynnfield lineup. We’ll need to see some pretty impressive frequency scaling capabilities on the revised/enhanced silicon for that to happen though. Regardless of how things work out, we’d advise you to take a very firm look at the X58 refresh motherboards before considering P55 at this price point.


