Original Link: https://www.anandtech.com/show/5728/intel-z77-panther-point-chipset-and-motherboard-preview-asrock-asus-gigabyte-msi-ecs-and-biostar
Intel Z77 Panther Point Chipset and Motherboard Preview – ASRock, ASUS, Gigabyte, MSI, ECS and Biostar
by Ian Cutress on April 8, 2012 12:00 AM EST- Posted in
- Intel
- Biostar
- MSI
- Gigabyte
- ASRock
- Motherboards
- Asus
- Ivy Bridge
- ECS
- Z77
Well, today is a day that everyone was expecting but not the most exciting day of the month. Today, Intel officially releases the spate of 7-series chipsets for their 3rd generation Core microarchitecture processors (read—Ivy Bridge), despite the actual release of the processors being another three weeks away. This means that today we can actually look at, test, or purchase the range of motherboards that natively support Ivy Bridge. However, we can’t officially publish all the benchmarks for these products using Ivy Bridge until that date three weeks away (to be honest, we are still testing!). So today we are going to have a good in depth look into the Z77 chipset itself, and the review products we have received to let you know what we think looks good. All these boards today will be fully reviewed, warts and all, with Ivy Bridge, as close to official release as possible.
The boards today are from ASRock, ASUS, Gigabyte, MSI, ECS and Biostar. All these boards will natively support Sandy Bridge processors, and be fully upgradeable to Ivy Bridge silicon when the processors are released.
The Z77 Chipset
The important things to note about the Z77 chipset will be its differences to all things Sandy Bridge/Cougar Point, typically in relation to the Z68 platform. Rather than have a split between a chipset with video outputs and a chip without video outputs, all motherboards in the Z77 (and H77) will natively support video outputs (if the motherboard manufacturer wishes to use them). There will also not be a chipset issue as there was back this time last year with Cougar Point—so none of this B2/B3 nonsense that confused consumers.
In comparison to the previous chipsets, what we can see is simple from a table:
| Chipset Comparison | ||||||||
| Z77 | Z75 | H77 | Z68 | P67 | H67 | |||
| CPU Support |
IVB LGA-1155 |
IVB LGA-1155 |
IVB LGA-1155 |
SNB/IVB LGA-1155 |
SNB/IVB LGA-1155 |
SNB/IVB LGA-1155 |
||
| CPU Overclocking | Yes | Yes | No | Yes | Yes | No | ||
| CPU PCIe Config |
1 x16 or 2 x8 or 1 x8 + 2 x4 PCIe 3.0 |
1 x16 or 2 x8 PCIe 3.0 |
1 x16 PCIe 3.0 |
1 x16 or 2 x8 or 1 x8 + 2 x4 PCIe 3.0 |
1 x16 or 2 x8 PCIe 3.0 |
1 x16 PCIe 3.0 | ||
| Processor Graphics Support | Yes | Yes | Yes | Yes | No | Yes | ||
| Intel SRT (SSD caching) | Yes | No | Yes | Yes | No | No | ||
| RAID Support | Yes | Yes | Yes | Yes | Yes | Yes | ||
| USB 2.0 Ports (3.0) | 14 (4) | 14 (4) | 14 (4) | 14 | 14 | 14 | ||
| SATA Total (Max Number of 6Gbps Ports) | 6 (2) | 6 (2) | 6 (2) | 6 (2) | 6 (2) | 6 (2) | ||
| PCIe Lanes | 8 (5GT/s) | 8 (5GT/s) | 8 (5GT/s) | 8 (5GT/s) | 8 (5GT/s) | 8 (5GT/s) | ||
Segregation is quite apparent for the consumer—a Z means you can overclock an appropriate CPU, and a ‘77’ means that you can take advantage of Intel’s SSD smart caching.
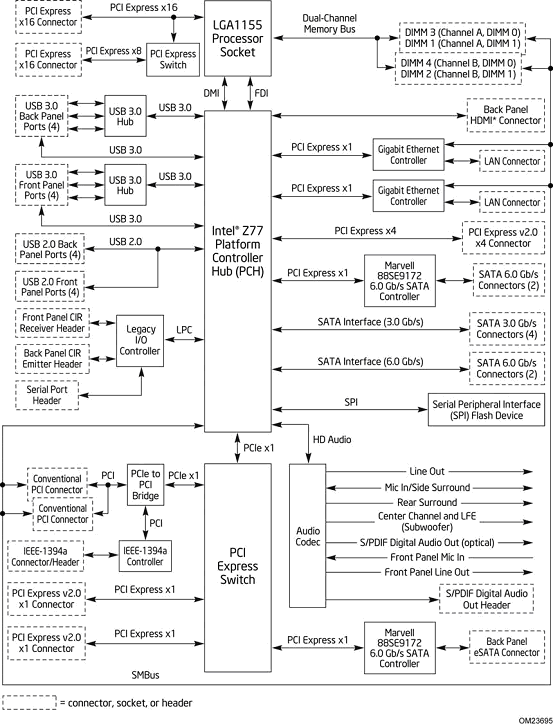
The chipset diagram above shows the layout of the Intel DZ77GA-70K motherboard, showing sixteen PCIe lanes from the processor. The astute will note that only one PCIe lane is coming from the PCH to the PCI Express Switch, which powers the PCIe to PCI bridge (and thus PCI and IEEE1394a) and the PCIe 2.0 x1 ports. This would mean that users of the DZ77GA-70K may experience bandwidth limitations when PCI and PCIe x1 devices are used.
PCIe 3.0
We still have 16 PCIe lanes from the CPU, but with the new chipset these are fully and officially rated at PCIe 3.0 speeds if you have the GPUs to take advantage of this feature. This becomes more apparent in multi-GPU setups, where the 16 lanes are split between the slots. Typically, this will be in the form of x16 for single card, x8/x8 for dual GPU, and x8/x4/x4 at tri-GPU. Having an x4 PCIe 3.0 is equivalent to an x8 PCIe 2.0, but only if you have a card that can take advantage of PCIe 3.0.
Due to this feature with the CPUs, the chipsets will have to adhere to PCIe 3.0 compliance, to deal with the transfers and lane layout design. A novel addition that we will see on many of the high-end boards is a series of onboard chips to increase the number of available lanes. These are known as PCIe 3.0 PLX PXE chips, which increase the number of lanes on the motherboard from 16 to 32—all rated PCIe 3.0. This also raises the cost of the motherboard, perhaps as much as $10-$15, so it is worth thinking long and hard if you really need that tri-GPU setup.
Native USB 3.0
The other long awaited addition found on Panther Point is the native implementation of USB 3.0 that comes directly from the chipset. The chipset will only provide two USB 3.0 headers, giving four ports total, either in the form of rear panel additions or an onboard header (this is at the discretion of the motherboard manufacturer). For many low-end boards, this eliminates the cost of a controller from the product. For high end SKUs that typically have 4-6+ USB 3.0 ports, while it does reduce the number of controllers by two, some PCB real estate will still be utilized by USB 3.0 controllers.
Memory Improvements
The Panther Point chipset comes with a few additional features that may be of benefit to some users. Partially derived from the processors themselves, the chipset now supports DDR3L thanks to its power gated DDR3 interface. This is a primary benefit for the lower end processor and chipset products (that is, all things mobile), but we will see if this moves its way into the mainstream or HTPC versions of Panther Point.
For the high-end power user, the chipset is now geared to handle memory that is more powerful. Again, thanks to the improvement on the new processors, these combined systems should be able to handle (with ease) DDR3-2800 memory. The memory dividers work similar to the gear ratios in Sandy Bridge-E, with users able to call a larger array of memory dividers than before with up to 200 MHz increments. This is of great benefit to the integrated graphics on the new generation processors, which should benefit from the purchase of a higher end memory kit to provide enough bandwidth.
We are still going to play with dual channel memory for the time being on consumer platforms. As this processor change is only a tick (process node decrease), we will have to wait for a tock or two in order for the memory subsystem to change to a larger number of channels. As seen on X58, tri-channel memory/6 slots was fairly cumbersome on motherboards, however on Sandy Bridge-E the quad channel memory (should Intel want to move in this direction) would still allow four slots on the board for an increase in memory bandwidth. However for now, dual channel it is.
If you happen to purchase ASUS for Ivy Bridge, there is also a little treat in store, as they have reworked the memory sub-system. Their new method stunned Intel engineers, but should provide distinct memory speed advantages. Simply put, instead of memory banks being read consecutively, the memory is read in parallel. We are awaiting more detail regarding how this feature works.
Power Consumption and Power Delivery
It has been well documented over the past few months that the top end model of the new processors should have a TDP of 77W. This is just shy of 50 watts less than the top models seen in Sandy Bridge-E, but more importantly, down from 95 watts as shown by the 2600K/2700K processors of Sandy Bridge. This does force a small change with the power delivery on Panther Point/Z77 products.
With less TDP to cater for, the motherboard manufacturers can spend less on the power delivery to get it to work. So there is a chance that the days of '24 phase power’ are long gone, and we will be dealing with less phases. Fewer motherboards will have dual 8-pin 12V connectors, and unless you go high end, may only require one 4-pin 12V connector to get the job done. Obviously if you apply an overclock, having access to more current (and thus more power) is of major benefit, but for the majority of system builders who will run systems at stock, this could represent savings in the construction being passed on to the consumer.
However, this does lend itself to potential issues when used in conjunction with Sandy Bridge processors—having a power delivery system less robust than Z68 could perhaps hinder Sandy Bridge overclocks.
Backwards Compatibility with Sandy Bridge Processors
To confirm what has been said in news articles around the world, the Intel 7-series chipsets will be backwards compatible with the Sandy Bridge (Intel 2nd Generation Core Microarchitecture) processors from the point of sale. All motherboard vendors should have this functionality built into their BIOSes. The beauty lies not in backwards compatibility but in releasing chipsets to take advantage of the new features—this is something AMD has done well with in the past.
In addition, a significant number of Intel 6-series chipsets (P67, Z68) should be forwards compatible with the Ivy Bridge processors, pending a BIOS update. Thus, current Sandy Bridge processor owners wishing to upgrade should make sure they have an appropriate BIOS before installing a new processor in their 6-series motherboard.
LucidLogix Virtu MVP Technology and HyperFormance
While not specifically a feature of the chipset, Z77 will be one of the first chipsets to use this remarkable new technology. LucidLogix was the brains behind the Hydra chip—a hardware/software combination solution to allow GPUs from different manufacturers to work together (as we reviewed the last iteration on the ECS P62H2-A). Lucid was also behind the original Virtu software, designed to allow a discrete GPU to remain idle until needed, and let the integrated GPU deal with the video output (as we reviewed with the ASUS P8Z68-V Pro). This time, we get to see Virtu MVP, a new technology designed to increase gaming performance.
To explain how Virtu MVP works, I am going to liberally utilize and condense what is said in the Lucid whitepaper about Lucid MVP, however everyone is free to read what is a rather interesting ten pages.
The basic concept behind Virtu MVP is the relationship between how many frames per second the discrete GPU can calculate, against what is shown on the screen to the user, in an effort to increase the 'immersive experience'.
Each screen/monitor the user has comes with a refresh rate, typically 60 Hz, 75 Hz or 120 Hz with 3D monitors (Hz = Hertz, or times ‘per second’). This means that at 60 times per second, the system will pull out what is in the frame buffer (the bit of the output that holds what the GPU has computed) and display what is on the screen.
With standard V-Sync, the system will only pull out what is in the buffer at certain intervals—namely at factors of the base frequency (e.g. 60, 30, 20, 15, 12, 10, 6, 5, 3, 2, or 1 for 60Hz) depending on the monitor being used. The issue is with what happens when the GPU is much faster (or slower) than the refresh rate.
The key tenet of Lucid’s new technology is the term responsiveness. Responsiveness is a wide-ranging term which could mean many things. Lucid distils it into two key areas:
a) How many frames per second can the human eye see?
b) How many frames per second can the human hand respond to?
To clarify, these are NOT the same questions as:
i) How many frames per second do I need to make the motion look fluid?
ii) How many frames per second makes a movie stop flickering?
iii) What is the fastest frame (shortest time) a human eye would notice
If the display refreshes at 60 Hz, and the game runs at 50 fps, would this need to be synchronized? Would a divisor of 60 Hz be better? Alternatively, perhaps if you were at 100 fps, woud 60 fps be better? The other part of responsiveness is how a person deals with hand-to-eye coordination, and if the human mind can correctly interpolate between a screen's refresh rate and the output of the GPU. While a ~25 Hz rate may be applicable for a human eye, the human hand can be as sensitive as 1000 Hz, and so having the correlation between hand movement and the eye is all-important for 'immersive' gaming.
Take the following scenarios:
Scenario 1: GPU is faster than Refresh Rate, VSync Off
Refresh rate: 60 Hz
GPU: 87 fps
Mouse/Keyboard responsiveness is 1-2 frames, or ~11.5 to 23 milliseconds
Effective responsiveness makes the game feel like it is between 42 and 85 FPS
In this case, the GPU is 45% faster than the screen. This means that as the GPU fills the frame buffer, it will continuously be between frames when the display dumps the buffer contents on screen, such that the computation of the old frame and the new frame is still in the buffer:
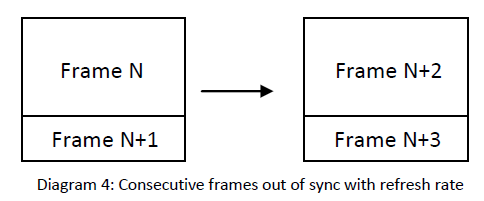
This is a phenomenon known as Tearing (which many of you are likely familiar with). Depending on the scenario you are in, tearing may be something you ignore, notice occasionally, or find rather annoying. For example:
So the question becomes, was it worth computing that small amount of frame N+1 or N+3?
Scenario 2: GPU is slower than Refresh Rate, VSync Off
Refresh rate: 60 Hz
GPU: 47 fps
Mouse/Keyboard responsiveness is 1-2 frames, or ~21.3 to 43 milliseconds
Effective responsiveness makes the game feel it is between 25 and 47 FPS
In this case, the GPU is ~37% slower than the screen. This means that as the GPU fills the frame buffer slower than what the screen requests and it will continuously be between frames when the display dumps the buffer contents on screen, such that the computation of the old frame and the new frame is still in the buffer.
 So does this mean that for a better experience, computing frame N+1 was not needed, and N+2 should have been the focus of computation?
Scenario 3: GPU can handle the refresh rate, V -Sync On
This setting allows the GPU to synchronize to every frame. Now all elements of the system are synchronized to 60 Hz—CPU, application, GPU and display will aim for 60 Hz, but also at lower intervals (30, 20, etc.) as required.
While this produces the best visual experience with clean images, the input devices for haptic feedback are limited to the V-Sync rate. So while the GPU could enable more performance, this artificial setting is capping all input and output.
Result:
If the GPU is slower than the display or faster than the display, there is no guarantee that the frame buffer that is drawn on the display is of a complete frame. A GPU has multiple frames in its pipeline, but only few are ever displayed at high speeds, or frames are in-between when the GPU is slow. When the system is set a software limit, responsiveness decreases. Is there a way to take advantage of the increased power of systems while working with a limited refresh rate—is there a way to ignore these redundant tasks to provide a more 'immersive' experience?
LucidLogix apparently has the answer…
The answer from Lucid is Virtu MVP. Back in September 2011, Ryan gave his analysis on the principles of the solution. We are still restricted to the high level overview (due to patents) explanation as Ryan was back then. Nevertheless, it all boils down to the following image:
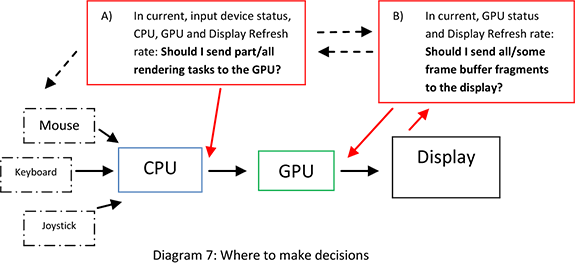
Situation (A) determines whether a rendering task/frame should be processed by the GPU, and situation (B) decides which frames should go to the display. (B) helps with tearing, while (A) better utilizes the GPU. Nevertheless, the GPU is doing multiple tasks—snooping to determine which frames are required, rendering the desired frame, and outputting to a display. Lucid is using hybrid systems (those with an integrated GPU and a discrete GPU) to overcome this.
Situation (B) is what Lucid calls its Virtual V-Sync, an adaptive V-Sync technology currently in Virtu. Situation (A) is an extension of this, called HyperFormance, designed to reduce input lag by only sending required work to the GPU rather than redundant tasks.
Within the hybrid system, the integrated GPU takes over two of the tasks for the GPU—snooping for required frames, and display output. This requires a system to run in i-Mode, where the display is connected to the integrated GPU. Users of Virtu on Z68 may remember this: back then it caused a 10% decrease in output FPS. This generation of drivers and tools should alleviate some of this decrease.
What this means for Joe Public
Lucid’s goal is to improve the 'immersive experience' by removing redundant rendering tasks, making the GPU synchronize with the refresh rate of the connected display and reduce input lag.
By introducing a level of middleware that intercepts rendering calls, Virtual V-Sync and HyperFormance are both tools that decide whether a frame should be rendered and then delivered to the display. However the FPS counter within a title counts frame calls, not completed frames. So as the software intercepts a call, the frame rate counter is increased, whether the frame is rendered or not. This could lead to many unrendered frames, and an artificially high FPS number, when in reality the software is merely optimizing the sequence of rendering tasks rather than increasing FPS.
If it helps the 'immersion factor' of a game (less tearing, more responsiveness), then it could be highly beneficial to gamers. Currently, to work as Lucid has intended, they have validated around 100 titles. We spoke to Lucid (see next page), and they say that the technology should work with most, if not all titles. Users will have to add programs manually to take advantage of the technology if the software is not in the list. The reason for only 100 titles being validated is that each game has to be validated with a lot of settings, on lots of different kit, making the validation matrix huge (for example, 100 games x 12 different settings x 48 different system hardware configurations = time and lots of it).
Virtu MVP causes many issues when it comes to benchmarking and comparison of systems as well. The method of telling the performance of systems apart has typically been the FPS values. With this new technology, the FPS value is almost meaningless as it counts the frames that are not rendered. This has consequences for benchmarking companies like Futuremark and overclockers who like to compare systems (Futuremark have released a statement about this). Technically all you would need to do (if we understand the software correctly) to increase your score/FPS would be to reduce the refresh rate of your monitor.
Since this article was started, we have had an opportunity to speak to Lucid regarding these technologies, and they have pointed out several usage scenarios that have perhaps been neglected in other earlier reviews regarding this technology. In the next page, we will discuss what Lucid considers ‘normal’ usage.
Last week Ryan and I had a meeting with Offir Remez, Co-Founder, President and Vice President of Business Development at Lucid. It went on a while, as Offir described Lucid and we peppered him with questions. There are several points worth mentioning about the functionality of Virtu MVP, which Offir was happy to share with us so we could share with you.
The first, to reiterate, is that Virtu requires a system with an integrated GPU (iGPU, such as a mainstream Intel Sandy/Ivy Bridge processor or an AMD APU) as well as discrete graphics (dGPU, AMD or NVIDIA). Without this setup, Virtu will not do anything. This also means that both the drivers for the iGPU and dGPU have to be installed at the same time. Lucid have validated the several previous generations of discrete cards (AMD 5xxx and above, NVIDIA 4xx and above), but are keen to stress that the technology should work with any card, including 8800 and 2400 series—they don’t have the time to validate every configuration being the point here.
In terms of how Virtu functions, it is important to understand the concept of being able to perform what was mentioned on the previous page—being able to manipulate what the GPU does and what it does not do. The underlying technology of Virtu is that the environment is virtualized. This means that instead of the GPUs working on top of the operating system, Virtu adds in a middle layer between the operating system and the GPU. This way, Virtu can manipulate everything that the operating system wants to say to the GPU, and vice versa, without either of them knowing that there is a middleware layer.
The second is most important perhaps, which I will go into later. Virtual V-Sync and HyperFormance will only make a difference in the following circumstances:
a) You suffer from visual tearing in your games, or you actively use V-Sync
b) If your setup (screen resolution and graphics settings) perform better than your refresh rate of your monitor (essentially 60 FPS for most people). If you have less than this, then you will probably not see any benefit.
I should mention some terminology. Virtu works in two modes, i-Mode and d-Mode, depending on if the display is connected to the integrated graphics or discrete graphics:
Let us go over the technologies again quickly.
Virtual V-Sync: Making sure the last fully rendered frame is shown, without tying the CPU, display and input down to 60 Hz (or the refresh rate of your display) and increasing responsiveness.
Virtual V-Sync works by making the integrated GPU probe the rendering buffer on the discrete card. In i-Mode, it transfers the last completed frame that the GPU has processed into the iGPU, and then when the display requires a refresh, it can process that entire frame. This results in no tearing, and the latest frame being shown. This means that Virtual V-Sync only works when your frame rate is greater than the refresh rate—if it is worse, then Virtual V-Sync will show stuttering in the periods where the next frame is not complete in time, thus it shows an old frame.
To reiterate, Virtual V-Sync will only work if your frame rate is greater than your refresh rate, usually 60 FPS. It does not increase frame rates, but removes tearing while keeping the responsiveness of the input system (mouse) better than normal V-Sync.
HyperFormance: Predicting which frames (or rendering tasks) will never be shown and taking them out of the pipeline so the GPU can work on what is needed (which also increases input responsiveness).
HyperFormance is a tool that uses the iGPU to examine rendering tasks. It applies a prediction algorithm to calculate how long the next few frames will take to render. If the refresh rate of the monitor means that the next two frames have no chance of being shown, then HyperFormance removes all applicable rendering tasks for those frames. Some rendering tasks still need to be processed (certain features like smoke or iterative algorithms), however a lot can be nullified. It then does the predictive algorithm and probe again; when it finds a frame which needs to be rendered for the refresh rate, it will make sure all rendering tasks are done on the GPU.
As the FPS counter is increased at the beginning of a frame, this makes it look like the FPS has shot up as rendering tasks are removed. However, this is a poor indication of what the software does—it means that the responsiveness of the input peripherals (e.g. mouse) goes up in line with this ‘FPS’ number.
This means, HyperFormance increases responsiveness and makes FPS meaningless. In order to work, HyperFormance will only make a difference if your normal frame rate is greater than your refresh rate, usually 60 FPS.
Essentially, the FPS number you get from HyperFormance becomes a measure of system responsiveness, not GPU output.
If the prediction algorithm for HyperFormance is wrong and a frame takes longer to render than predicted, the system will show the last fully rendered frame, causing stuttering. Lucid have asked us to make clear that this should be reported to them as a bug, stating the system being used, settings, and version of Lucid MVP.
What you will see on a system
As the technologies are all based around a virtualization layer, there is a little overhead in processing. Information from the frame buffer has to be passed from the iGPU to the dGPU and vice versa over the PCIe bus. If your screen resolution is high (~2MP for 1920x1080, ~4.1 MP for 2560x1600), this means data transfer could potentially be limited by bandwidth, but it should not be at 5GBps. The virtualization layer actually adds in latency, per frame and per call.
For Virtual V-Sync, in i-Mode, frames need to be transferred between dGPU to iGPU, and then displayed through the iGPU. The latency for this, or so we are told, should be around 3% for high frame rates greater than 100 FPS, compared to that from d-Mode. d-Mode requires less overhead as frames do not need to be copied for display, but commands still have to go between the iGPU and dGPU.
For HyperFormance, in i-Mode, we still have to transfer frames to output on the integrated graphics. However, as the iGPU is also dealing with rendering calls for parts of the frame, this is the main transfer between the two graphics units. In d-Mode, we have a similar experience to Virtual V-Sync.
The upshot of how all this works comes in the form of several numbers and a feature, depending on which settings you choose. The table below shows a theoretical result of what you can expect to get with these technologies in d-Mode mode. Here we are going with Lucid’s standard predictions—Virtual V-Sync and HyperFormance causing a 3% reduction in frame rates above 60 FPS, Virtual V-Sync removing tearing and utilizing more of the GPU, and HyperFormance removing 30% of rendering tasks.
| FPS | Refresh Rate | Tearing | On-Screen FPS | Responsiveness | |
| Normal | 100 | 60 | Yes | 60 | 100 |
| In Game V-Sync | 100 | 60 | No | 60 | 60 |
| Virtual V-Sync | 100 | 60 | No | 60 | 100 |
| HyperFormance | 100 | 60 | Yes | 60 | 130 |
|
Virtual V-Sync + HyperFormance |
100 | 60 | No | 60 | 130 |
As you can see, both Virtual V-Sync and HyperFormance are designed to work together, but are available in the software as separate options. This is, as we found out, because there may be the odd setup that does not like a particular game/setting, or that it changes the feel of a game too much to what the user is used to. Thus, Lucid allows users to chop and change with whatever feels good to them.
The ultimate realization is this—the FPS counter shown in games when using Virtu MVP no longer means the true FPS value of the output of your GPU. The FPS counter is now a measure of responsiveness. So please be wary when reading reviews using this technology and of the analysis of the results—the refresh rate of the monitor is also a vital component of the results.
Caveats of the Technology
There are a few bumps in the road, as expected with anything new, and we put these to Lucid for answers. The first is the possibility of stuttering as mentioned above when the prediction algorithm cannot cope with a massively different frame to previous—Lucid has asked us to reiterate that this should be reported as a bug.
In terms of multiple GPU users, Lucid says they are not specifically designing the software for them. However, they have said that multiple GPU users are more than welcome to assign Virtu MVP to their games to see if it works—Lucid just will not be validating multi-GPU scenarios due to the additional QA required.
There are currently three main titles as of today that Lucid are still fine-tuning for HyperFormance—Crysis 2, Lost Planet 2, and most importantly, Battlefield 3. These games are currently not validated as they are experiencing stuttering, which Lucid hopes to fix. This is more than likely related to the way the software interprets the rendering calls and the adaptive prediction algorithm specifically for these titles.
There is also an issue of licensing. Lucid MVP is a licensed bit of software, requiring motherboard manufacturers to write specific BIOS code in order for it to work. This obviously costs some money to the motherboard manufacturers as well. Some motherboard manufacturers will be licensing it for their back catalogue of hardware (H61, H67), whereas some will focus only from Z77/H77 onwards. There is a possibility that we will see SKUs that do not have it, either through design or as a sales decision. Despite this, Lucid expects Virtu MVP to be enabled on 100 different Z77/H77 motherboards, and up to 10 million motherboards shipped in the next twelve months.
In addition, as graphics cards become more powerful, HyperFormance obviously will increase, surpassing the responsiveness of the input system. Thus running a 7970 with an old DX9 game at 1024x768 may make your FPS hit 1500+, but your responsiveness will be limited by the system.
Future for Virtu MVP
On paper, Virtu MVP sounds like a great technology to have if you are a gamer demanding a more responsive system for 'immersive' gameplay. If Lucid can make Virtu MVP live up to the software’s lofty goals (and not be dogged by new game releases), it sounds good. Arguably, the best place to see this technology would be with upcoming consoles. If it is integrated into the console, and part of the validation of future games is that is has to run with Lucid, it could mean a lot cleaner and more responsive gameplay.
So much for the new technologies; what about the motherboards themselves? In this preview (we will come back at a later date with Ivy Bridge performance numbers), we aim to cover as many boards as possible to give you an idea of what is available on the market. Up first is the ASRock Z77 Extreme4.
ASRock Z77 Extreme4—Visual Inspection
ASRock are still insistent with bringing the black gold philosophy to its range, as seen here with the Z77 Extreme4 and later with the Z77 Extreme6. The main point you may immediately notice is the size and depth of the heatsinks covering up the power delivery—they are smaller than previous iterations of ASRock boards, and no longer connected via a heatpipe. This is indicative of quite a few boards we are looking at today, due to the low power requirements of the new processors and as a result, the lack of heat produced at stock voltage.
The socket area is relatively clean, especially to the south where we have no large intruding heatsink. The VRM heatsinks however do brush right up against the Intel specifications for the socket area, so you ultimately have only two directions (to the PCIe and towards the memory) in which to play around with big air coolers. The socket area is adorned with five fan headers—three along the top edge of the board and two chassis headers near the top PCIe x1 slot. The other header on board is along the bottom next to the two-digit debug.
The board is actually not a full ATX sized board—from left to right, it measures only 21.8 cm, rather than the standard ATX size of 24.4 cm. As a result this means ASRock do not have to deal with the far right holes in the motherboard for case mounting, and hence why the SATA ports in the bottom right are neatly tucked away. In this corner, we have the six SATA ports from the PCH (two SATA 6 Gbps, four SATA 3 Gbps) and another two from an ASMedia ASM1061 controller (SATA3_A1 is shared with an eSATA port, however). The internal USB 3.0 header is located nearer the 24-pin ATX power connector, perhaps indicating that is for both front case use and rear case use, taking up the space where the first PCIe x1 is.
The chipset heatsink is rather small, compared to Z68 and X79 boards, and is not connected via heatpipe to any other heatsink nearby. On the south side of the board are the standard array of audio and USB headers, along with a fan header and power/reset buttons. It is good also to see the two digit debug on the board as well.
The PCIe layout is indicative of what we will see on many Z77 boards this year, which do not use any form of PCIe lane expansion, such as a PLX chip. In this case, we have an x1, an x16 (x8 on dual card), a gap, a PCI, an x8, another PCI, and another x1. This is some smart thinking, as even with a dual GPU setup there is space for two single width PCIe x1 cards and a PCI card (which contrary to what some people think are still used in reasonable numbers).

Despite the stock image from ASRock looking a little bent on the back panel, we have a typical Z77 arrangement for IO. From left to right, a combination PS/2 port, two USB 3.0 ports (blue), a D-Sub output, a DVI-D output, HDMI, a clear CMOS button, two USB 2.0 ports (black), an eSATA port (red), gigabit Ethernet, two more USB 3.0 ports (blue), and a standard array of audio jacks featuring an optical SPDIF output.
Board Features
| ASRock Z77 Extreme4 | |
| Size | ATX |
| CPU Interface | LGA-1155 |
| Chipset | Intel Z77 |
| Power Delivery | 8 + 4 Phase |
| Memory Slots |
Four DDR3 DIMM slots supporting up to 32 GB Up to Dual Channel, 1066-2800 MHz |
| Video Outputs | HDMI 1.4a, DVI-D, D-Sub |
| Onboard LAN | Broadcom BCM57781 |
| Onboard Audio | Realtek ALC898 |
| Expansion Slots |
2 x PCIe x16 Gen3 2 x PCIe x1 Gen2 2 x PCI |
| Onboard SATA/RAID |
2 x SATA 6 Gbps (PCH), Support for RAID 0, 1, 5, 10 2 x SATA 6 Gbps (ASMedia ASM1061) 4 x SATA 3 Gbps (PCH), Support for RAID 0, 1, 5, 10 |
| USB |
Two USB 3.0 at rear (PCH) Two USB 3.0 at rear (ASMedia 1042) One USB 3.0 header (PCH) |
| Onboard |
4 x SATA 6 Gbps 4 x SATA 3 Gbps 1 x IR Header 1 x CIR Header 1 x COM Header 1 x SPDIF Header Power/Reset Buttons Two Digit Debug LED 6 x Fan Headers Front panel audio connector 3 x USB 2.0 headers (support 6 USB 2.0 ports) 1 x USB 3.0 header (supports 2 USB 3.0 ports) |
| Power Connectors |
1 x 24-pin ATX connector 1 x 8-pin 12V connector |
| Fan Headers |
2 x CPU Fan Header (one 4-pin, one 3-pin) 3 x CHA Fan Headers (one 4-pin, two 3-pin) 1 x PWR Fan Headers (3-pin) |
| IO Panel |
1 x Combo PS/2 Port 1 x HDMI 1.4a 1 x DVI-D 1 x D-Sub 1 x Optical SPDIF 2 x USB 2.0 4 x USB 3.0 1 x eSATA 6 Gbps 1 x Gigabit Ethernet 1 x Clear CMOS Audio Outputs |
| Warranty Period | 3 years from date of purchase |
| Product Page | Link |
Rather than dump a Realtek NIC/Audio combination on this board, ASRock have gone for a Broadcom NIC. This means either they have struck a deal, or it works a lot better for their ASRock LAN software. ASRock are one of few motherboard manufacturers to state they support HDMI 1.4a on their website specifications as well. As one of the cheaper boards of this roundup, the Z77 Extreme4 actually comes away pretty well in terms of features.
ASRock Z77 Extreme6—Visual Inspection
With the Extreme6, compared to the Extreme4, there are a significant number of changes, both visual and in terms of features. For a start, the heatsink design is more pronounced, using something similar to their X79 range in terms of black and gold ridged and edged surfaces. The VRM heatsink design is more substantial than the Extreme4, even though online it states it is still only an 8 + 4 VRM design—actually looking at the board, it seems more of a 10 + 4 design.
By looking at the motherboard, you would assume that it would support three-GPU setups. Unfortunately, this third full-length PCIe lane is only PCIe 2.0 x4, rather than splitting up the PCIe 3.0 lanes x8/x4/x4 or using a PLX chip. The MSRP for this board should be around $177, indicating that perhaps that is too cheap a board for one of the expensive PCIe 3.0 expansion PLX chips.
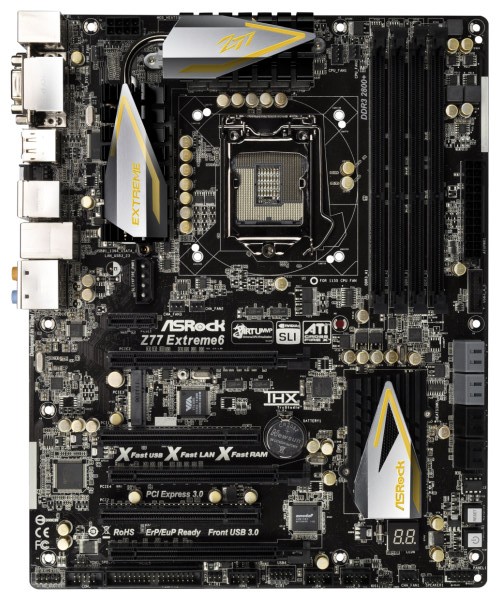
Onboard is also an mSATA port, right in the middle between the first PCIe slot and the PCI slot. Above the PCIe slots is a 4-pin molex power connector to provide extra power to the PCIe slots, although I am kind of getting tired of seeing it put in this location. If anything, it should be at the bottom end or beside the 24-pin power connector, as having it above the PCIe slots just means that there will be cables all over the place.
One other less obvious change to the Extreme4 is that there is a Floppy drive header on board. Yes, you heard me right—floppy drive! It seems odd now to include this legacy connection. It still has a place in industrial concepts (where a machine uses floppy drives and costs 1000x more than the PC processing its data), but not particularly on a higher end product which may be geared towards gaming and overclocking. Perhaps if ASRock are the only ones, then it creates a niche just for them.
In terms of fan headers on board, we have one three-pin beside the 8-pin 12V power connector, two CPU headers (one 4-pin, one 3-pin) just to the right of the top heatsink, two chassis three-pin headers beside the molex connector, and another 4-pin chassis header on the bottom of the board. On the right hand side, the USB 3.0 connector has been placed beneath the 24-pin ATX power connector, followed by the SATA ports. Like the Extreme4, we have the PCH SATA ports (two SATA 6 Gbps and four SATA 3 Gbps) and two extra SATA 6 Gbps from an ASMedia ASM1061 controller.
Around the larger chipset heatsink, we have power/reset buttons and a two digit debug display, both of which I personally like to see as a reviewer (makes my job a bit easier) but also helps overclockers. On the south side of the board, apart from that floppy connector I mentioned, we have a COM port, front panel audio, and an array of USB 2.0 headers.
PCIe layout is similar to the Extreme6, with a PCIe x1, PCIe 3.0 x16/x8, an mSATA connector, PCI, PCIe 3.0 x8, PCI, and a PCI 2.0 x4. This allows a user to use a dual GPU setup, and still have access to a PCIe x1 and x4.

Aside from the bowed picture from ASRock, we have something similar to the Extreme4 for the IO back panel, though this time with a DisplayPort output. From left to right, we have a combination PS/2 port, two USB 3.0 ports (blue), a D-Sub port, DVI-D, DisplayPort, HDMI, a ClearCMOS button, two USB 2.0 (red), an IEEE1394 port, eSATA, gigabit Ethernet, two more USB 3.0 (blue), and audio outputs including an optical SPDIF.
Board Features
| ASRock Z77 Extreme6 | |
| Size | ATX |
| CPU Interface | LGA-1155 |
| Chipset | Intel Z77 |
| Power Delivery | 8 + 4 |
| Memory Slots |
Four DDR3 DIMM slots supporting up to 32 GB Up to Dual Channel, 1066-2800 MHz |
| Video Outputs | DisplayPort, HDMI 1.4a, DVI-D, D-Sub |
| Onboard LAN | Broadcom BCM57781 |
| Onboard Audio | Realtek ALC898 |
| Expansion Slots |
2 x PCIe x16 Gen3 (x16, x8/8) 1 x PCIe x16 Gen2 (x4) 1 x PCIe x1 Gen2 2 x PCI 1 x mini PCIe |
| Onboard SATA/RAID |
2 x SATA 6 Gbps (PCH), Support for RAID 0, 1, 5, 10 2 x SATA 6 Gbps (ASMedia ASM1061) 4 x SATA 3 Gbps (PCH), Support for RAID 0, 1, 5, 10 |
| USB |
Two USB 3.0 at rear (PCH) Two USB 3.0 at rear (Etron EJ168A) One USB 3.0 header (PCH) |
| Onboard |
4 x SATA 6 Gbps 4 x SATA 3 Gbps 1 x Floppy Connector 1 x IR Header 1 x CIR Header 1 x COM Header 1 x SPDIF Header 1 x 4-pin Molex power connector Power/Reset Buttons Two Digit Debug LED 6 x Fan Headers Front panel audio connector 3 x USB 2.0 headers (support 6 USB 2.0 ports) 1 x USB 3.0 header (supports 2 USB 3.0 ports) |
| Power Connectors |
1 x 24-pin ATX connector 1 x 8-pin 12V connector 1 x 4-pin Molex for PCIe |
| Fan Headers |
2 x CPU Fan Header (one 4-pin, one 3-pin) 3 x CHA Fan Headers (one 4-pin, two 3-pin) 1 x SYS Fan Header (one 3-pin) |
| IO Panel |
1 x Combo PS/2 Port 1 x DisplayPort 1 x HDMI 1.4a 1 x DVI-D 1 x D-Sub 1 x Optical SPDIF 2 x USB 2.0 4 x USB 3.0 1 x IEEE1394 1 x Gigabit Ethernet 1 x Clear CMOS Audio Outputs |
| Warranty Period | 3 years from date of purchase |
| Product Page | Link |
Nothing immediately jumps out from the board features list aside from the differences to the Extreme4. This is a quite good package for an MSRP of $171.
ASUS P8Z77-V Pro—Visual Inspection
ASUS have a lot to live up to with its Ivy Bridge Pro board. Both the ASUS P8P67 Pro and ASUS P8Z68-V Pro have been top class sellers in their respective chipsets, meaning that ASUS has to deliver. Thankfully, by just looking at the board, it seems that ASUS is keen to innovate and offer a complete package.
Using a 12 + 4 VRM power delivery system, the ASUS P8Z77-V Pro sports a blue and black livery synonymous with their channel / non-ROG products. The VRM heatsinks cover a lot of surface area in their jagged fashion, and around the socket itself, we have access to five main fan headers. Two of these are CPU 4-pin headers just north of the top VRM heatsink, one 4-pin below the left hand side VRM heatsink, and two 4-pin headers below the 24-pin ATX power connector, along with a USB 3.0 port. A sixth fan header (4-pin) is found on the south side of the board.
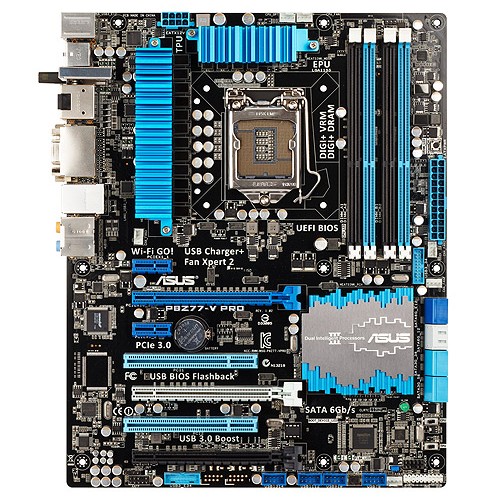
Above the 24-pin ATX power connector, we find the ASUS MemOK! button, which allows memory recovery to default speeds. Along with the ASRock boards, we have eight SATA ports—four SATA 3 Gbps from the PCH and four SATA 6 Gbps—two from the PCH and two more from an ASMedia controller. Below this are the TPU and EPU switches, designed for enhanced CPU performance and energy saving modes respectively.
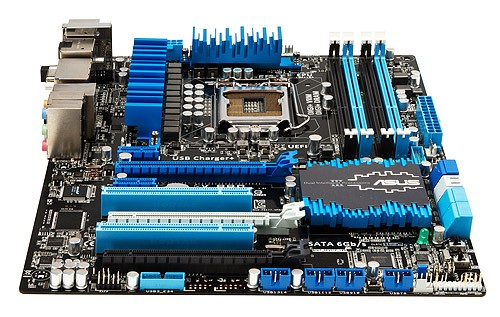
Along the bottom of the board is the standard array of a front panel audio header, another USB 3.0 header, USB 2.0 headers, and a front panel header. In terms of PCIe layout, despite there being three full-length PCIe connectors on board, we are only limited to using two for multi-GPU setups. In order, we have a PCIe x1, a PCIe 3.0 x16 (x8 in dual GPU), x1, PCI, PCIe 3.0 x8, PCI, and a PCIe 2.0 x4. Thus in dual GPU mode, similarly to the ASRock Extreme6, we can also add in a PCIe x1 and PCIe x4 card.
The chipset heatsink is indicative of the large but low philosophy of many motherboard manufacturers, hiding away the chipset controller. What is not on these boards, as you may notice, is a combination power/reset pair of buttons, nor a two-digit debug, some of which we used to see on ASUS Pro boards of old. Nevertheless, the ASUS board in return makes up for it on the back IO panel.
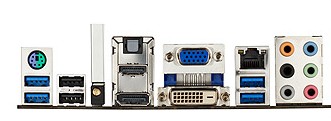
On the back panel, we have a combination PS/2 port, two USB 3.0 ports (blue), two USB 2.0 ports (black), an ASUS Wi-Fi GO! Card, optical SPDIF output, HDMI, DisplayPort, D-Sub, DVI-D, gigabit Ethernet, two more USB 3.0 ports in blue, and standard audio headers.
This means that rather than add in a WiFi module on the board, or use up a mini-PCIe slot with wifi, we have a slot in order to add a WiFi module. This can be in 2.4 GHz or 5 GHz mode, and updateable as WiFi standards change. This all comes as part of the package, with magnetic wireless antenna to attach to the case.
Board Features
| ASUS P8Z77-V Pro | |
| Size | ATX |
| CPU Interface | LGA-1155 |
| Chipset | Intel Z77 |
| Power Delivery | 12 + 4 |
| Memory Slots |
Four DDR3 DIMM slots supporting up to 32 GB Up to Dual Channel |
| Video Outputs | DisplayPort, HDMI 1.4a, DVI-D, D-Sub |
| Onboard LAN | Intel 82579V |
| Onboard Audio | Realtek ALC892 |
| Expansion Slots |
2 x PCIe x16 Gen3 (x16, x8/8) 1 x PCIe x16 Gen2 (x4) 2 x PCIe x1 Gen2 2 x PCI |
| Onboard SATA/RAID |
2 x SATA 6 Gbps (PCH), Support for RAID 0, 1, 5, 10 2 x SATA 6 Gbps (ASMedia) 4 x SATA 3 Gbps (PCH), Support for RAID 0, 1, 5, 10 |
| USB |
Four USB 3.0 at rear (2 PCH, 2 ASMedia) Two USB 3.0 headers on board (PCH, ASMedia) Ten USB 2.0 (2 back panel, 8 on board) |
| Onboard |
4 x SATA 6 Gbps 4 x SATA 3 Gbps 2 x USB 3.0 Headers 4 x USB 2.0 Headers 6 x Fan Headers 1 x SPDIF Header 1 x Front Panel Audio Header MemOK! Button TPU/EPU Switches USB Flashback Button |
| Power Connectors |
1 x 24-pin ATX connector 1 x 8-pin 12V connector |
| Fan Headers |
1 x CPU Fan Header (4-pin) 4 x CHA Fan Headers 1 x OPT Fan Header |
| IO Panel |
1 x PS/2 Combo Port 1 x DisplayPort 1 x HDMI 1.4a 1 x DVI-D 1 x D-Sub 1 x Gigabit Ethernet 4 x USB 3.0 2 x USB 2.0 1 x Optical SPDIF 1 x WLAN Connector 6 x Audio Jacks |
| Warranty Period | 3 Years |
| Product Page | Link |
ASUS as a direct standard are now placing Intel NICs on all their channel motherboards. This is a result of a significant number of their user base requesting them over the Realtek solutions. Also to note are a total of six USB 3.0 on board, two on the back panel and four from internal headers. These USB 3.0 ports can take advantage of the improved UASP USB 3.0 protocol using appropriate hardware and some ASUS software. As always, we expect ASUS fan control of the six headers to be top notch.
ASUS P8Z77-V Deluxe—Visual Inspection
In the next notch up in the channel board segregation, ASUS sell the Deluxe. This will be the first ASUS Deluxe board we have reviewed at AnandTech since the Llano mini-ITX F1A75-I Deluxe last year. In comparison to the P8Z77-V Pro, the Deluxe features several upgrades in terms of functionality and comfort.
The first to note is the increased power delivery to the CPU—this time in the form of a 16 + 4 phase power delivery. As a result, the VRM heatsinks to the left of the CPU are directly connected via a heatpipe to another heatsink below the socket. Also on board are the ‘enthusiast’ power/reset buttons and two-digit debug that we did not see on the Pro, and the use of dual NICs on the I/O, in the form of an Intel 82579V and a Realtek 8111F.
Due to the positioning off the heatsinks on the Deluxe compared to the Pro, the socket area seems a bit smaller (for example, the left hand heatsink is moved further in towards the socket), meaning that big air coolers may have a tougher time if they do not fit into Intel’s socket specification. Around the socket itself, we still have access to five fan headers—two 4-pin on the top of the board, one 4-pin to the bottom left of the main VRM heatsink, and one 4-pin either side of the 24-pin ATX power connector. A sixth fan header on board is found at the bottom next to the two-digit debug output.
Above the main power connector on the right hand side are the MemOK button and the TPU switch (for a fast automatic overclock). Below it is a USB 3.0 header, and a set of eight SATA ports. Similar to the ASUS Pro, we have four SATA 3 Gbps from the PCH, two SATA 6 Gbps also from the PCH, and two SATA 3 Gbps from a different controller—the Marvell 9128. This allows RAID 0/1 on these two SATA 6 Gbps ports.
The south side of the board still contains front panel headers and USB 2.0 ports, but also comes with the aforementioned power/reset buttons and two-digit debug display. We also find a ClearCMOS button on board, useful for overclockers. There is also a header labelled 'TB_Header', which should mean Thunderbolt, but there is no mention of it in the specifications. I will have to check up on this.
Update: The TB_Header is actually for a new Thunderbolt add-in card that ASUS will be selling. This is aimed to go into the x4 slot and provide Thunderbolt connectivity. MSRP will be around the $30-$40 mark so I am told.
In terms of the PCIe, we have a little bit of confusion. While in the middle between the PCIe is a PLX chip, it is not the PLX PXE 8747 chip that increases PCIe lane count. The one on the Deluxe is just to provide extra data transfer access for the various controllers on the motherboard. This means that the third full length PCIe in black is like other boards in that this is a PCIe 2.0 x4, non-GPU port. So from the top, we have a PCIe x1, x16 (x8 in Multi-GPU), x1, x1, x8, x1, x4. As a result, there is no PCIe to PCI bridge chip on this high-end model for PCI slots.
For the back panel, ASUS have done a juggling act deciding what to include. On the far left is a set of four USB 2.0 ports (black), a mini-PCIe WiFi + Bluetooth module, two USB 3.0 (blue), two eSATA, optical SPDIF output, HDMI output, DisplayPort, dual gigabit Ethernet, another four USB 3.0 ports (blue), a BIOS flashback button, and audio outputs. So in the name of a double NIC and 10 total USB ports on the back panel, we have lost D-Sub, DVI, IEEE1394 and a ClearCMOS button.
Board Features
| ASUS P8Z77-V Deluxe | |
| Size | ATX |
| CPU Interface | LGA-1155 |
| Chipset | Intel Z77 |
| Power Delivery | 16 + 4 |
| Memory Slots |
Four DDR3 DIMM slots supporting up to 32 GB Up to Dual Channel |
| Video Outputs | DisplayPort, HDMI |
| Onboard LAN |
Intel 82579V Realtek 8111F |
| Onboard Audio | Realtek ALC898 |
| Expansion Slots |
2 x PCIe x16 Gen3 (x16, x8/8) 1 x PCIe x16 Gen2 (x4) 4 x PCIe x1 Gen2 |
| Onboard SATA/RAID |
2 x SATA 6 Gbps (PCH), Support for RAID 0, 1, 5, 10 2 x SATA 6 Gbps (Marvell PCIe 9128), RAID 0, 1 4 x SATA 3 Gbps (PCH), Support for RAID 0, 1, 5, 10 2 x eSATA 6 Gbps (ASMedia) |
| USB |
Four USB 3.0 at rear (2 PCH, 2 ASMedia) Two USB 3.0 headers on board (PCH, ASMedia) Eight USB 2.0 (4 back panel, 4 on board) |
| Onboard |
4 x SATA 6 Gbps 4 x SATA 3 Gbps 1 x USB 3.0 Headers 2 x USB 2.0 Headers 6 x Fan Headers 1 x SPDIF Header 1 x Front Panel Audio Header 1 x TB Header MemOK! Button TPU/EPU Switches USB Flashback Button Power/Reset Buttons |
| Power Connectors |
1 x 24-pin ATX connector 1 x 8-pin 12V connector |
| Fan Headers |
1 x CPU Fan Header (4-pin) 4 x CHA Fan Headers 1 x OPT Fan Header |
| IO Panel |
2 x eSATA 6 Gbps 1 x DisplayPort 1 x HDMI 1.4a 2 x Gigabit Ethernet 6 x USB 3.0 4 x USB 2.0 1 x Optical SPDIF Audio Outputs Bluetooth V4.0 Wifi USB Flashback |
| Warranty Period | 3 Years |
| Product Page | Link |
Obviously one of the main selling points of the board is the onboard WiFi and Intel NIC (alongside a Realtek NIC).
Gigabyte GA-Z77X-UD3H WiFi—Visual Inspection
Black and blue seems to be the order of the day when it comes to mainstream boards, as indicated by some of the previous boards but also with the Gigabyte GA-Z77X-UD3H WiFi. Perhaps there is a sale on black PCBs and blue heatsinks?
Joking aside, Gigabyte intends to release two high- end boards initially—the Z77X-UD5H and the Z77X-UD3H, both in regular and WiFi variants. The WiFi variant comes with a PCIe x1 WiFi card to be used in the first PCIe slot on the board, and aerials for the outside of the case.
We have the Z77X-UD3H WiFi in to review for the launch of Ivy Bridge, which should retail for around $160 MSRP. Gigabyte has chosen a few different directions regarding which controllers are on the motherboard. This should provide interesting results when it comes to performance.
The VRM power delivery weighs in at 6 + 4 phase, which is by no means substantial (remember the ASRock Z77 Extreme4 was 8 + 4 and less expensive), and comes paired with a relatively small blue heatsink next to the socket. I’ve noticed that Gigabyte tend to have their memory closer to the socket than most other manufacturers, presumably in the name of performance due to shorter interconnects, but the downside is that it can restrict big air coolers. Nonetheless, it all still conforms to Intel specifications, and there is actually a large gap to the south of the socket.
In terms of fan headers, there are only two within reach of the socket. We have a 4-pin CPU header at the top near the memory slots, and another near the power/reset/ClearCMOS buttons at the top right of the board. The other three headers on board are found at the bottom—one 4-pin beside the SATA ports, one 4-pin next to the USB headers and another 4-pin beside the TPM.
Along the right hand side of the motherboard, Gigabyte has given us a different style of power/reset/clear CMOS button that I have not seen before. The power button is big and red, whereas the other two are relatively small. These will be of use to reviewers and overclockers, however having the ClearCMOS the same size and shape as the reset button may lead to several bad fumblings for the right button followed by several four-letter expletives.
Further down is another style choice—an additional power connector for the PCIe and system, but this case it is a SATA power connector. I prefer this to the awkward molex connectors we see on other products. Below this are the standard six SATA ports from the PCH—two SATA 6 Gbps and four SATA 3 Gbps. Below this is the handy two-digit debug display.
Along the bottom of the board, from left to right, we have the front panel audio, SPDIF header, a 4-pin fan header, the TPM header, three USB 2.0 headers, and another fan header. At the top of the PCIe is our mSATA connection, useful for mSATA SSDs and boot drives to save case space. In terms of PCIe, Gigabyte has installed a little nugget of common sense, giving enough space between the first two full-length PCIe for GPUs. However, in the x1, x16 (x8 in multi-GPU), x1, x1, x8, PCI, x4 setup, only the first two full length PCIe are for graphics output—the final one is a PCIe 2.0 x4 connector. This would be better served if it were a slightly different color to the other PCIe x16/x8 connectors. Also with two full length GPUs on board, the user will have access to two PCIe x1 connectors but the PCI connector is blocked.
I know Gigabyte will make a few people jump with joy in relation to the back panel layout—no USB 2.0! From left to right, we have a PS/2 combination port, two USB 3.0, D-Sub, DVI-D, an Optical SPDIF output, HDMI, DisplayPort, two more USB 3.0, two eSATA, gigabit Ethernet, a final two USB 3.0, and audio outputs.
Board Features
| Gigabyte GA-Z77X-UD3H Wifi | |
| Size | ATX |
| CPU Interface | LGA-1155 |
| Chipset | Intel Z77 |
| Power Delivery | 6 + 4 |
| Memory Slots |
Four DDR3 DIMM slots supporting up to 32 GB Up to Dual Channel, 1066-1600 MHz |
| Video Outputs | DisplayPort, HDMI, DVI-D, D-Sub |
| Onboard LAN | Atheros |
| Onboard Audio | Via VT2021 |
| Expansion Slots |
2 x PCIe x16 Gen3 (x16, x8/8) 1 x PCIe x16 Gen2 (x4) 3 x PCIe x1 Gen2 1 x PCI |
| Onboard SATA/RAID |
2 x SATA 6 Gbps (PCH), Support for RAID 0, 1, 5, 10 4 x SATA 3 Gbps (PCH) 1 x mSATA connector (shared with SATA2_5) 2 x eSATA 6Gbps (Marvell 9172), RAID 0, 1 |
| USB |
Six USB 3.0 at rear (2 PCH, 4 VIA VL800) One USB 3.0 header on board Three USB 2.0 headers on board |
| Onboard |
4 x SATA 3 Gbps 2 x SATA 6 Gbps 1 x mSATA Connector 5 x Fan Headers 1 x USB 3.0 Header 3 x USB 2.0 Headers 1 x Front Panel Header 1 x Clear CMOS Button 1 x TPM Header 1 x SPDIF Output 1 x SATA Power Connector |
| Power Connectors |
1 x 24-pin ATX connector 1 x 8-pin 12V connector 1 x SATA Power connector |
| Fan Headers |
1 x CPU Fan Header (4-pin) 4 x CHA Fan Headers (4-pin) |
| IO Panel |
1 x Gigabit Ethernet Audio Outputs 1 x DVI-D 1 x D-Sub 1 x DisplayPort 1 x HDMI 2 x eSATA 6 Gbps 1 x Combo PS/2 Port 6 x USB 3.0 1 x Optical SPDIF Output |
| Warranty Period | 3 Years |
| Product Page | Link |
One of the odd choices of Gigabyte is their network and audio controllers. On near every board I have reviewed, we get either a Realtek, an Intel or a Broadcom for the network, and a Realtek or Creative audio solution. Gigabyte has decided to jump in with an Atheros network controller, and a Via VT2021 audio. It will be interesting to see if this has an effect on our test capabilities.
Gigabyte GA-Z77MX-D3H—Visual Inspection
In a twist to the previous motherboards, Gigabyte sent us a micro-ATX sample, the GA-Z77MX-D3H. While still a Z77 product, capable of dual GPU setups, we have a motherboard aimed at the cheaper end of the spectrum. This is shown with what looks like a 4 + 2 VRM power delivery, and the relatively small sized heatsinks. We are also limited in terms of fan headers (three), and rear panel USB 3.0 ports (only two) compared to the Z77X-UD3H WiFi bigger brother.
The socket itself is clean with little obstructions—fan headers are found below the VRM heatsink, where we have two of the 4-pin variety. The other fan header on board can be found at the bottom next to the TPM.
Despite being a cheaper small motherboard, we still have typical Gigabyte features, such as dual BIOSes next to the USB 3.0 header underneath the 24-pin ATX power connector, but only the SATA ports from the PCH. This means two SATA 6 Gbps and three SATA 3 Gbps. The chipset heatsink is also small but has enough surface area to keep Gigabyte confident of its functionality.
The south side of the board is relatively naked, with a front panel audio, fan header, TPM and two USB 2.0 headers. Given the look of the board and that it does not display many potential features (presumably to fit into a price bracket), I was not expecting anything elaborate such as power/reset buttons.
The PCIe layout is aimed at users wanting dual GPUs or users needing an extra PCIe device alongside their GPU. The PCIe layout becomes x16 (x8 on dual GPU), x1, x8, x4, with this final x4 only being PCIe 2.0.
The rear IO panel is more substantial than I assumed, which can only be a good thing. From left to right we have a pair of USB 2.0 (black), a combination PS/2 port, D-Sub, DVI, two USB 3.0 (blue), HDMI, four more USB 2.0 (black), gigabit Ethernet, and standard audio jacks with a combination optical SPDIF output.
Board Features
| Gigabyte GA-Z77MX-D3H | |
| Size | mATX |
| CPU Interface | LGA-1155 |
| Chipset | Intel Z77 |
| Power Delivery | TBC |
| Memory Slots |
Four DDR3 DIMM slots supporting up to 32 GB Up to Dual Channel, 1066-1600 MHz |
| Video Outputs | HDMI, DVI-D, D-Sub |
| Onboard LAN | Atheros |
| Onboard Audio | Via VT2021 |
| Expansion Slots |
2 x PCIe x16 Gen3 (x16, x8/8) 1 x PCIe x16 Gen2 (x4) 1 x PCIe x1 Gen2 |
| Onboard SATA/RAID |
2 x SATA 6 Gbps (PCH), Support for RAID 0, 1, 5, 10 4 x SATA 3 Gbps (PCH), Support for RAID 0, 1, 5, 10 |
| USB |
4 USB 3.0 ports (2 back panel, 2 from headers) 10 USB 2.0 ports (6 back panel, 4 from headers) |
| Onboard |
4 x SATA 3 Gbps 2 x SATA 6 Gbps 3 x Fan Headers 1 x Front Panel Header 1 x Front Audio Header 1 x SPDIF Output Header 1 x USB 3.0 Header 2 x USB 2.0 Headers 1 x TPM |
| Power Connectors |
1 x 24-pin ATX connector 1 x 8-pin 12V connector |
| Fan Headers |
1 x CPU Fan Header (4-pin) 2 x SYS Fan Headers (4-pin) |
| IO Panel |
1 x PS/2 Combo Port 1 x D-Sub 1 x DVI-D 1 x HDMI 2 x USB 3.0 6 x USB 2.0 1 x Gigabit Ethernet 1 x Optical SPDIF Audio Jacks |
| Warranty Period | 3 Years |
| Product Page | Link |
As with the Gigabyte Z77X-UD3H WiFi, this Z77MX-D3H comes with an Atheros/Via network and audio combination. Given the lack of features on the main area of the board due to the size and the audience this product is aiming for, it seems good if all you want is a stock processor and a working Ivy Bridge system with no frills.
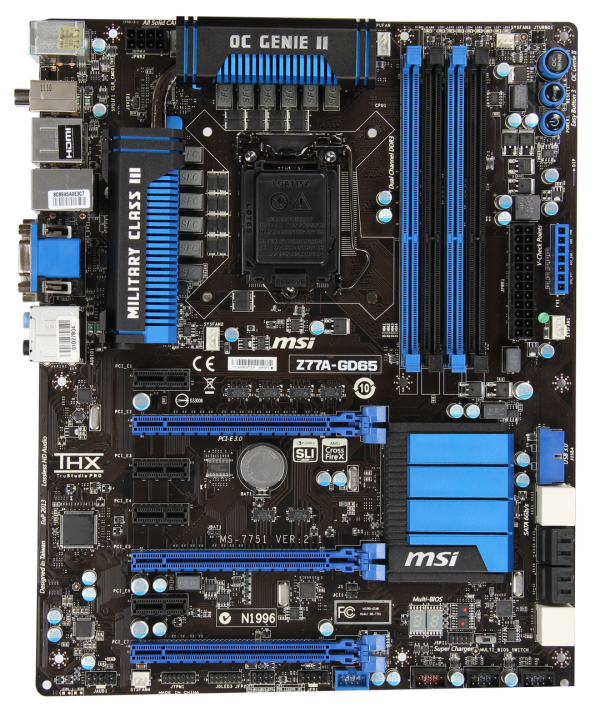
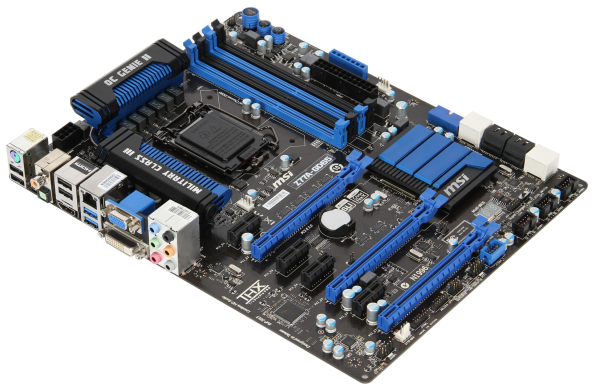
MSI Z77A-GD65—Visual Inspection
Whenever it comes to a motherboard comparison involving ASUS, Gigabyte or ASRock against an MSI board, the MSI board always tends to show a strong result—either in terms of price, performance or features. So when it comes to the new batch of motherboards for Ivy Bridge, it is fair to say that I expect a strong showing from MSI. For this preview, we have their Z77A-GD65, which will be one behind their future released GD80 that got attention back at CES for being Thunderbolt equipped.
The Z77A-GD65 is another motherboard in this roundup that comes in a black and blue livery. This time MSI have more of an excuse than others do as they have been using it for a fair while now. Using what is essentially a 10 + 2 phase power delivery, MSI are using somewhat beefier heatsinks than their rivals, connecting both via a heatpipe. The socket area is right up against Intel's minimum requirements from left to right, but there is some room to maneuver big air coolers from top to bottom. Around the socket there are at least four fan headers to use: one 4-pin CPU header between the top VRM and the memory slots, a 4-pin system fan header just the other side of the memory slots, a 4-pin to the bottom left of the socket area, and another 4-pin beside the 24-pin ATX power connector. A fifth fan header can be found at the bottom of the board.
Along the right hand side, we have the standard MSI trio of power/reset/OC Genie buttons, followed but a series of voltage checkpoints for overclockers. Aside from the 24-pin power connector and the system fan header, there is also a USB 3.0 header at right angles to the board, indicating its primary use is to the front of the case. Underneath this are the eight SATA ports—two SATA 6 Gbps from the PCH, four SATA 3 Gbps also from the PCH, and another two SATA 6 Gbps from an ASMedia controller.
As the power/reset/OC Genie buttons are at the top right, the bottom of the board has more room to fit in all the headers as needed—front panel audio, TPM, front panel headers and USB 2.0 headers. In terms of PCIe, MSI have done away with the PCIe to PCI bridge and focused purely on PCIe. We have an x1, x16 (x8 with dual GPU), x1, x1, x8, x1, and a PCIe 2.0 x4. In this instance, there is plenty of room for a dual GPU setup with PCIe slots to spare for any extras.
Also of note is the chipset cooler, which is very flat and large with minimal fins, perhaps suggesting that MSI is confident about their heatsink design. Underneath this is a two digit debug display, and a BIOS switch for changing between two BIOSes.
On the rear IO panel, I think MSI have been reasonable with what they have left in and what they have left out. From left to right, we have a combination PS/2 port, two USB 2.0 ports (black), a clear CMOS button, digital and coaxial SPDIF outputs, two more USB 2.0 ports (black), a HDMI port, gigabit Ethernet, two USB 3.0 ports (blue), D-Sub, DVI-D, and audio jacks.
Board Features
| MSI Z77A-GD65 | |
| Size | ATX |
| CPU Interface | LGA-1155 |
| Chipset | Intel Z77 |
| Power Delivery (CPU/iGPU) | 8 + 1 + 2 + 1 (VRM/VTT/GPU/SA) |
| Memory Slots |
Four DDR3 DIMM slots supporting up to 32 GB Up to Dual Channel, 1066-2667 MHz |
| Video Outputs | HDMI, DVI-D, D-Sub |
| Onboard LAN | Intel 82579V |
| Onboard Audio | Realtek ALC898 |
| Expansion Slots |
2 x PCIe x16 Gen3 (x16, x8/8) 1 x PCIe x16 Gen2 (x4) 4 x PCIe x1 Gen2 |
| Onboard SATA/RAID |
2 x SATA 6 Gbps (PCH), Support for RAID 0, 1, 5, 10 4 x SATA 3 Gbps (PCH), Support for RAID 0, 1, 5, 10 2 x SATA 6 Gbps (ASMedia ASM1061) |
| USB |
4 USB 3.0 ports (2 back panel, 2 from headers) 10 USB 2.0 ports (4 back panel, 6 from headers) |
| Onboard |
4 x SATA 6Gbps 4 x SATA 3 Gbps 1 x USB 3.0 Header 3 x USB 2.0 Headers 1 x IEEE1394 Header 1 x TPM Header 1 x Front Panel Audio Header Power/Reset Buttons OC Genie 5 x Fan Headers |
| Power Connectors |
1 x 24-pin ATX connector 1 x 8-pin 12V connector |
| Fan Headers |
1 x CPU Fan Header (4-pin) 4 x SYS Fan Headers (two 4-pin, two 3-pin) |
| IO Panel |
1 x Combo PS/2 Port 1 x Clear CMOS Button 1 x Coaxial S/PDIF Port 1 x Optical S/PDIF Port 4 x USB 2.0 2 x USB 3.0 1 x Gigabit Ethernet Audio Jacks 1 x HDMI 1 x DVI-D 1 x D-Sub |
| Warranty Period | 3 Years |
| Product Page | Link |
It is good to see an Intel NIC on this $180 MSRP motherboard. There are plenty of headers to go around. The only things missing where other motherboards may have better all-round functionality are a PCI slot, mSATA and on-board WiFi.
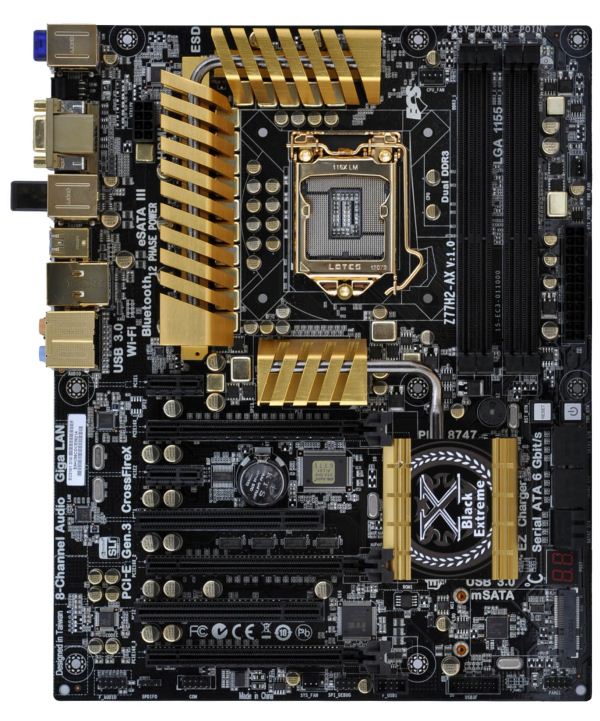
ECS Z77H2-AX—Visual Inspection
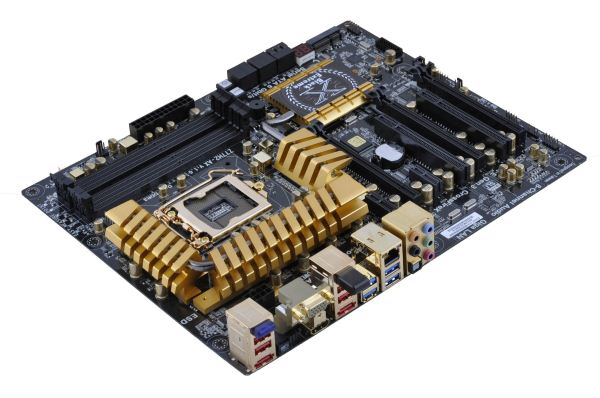
If all you ever wanted in life was something colored gold, I think ECS have you covered. As part of their Golden Board branding, the ECS Z77H2-AX has been plated with a layer of gold paint. Well, their heatsinks, heatpipes, socket, capacitors, VRMs and IO panel have all had a layer of gold paint added in order to improve aesthetics. When I first took this board out of the wrapper, I was figuratively blinded by just how much of the gold color was in my face.
Initially ECS will be releasing two high-end Z77 boards, with this one being the most expensive we have in for review, at an MSRP of $319. As such, I would expect it to perform near the top in almost every aspect—features, extras, performance and usability. As more than twice the price of the ASRock Z77 Extreme4, it had better be at least twice the board.
For a start, we can see that the socket is closed in, with the heatsinks and the memory slots being right up against Intel's minimum required socket spacing. This means big air coolers may not get a chance to fit, and only stock or water-cooling need apply. If that is the case, then I hope ECS have a robust overclock system in place.
One thing to feel disappointed by the ECS board though is the lack of fan headers. Around the socket you are lucky to have two—one 4-pin between the top VRM heatsink and the memory slots, and a 3-pin just above the 24-pin ATX power connector. A solitary third is on the bottom of the board. In the past ECS fan OS controls have had some of the better software support; however, it does not make sense to have only three headers on this.
Down the right hand side of the board, below the ATX power connector, are a pair of power/reset buttons, the standard six SATA ports from the PCH, and a two-digit debug display. Note we do not have any other SATA controllers for internal ports on the board. Below the two-digit debug display is an mSATA connector, which doubles up as a mini-PCIe if a user want to use a WiFi module (note, there is one on board already) or a TV Tuner.
On the south side of the board we are not given a vast amount of headers to say it is cramped—aside from standard front panel headers, there is a USB 3.0 header, a COM header, and a solitary USB 2.0 header.
This big selling point of this board over the other boards in this preview however is its multi-GPU capabilities. ECS have decided to invest in a PLX PXE 8747 chip, which is akin to the NF200 chips we saw on X58. This chip will expand the 16 PCIe 3.0 lanes on the board to 32, meaning that on the PCIe slots, we can have x16/x16 in dual card mode, or x16/x8/x8 in tri-card mode.
Thus in order we have an x1, an x16, x1, PCI, x16/x8, PCI, x8. So if all three full length PCIe slots are filled, there is still access to an x1 and a PCI, but we lose a lot of the functionality on the south part of the board.
The back panel has a mix and match of capabilities and functionality. From the left, we have a Bluetooth dongle, two USB 2.0 (red), an eSATA, a clear CMOS button, D-Sub, HDMI, a WiFi dongle, two USB 2.0, an eSATA, two USB 3.0, gigabit Ethernet, two USB 3.0, optical SPDIF and audio jacks. The big selling point for me is the WiFi, which ECS have cunningly added to their top range boards for a few chipsets now.
Board Features
| ECS Z77H2-AX | |
| Size | ATX |
| CPU Interface | LGA-1155 |
| Chipset | Intel Z77 |
| Power Delivery | 12 + 2 |
| Memory Slots |
Four DDR3 DIMM slots supporting up to 32 GB Up to Dual Channel, 1066-2800 MHz |
| Video Outputs | HDMI, D-Sub |
| Onboard LAN | Realtek 8111E |
| Onboard Audio | Realtek ALC892 |
| Expansion Slots |
2 x PCIe x16 Gen3 (x16, x8/8) 1 x PCIe x16 Gen2 (x4) 2 x PCIe x1 Gen2 2 x PCI |
| Onboard SATA/RAID |
2 x SATA 6 Gbps (PCH), Support for RAID 0, 1, 5, 10 4 x SATA 3 Gbps (PCH), Support for RAID 0, 1, 5, 10 2 x eSATA 3 Gbps |
| USB |
6 USB 3.0 ports (4 back panel, 2 from headers) 6 USB 2.0 ports (4 back panel, 2 from headers) |
| Onboard |
2 x SATA 6 Gbps 4 x SATA 3 Gbps 1 x USB 3.0 Header 1 x USB 2.0 Header 3 x Fan Headers 1 x COM Header 1 x SPDIF Output Header 1 x Front Panel Audio Header Power/Reset Buttons Debug LED 1 x mSATA |
| Power Connectors |
1 x 24-pin ATX connector 1 x 8-pin 12V connector |
| Fan Headers |
1 x CPU Fan Header (4-pin) 1 x SYS Fan Header (3-pin) 1 x PWR Fan Header (3-pin) |
| IO Panel |
4 x USB 3.0 Ports 4 x USB 2.0 Ports 1 x HDMI 1 x D-Sub 1 x Gigabit Ethernet 1 x Optical SPDIF Output 1 x Clear CMOS Button 1 x Wifi Connector 1 x Bluetooth 2 x eSATA 3 Gbps Audio Ports |
| Warranty Period | 3 Years from date of Purchase (3yr parts, 2yr labor) |
| Product Page | Link |
Despite having WiFi, mSATA and extended PCIe 3.0 lanes, the ECS board is down on audio (Realtek ALC892 rather than ALC898 of others), lacking fan headers and also lacking video outputs, with a lot of people requiring DVI to D-Sub or DVI to HDMI connectors.
Biostar TZ77XE4—Visual Inspection
With memories of Biostar fresh in my mind from the 990FX roundup, I have another chance to tackle a motherboard from them. This one comes in at more of a premium than the other—at an MSRP of $169 it is not the cheapest board this time. However, it does seem to have learned some lessons with the PCIe layout at least, but in terms of features we are perhaps a bit lacking.
Biostar have characteristically been black and orange, and we see it here again on their top Z77 model, the TZ77XE4. Power delivery is essentially a 10+2 (CPU/iGPU) system with large brightly colored heatsinks to remove heat, both connected via a heatpipe. These heatsinks are set a little away from the Intel designated socket area, though the memory banks are right up against the boundary—with only two sticks of memory in the board there will be enough room for most of the beefiest air coolers.
In terms of fan headers, Biostar have unfortunately put much effort in here, with only three to play with—a 4-pin CPU fan header to the top right of the socket, and two 3-pin at the south end of the board. Anyone requiring headers for fans will have to resort to providing their own fan control.
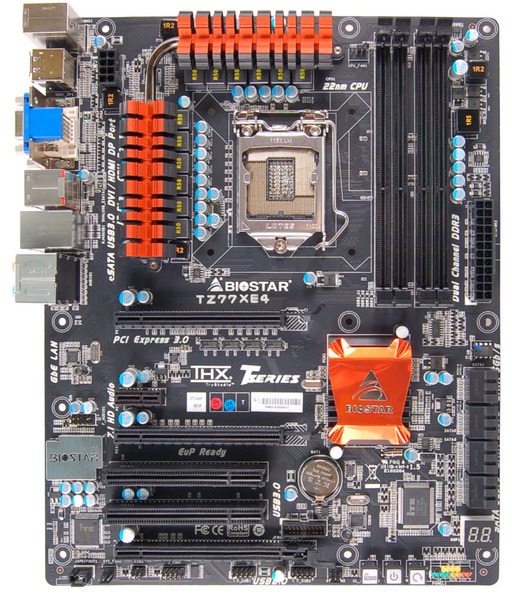
Along the right hand side, apart from the 24-pin power connector, we have a series of eight SATA ports—two SATA 6 Gbps from the PCH, four SATA 3 Gbps also from the PCH, and another two SATA 6 Gbps from an ASMedia controller. These are unfortunately not color coded, meaning users will have to double check every time that the SATA cable is going into the port as intended. Below these, we have a two-digit debug display for error reporting.
The chipset heatsink sports the bright orange Biostar color, but is rather small which could lead to it being warm to the touch. On the south side of the board, we are not exactly bursting with headers—aside from the fans, we have front panel headers, a pair of USB 2.0 headers, and power/reset/clear CMOS buttons. These buttons are all similar and next to each other, so I can just see myself accidentally pressing the wrong one from time to time. It is also important to note the location of a USB 3.0 header, just above the third full-length PCIe slot. This is a rather awkward place, and cements its use primarily for rear facing adaptors (as long as there is nothing in the PCI slot beside it).
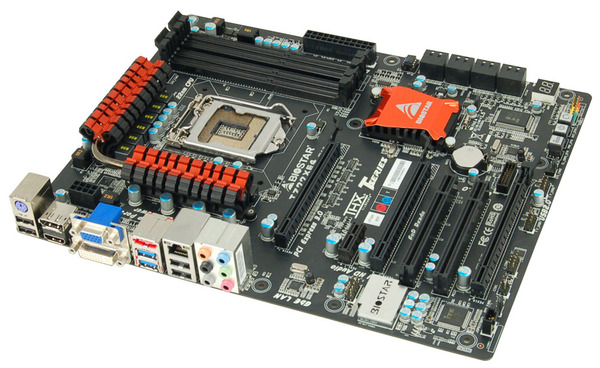
The PCIe layout is better than previous iterations, featuring an x16 (x8 in dual-GPU), x1, x8, PCI, PCI and Gen 2.0 x4. This leaves a space between GPUs, and a spare x1, PCI and x4 when dual GPUs are being used. Note we do not have a molex connector here, suggesting that Biostar are happy with the power delivery when the PCIe slots are in use.

For back panel functionality, we have a PS2 keyboard port, two USB 2.0 ports (black), DisplayPort, HDMI, D-Sub, DVI-I, eSATA, two USB 3.0 (blue), gigabit Ethernet, two more USB 2.0 (black), and audio jacks. I should stress that even though there is a DVI-I on the back panel, it does not accept analog signals by adaptor.
Board Features
| Biostar TZ77XE4 | |
| Size | ATX |
| CPU Interface | LGA-1155 |
| Chipset | Intel Z77 |
| Power Delivery | 10 + 2 + 1 + 2 (CPU/GPU/VCCIO/Memory) |
| Memory Slots |
Four DDR3 DIMM slots supporting up to 32 GB Up to Dual Channel, 1066-2600 MHz |
| Video Outputs | DisplayPort, HDMI, DVI-D, D-Sub |
| Onboard LAN | Realtek 8111E |
| Onboard Audio | Realtek ALC898 |
| Expansion Slots |
2 x PCIe x16 Gen3 (x16, x8/8) 1 x PCIe x16 Gen2 (x4) 1 x PCIe x1 Gen2 2 x PCI |
| Onboard SATA/RAID |
2 x SATA 6 Gbps (PCH), Support for RAID 0, 1, 5, 10 4 x SATA 3 Gbps (PCH), Support for RAID 0, 1, 5, 10 2 x SATA 6 Gbps (ASMedia Controller) 1 x eSATA 3 Gbps |
| USB |
4 USB 3.0 ports (2 back panel, 2 from headers) 8 USB 2.0 ports (4 back panel, 4 from headers) |
| Onboard |
4 x SATA 6 Gbps 4 x SATA 3 Gbps 1 x USB 3.0 Header 2 x USB 2.0 Header 3 x Fan Headers 1 x CIR Header 1 x SPDIF Output Header 1 x Front Panel Audio Header |
| Power Connectors |
1 x 24-pin ATX connector 1 x 8-pin 12V connector |
| Fan Headers |
1 x CPU Fan Header (4-pin) 2 x SYS Fan Header (3-pin) |
| IO Panel |
1 x PS/2 Keyboard Port 1 x eSATA 2 x USB 3.0 4 x USB 2.0 1 x DisplayPort 1 x HDMI 1 x DVI-D 1 x D-Sub 1 x Gigabit Ethernet Audio Jacks |
| Warranty Period | 3 years from date of sale |
| Product Page | Link |
Aside from the extra SATA controller, PCI slots, Power/Reset buttons and the use of all four display outputs, there's nothing much 'extra' that Biostar have put on the board which isn't already in the default chipset. This could perhaps be their downfall when it comes to conclusions after testing.
Features To Watch Out For
A few of the products listed here have some exciting new features and technologies, and the respective companies are quite proud of these. A lot of the time when a company advertises a 'unique' feature, it is a load of marketing fluff, but this time round I think a few of them are worth a mention.
ASRock BIOS Update from Internet within BIOS
ASRock have a new software technology coming along to aid BIOS updating. Their feature, as I've been told, will allow users to press a button in the BIOS which will let the motherboard connect to the internet, get and download the latest BIOS, then apply it. All at the touch of a button. Sounds good, right?
A little caveat: it will be for Ethernet wired connections only, where programs are not needed to access the internet, or through an ICS terminal. This may not be available with launch BIOSes, but should be a feature across their Z77 range soon.
ASUS T-Topology Memory
ASUS have outsmarted Intel and have decided to take their technology to another level. This is specifically in terms of memory, and how it is routed through the motherboard. Typically, routing through the memory would occur in a daisy chain type environment, whereby if data was in the furthest memory slot away from the board, it would take longer to get to the CPU, and perhaps cause synchronization issues and delays—all reads had to be done serially between sticks in the same channel.
With ASUS' new technology, they are essentially parallelizing memory reads that are commonly done serially between memory banks. This is part of their 'T-Topology' memory subsystem, which allows synchronization to be dealt with in hardware. This, according to ASUS, should allow for up to a 15% memory overclock beyond the previous methodology, where the motherboard is the limiting factor. In this circumstance, we could be seeing some new memory records being set in dual channel memory.
I have probed ASUS for specific details on how this works, and I am awaiting a response. I hope that by the time we are allowed to release our Ivy Bridge results on Z77 that I will have something more technical to pass on to you about how this works.
ASUS UASP Technology
While not strictly speaking a new technology, ASUS is the first to implement new USB protocols in Windows 7 under Intel platforms. Current USB protocols are very limited, insisting transfers are serial and rigorously monitored. ASRock first broke that with their XFast USB software (note, this was licensed to ASRock), which essentially implemented a new driver protocol. This had beneficial results on USB 2.0 and USB 3.0 transfers, both peak and in regular use. However, ASUS have gone one-step further.
Their software, enabled in X79, implements UASP, which stands for 'USB Attached SCSI Protocol'. This allows the operating system to use the SCSI command set for transferring data across the interface—this at the basic level involves command queuing, out of order execution, and hardware support for streams across USB 3.0.
To take advantage of UASP required a UASP compliant device, typically a modern USB 3.0 device using certain controllers. Unfortunately, that is a requirement of the protocol, not of the hardware itself. But hopefully this time around we will be able to test just how good it is, and whether your next USB 3.0 device will be able to take advantage of an ASUS only feature.
Of the nine boards we hope to cover across the Ivy Bridge release, we have a large range of prices and feature sets to consider. Styling seems to be of great importance to these companies, especially when they either all follow a similar color scheme or decide to spray everything with a coat of gold paint!
Today you may see many reviews with Sandy Bridge results being posted. We have decided to wait until we are allowed to publish Ivy Bridge results in order to fully test these boards to the limit, and show how they respond under the latest technology (and perhaps after a BIOS update or two). However, important chipset information is at our hands and we can discuss important changes to motherboard design—the long awaited addition of PCIe 3.0 and native USB 3.0 to the Intel mainstream chipset, but also to new technologies, such as Virtual V-Sync and HyperFormance that comes with Virtu MVP, or just how good ASUS' new memory topology might be.
|
ASRock Z77 Extreme4 |
ASRock Z77 Extreme6 |
ASUS P8Z77-V Pro |
ASUS P8Z77-V Deluxe |
|
| Price | $141 | $177 | TBC | TBC |
| Size | ATX | ATX | ATX | ATX |
| Power | 8 + 4 | 8 + 4 | 12 + 4 | 16 + 4 |
| Video |
HDMI 1.4a DVI-D D-Sub |
DisplayPort HDMI 1.4a DVI-D D-Sub |
DisplayPort HDMI DVI-D D-Sub |
DisplayPort HDMI |
| LAN | Broadcom BCM57781 | Broadcom BCM57781 | Intel 82579V |
Intel 82579V Realtek 8111F |
| Audio | Realtek ALC898 | Realtek ALC898 | Realtek ALC892 | Realtek ALC898 |
| Mini PCIe | No | Yes | No | No |
| Wifi | No | No | Yes | Yes |
| SATA 6Gbps | 2 + 2 | 2 + 2 | 2 + 2 | 2 + 2 |
| SATA 3Gbps | 4 + 0 | 4 + 0 | 4 + 0 | 4 + 0 |
| USB 3.0 | 6 | 6 | 8 | 8 |
| USB 2.0 | 8 | 8 | 10 | 8 |
| Fan Headers | 6 | 6 | 6 | 6 |
| SLI/XFire | Two GPUs | Two GPUs | Two GPUs | Two GPUs |
| NA Warranty | 3 Years | 3 Years | 3 Years | 3 Years |
|
Gigabyte GA-Z77X-UD3H Wifi |
Gigabyte GA-Z77MX-D3H |
MSI Z77A-GD65 |
ECS Z77H2-AX |
Biostar TZ77XE4 |
|
| Price | TBC | TBC | $180 | $319 | $169 |
| Size | ATX | mATX | ATX | ATX | ATX |
| Power | 6 + 1 + 2 +1 | TBC | 8 + 2 | 12 + 2 | 10 + 2 |
| Video |
DisplayPort HDMI DVI-D D-Sub |
HDMI DVI-D D-Sub |
HDMI DVI-D D-Sub |
HDMI D-Sub |
DisplayPort HDMI DVI-D D-Sub |
| LAN | Atheros | Atheros | Intel 82579V | Realtek 8111E | Realtek 8111E |
| Audio | Via VT2021 | Via VT2021 | Realtek ALC898 | Realtek ALC892 | Realtek ALC898 |
| Mini PCIe | Yes | No | No |
mSATA + mini PCIe |
No |
| Wifi | PCIe Card | No | No | Yes | No |
| SATA 6Gbps | 2 + 0 | 2 + 0 | 2 + 2 | 2 + 0 | 2 + 2 |
| SATA 3Gbps | 4 + 0 | 4 + 0 | 4 + 0 | 4 + 0 | 4 + 0 |
| USB 3.0 | 8 | 4 | 4 | 6 | 4 |
| USB 2.0 | 6 | 10 | 10 | 6 | 8 |
| Fan Headers | 5 | 3 | 5 | 3 | 3 |
| SLI/XFire | Two GPUs | Two GPUs | Two GPUs | Three GPUs | Two GPUs |
| NA Warranty | 3 Years | 3 Years | 3 Years | 3 Years | 3 Years |
There is a lot to digest regarding Z77. If you are planning an Ivy Bridge build, we want to hear what you want out of your boards or which ones you are considering to purchase. A little while after these boards, we should be tackling some rather interesting mini-ITX ones as well, so stay tuned!

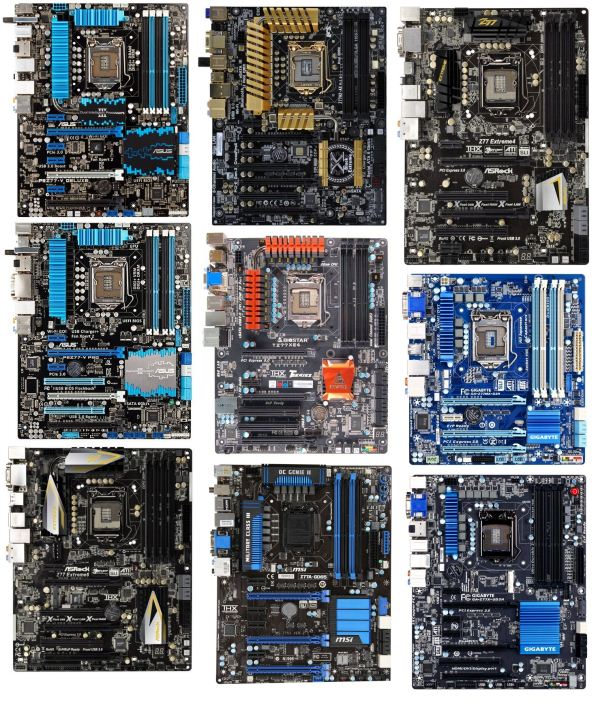


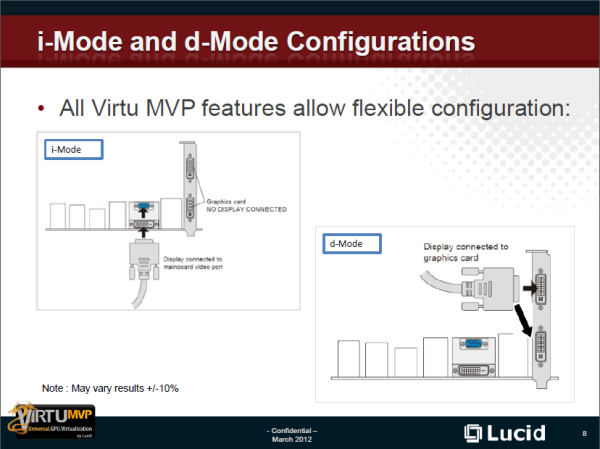
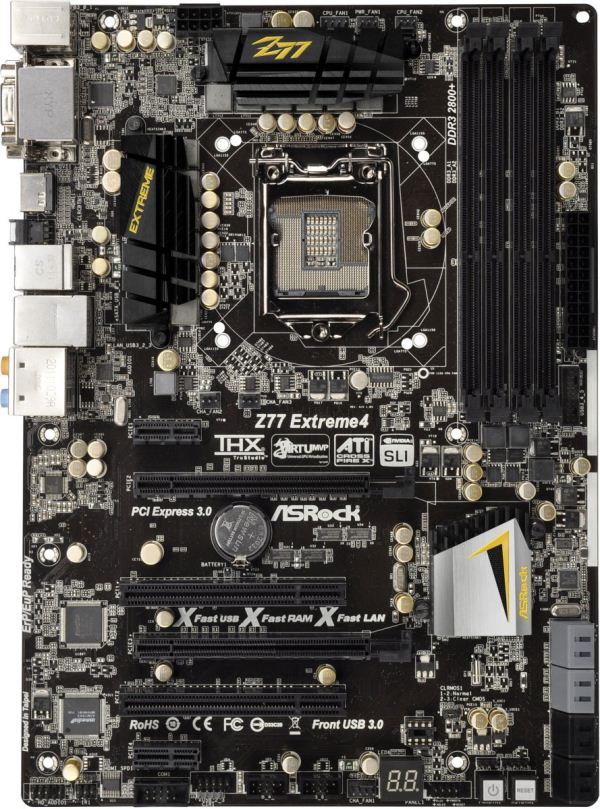
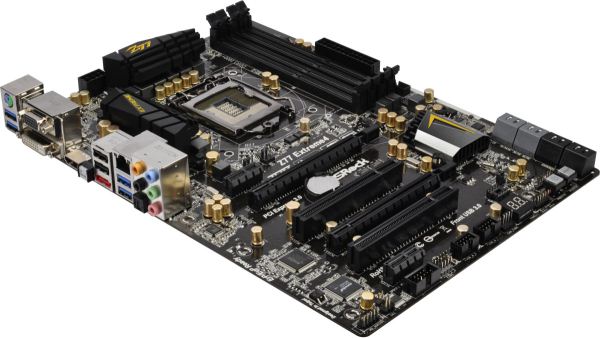
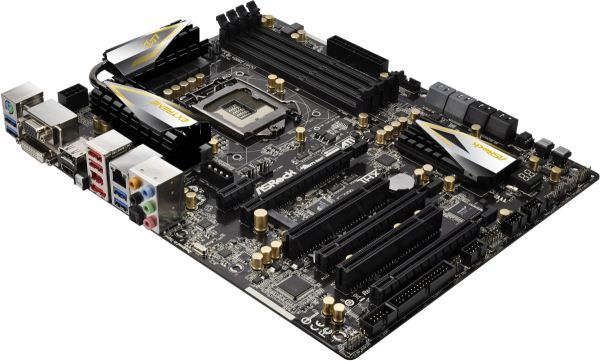
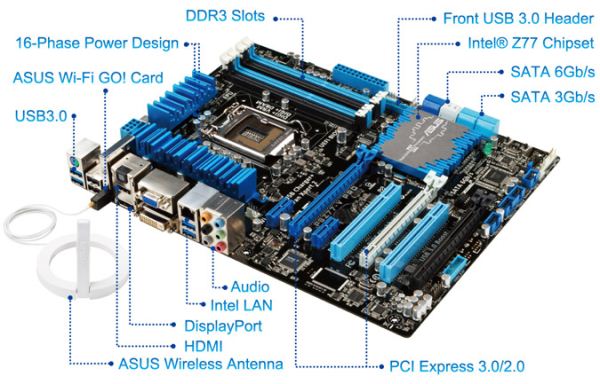
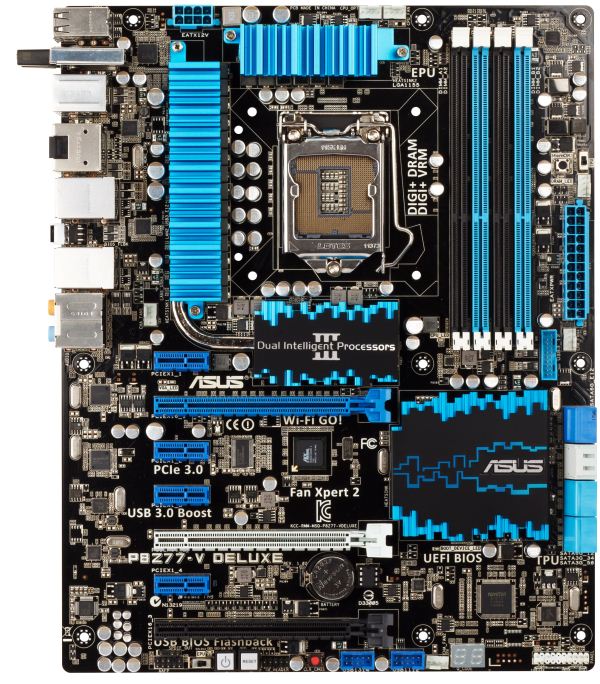
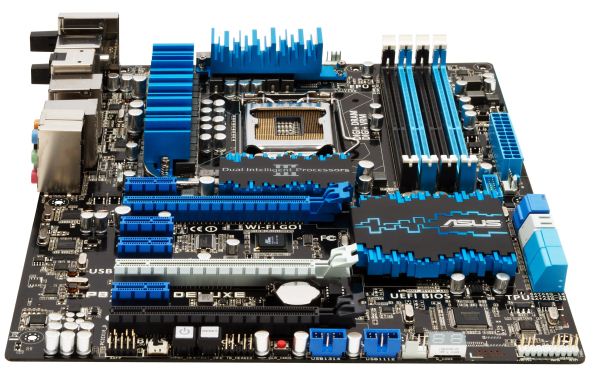
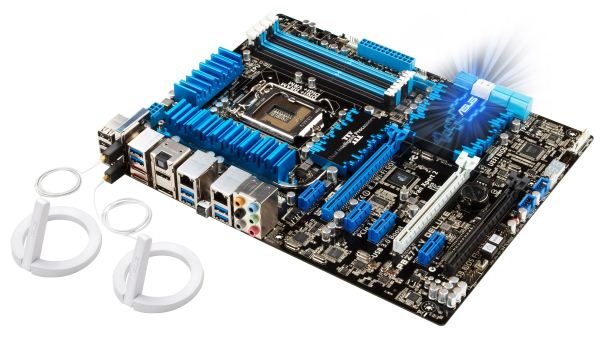

_575px.png)
-B_575px.png)
-bb_575px.png)
_575px.png)
-B_575px.png)
-bb_575px.png)
