Intel Z87 Motherboard Review with Haswell: Gigabyte, MSI, ASRock and ASUS
by Ian Cutress on June 27, 2013 8:00 AM EST- Posted in
- Motherboards
- Intel
- MSI
- Gigabyte
- ASRock
- Asus
- Haswell
- Z87
- Shark Bay
- Lynx Point
While Anand deals with the detailed analysis of the Haswell CPU architecture and performance, a CPU is almost nothing without an accompanying chipset to provide connectivity and an interface with which to interact with the CPU. For our Z87 launch article all the major manufacturers sent us a motherboard to test, around the $200 mark, in order to showcase what we as users can expect from them in a reasonable price bracket. We also have managed to get hold of more of the nitty-gritty behind the Z87 platform, which has several features worth noting and talking about.
The Z87 Chipset
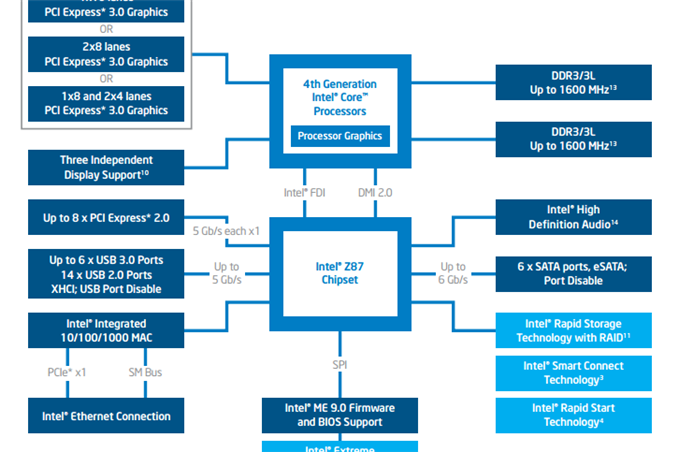
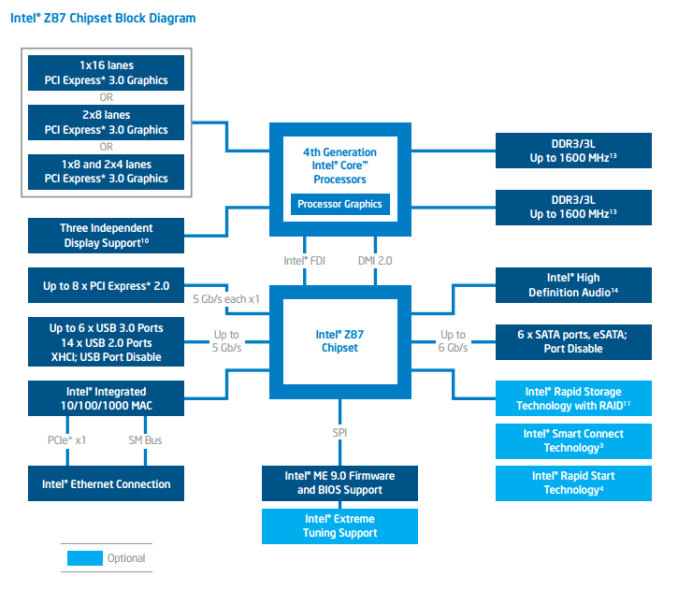
As consolidation occurs with parts of the system into the CPU, there could potentially be fewer and fewer opportunities for motherboard manufacturers to express their own individual take on each motherboard. Nonetheless, this has not stopped them coming up with gaming ranges, overclocking ranges, and using any number of controllers to provide additional functionality above and beyond the native Z87 chipset. Here is the chipset diagram for Z87 in a nutshell:
The first things to note are the lane allocations – we have a similar layout to Panther Point (Ivy Bridge) for 1x16, 2x8 or 1x8+2x4. The processor now takes control of the digital display outputs rather than the PCH, and can also deal with DDR3L memory. Natively the processor is set at 1333/1600 MHz, however from internal testing and from manufacturers almost every K-series SKU should handle DDR3-2400 at stock CPU speeds with ease.
On the chipset itself, we have a few new features – it is worth noting that it says ‘up to 8x PCIe 2.0, up to 6x USB 3.0 and up to 6x SATA 6 Gbps ports. This is a feature new to the consumer chipset range called Flex I/O.
Flex IO
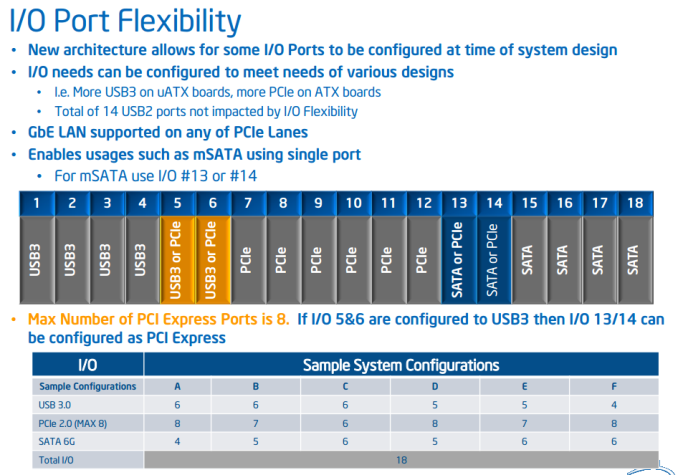
Typically with a motherboard chipset we have a fixed number of SATA ports, a fixed number of PCIe lanes and a fixed number of USB ports. This is due to the fact that the PCH has them automatically wired in, and it is up to the motherboard manufacturer to connect the traces up within the Intel specified tolerances. Flex IO changes all this, into a mini-FPGA style arrangement, where several of the ports available can be configured to SATA 6 Gbps, PCIe or USB 3.0.
We get a total of 18 points in the architecture, of which four are USB 3.0, six are PCIe and four are SATA 6 Gbps. That leaves two pairs of two – the first pair can be assigned to USB 3.0 or PCIe, and the second pair can be assigned to SATA 6 Gbps or PCIe. The only limitation is that there can only be a maximum of eight PCIe 2.0 slots.
This allows motherboard manufacturers to position their SKUs very nicely – the PCIe 2.0 lanes can be split into extra USB 3.0 or SATA 6 Gbps controllers as well, meaning that on high storage platforms the manufacturer can go full out SATA 6 Gbps with controllers. There also remains the possibility that a motherboard manufacturer could assign all eight PCIe 2.0 lanes into a PCIe slot, giving that slot better bandwidth for multi-GPU scaling (at the expense of not being able to use those lanes for anything else such as PCIe x1).
The Intel Z87 Motherboard
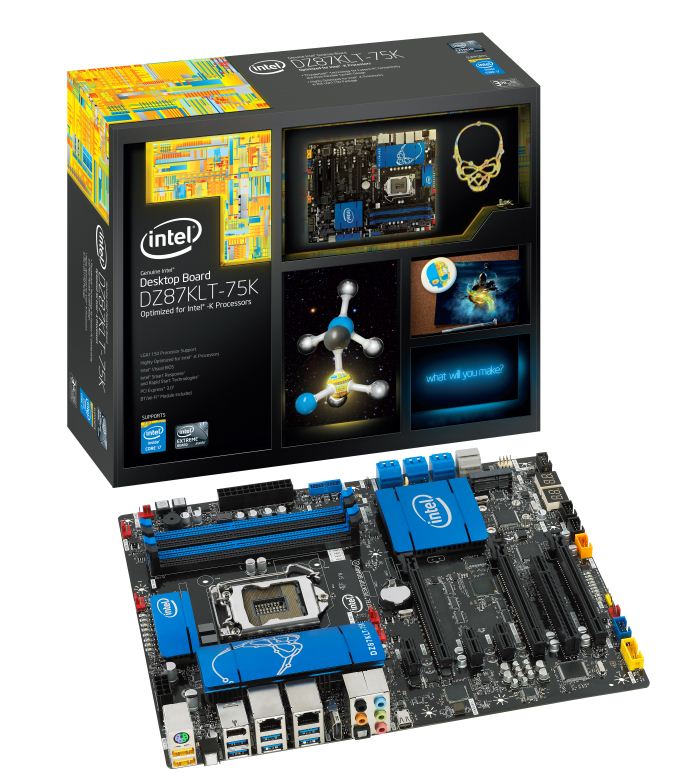
Intel is still in the motherboard business for a couple of years, despite announcing their intention to leave the consumer motherboard market space. Like AMD, when it comes to media preview kits, they may call upon one of the motherboard manufacturers to supply the motherboard to send out of reviews. Until that day, we still get motherboards from Intel. Our Intel motherboard sample is in Anand’s hands right now for the CPU and IGP end of our motherboard coverage, but it looks a little something like this:
The reason why I bring up the Intel DZ87KLT-75K is that we have access directly to its chipset diagram:
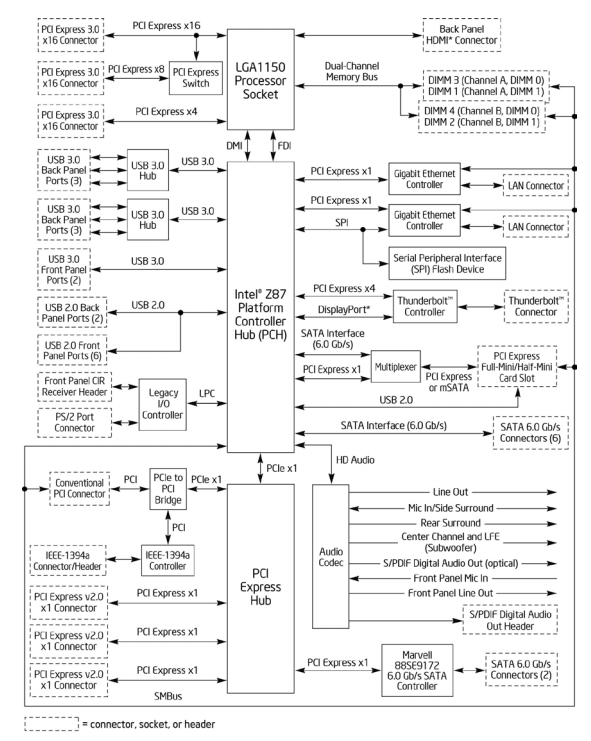
Perhaps annoyingly, this is a little misleading – the chipset diagram suggests that we have a 20 PCIe lane processor when in actual fact the motherboard is an x8/x4/x4 layout. We can tell this because the PCH has all the 8x lanes being used – four for a Thunderbolt controller, two for Gigabit Ethernet, and one each for a USB 3.0 controller and a SATA 6 Gbps. This allows the motherboard to have a total of eight USB 3.0 and eight SATA 6 Gbps, which from what we have seen in our Z87 motherboard preview, is not too far-fetched.
What about H87 and others?
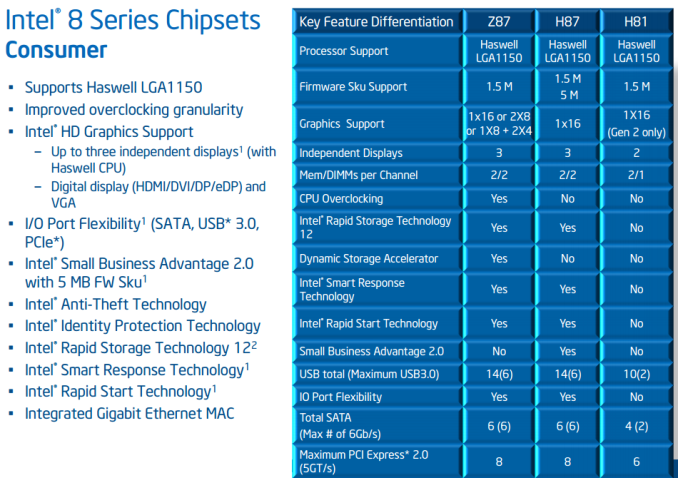
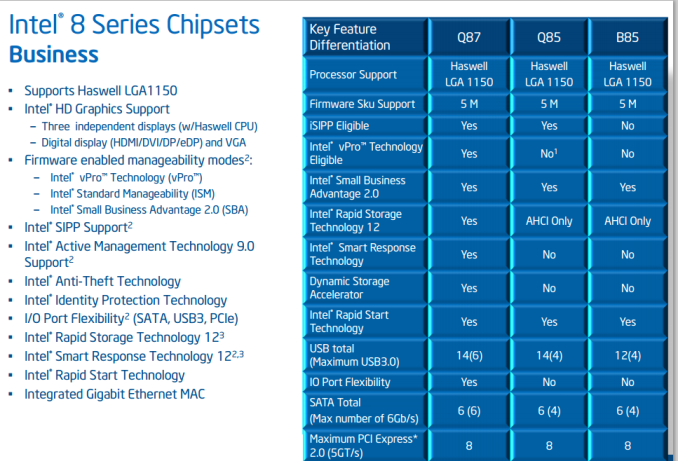
Intel is launching several chipset variations for Haswell processors, including H- for consumers as well as B- and Q- variants for business. The salient comparisons are as follows:
With H87 we lose CPU multiplier overclocking and multiple GPU configurations from the PEG lanes on the CPU. H81 takes it a little further, restricting displays, limiting the PCIe to Gen 2, and removing features such as RST, SRT and Flex IO.
Business chipsets follow on from the H87 chipset in terms of overclocking/GPU allocations, but typically come with business level features and support. For example, vPro needs a Q87 chipset, and B85 has fewer USB ports in total as well as not being iSIPP (Intel Stable Image Platform Program) eligible.
What about Display Configurations?
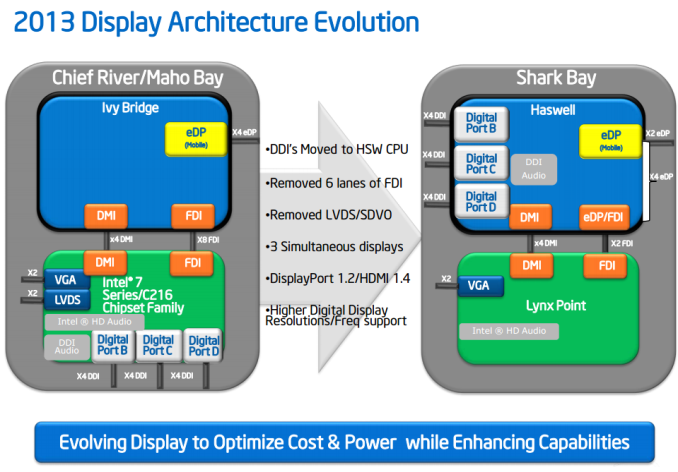
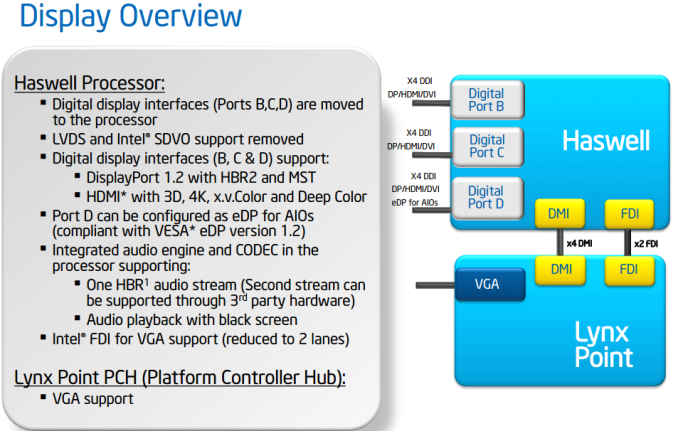
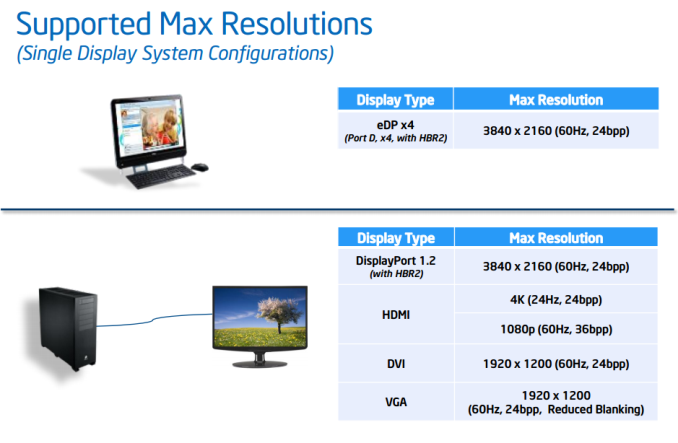
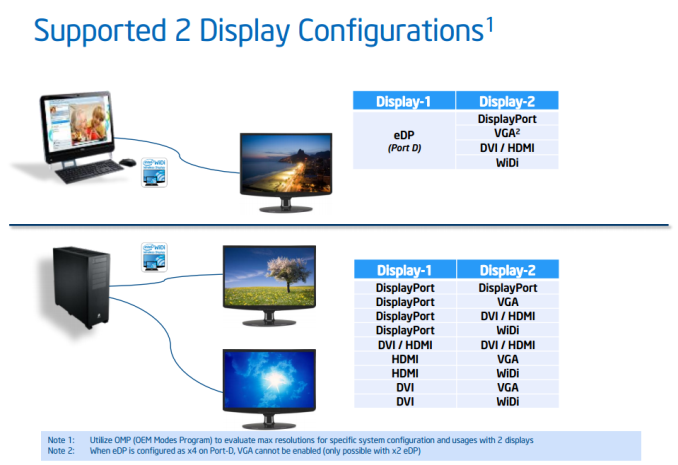
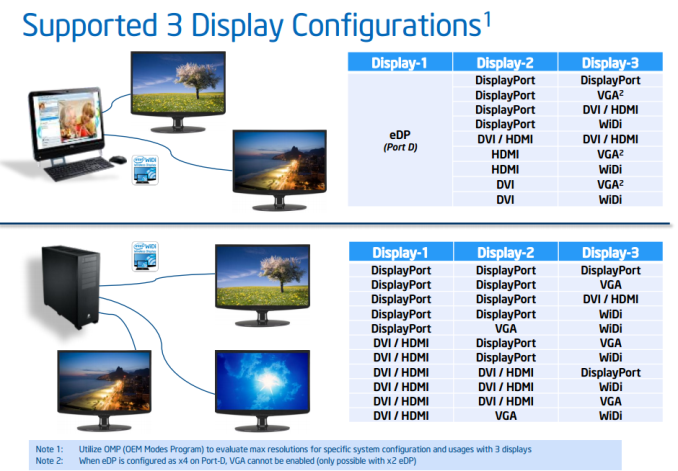
With “Shark Bay” (the platform combining a Haswell CPU and Lynx Point 8-series PCH), the ecosystem has moved the digital displays from the PCH to the CPU, leaving the VGA behind. This allows the system to integrate the S0ix power states a lot better than before, reducing idle power consumption and improving wake from sleep times (a main goal of Shark Bay). It also in some way allows Intel to have more control over the digital display allocations, especially dealing with WiDi. The platform now looks like:
Arguably this may result in increased power consumption on the CPU, at the benefit of lower power consumption at the PCH (down 10%) which has to have a heatsink attached. But the digital ports, like with Panther Point, can be configured to a wide variety of digital outputs in a similar way to Flex IO.
This is all from the processor itself of course – users with discrete GPUs will have different options from the GPU side of the equation.
What Did I hear about an Integrated Voltage Regulator?
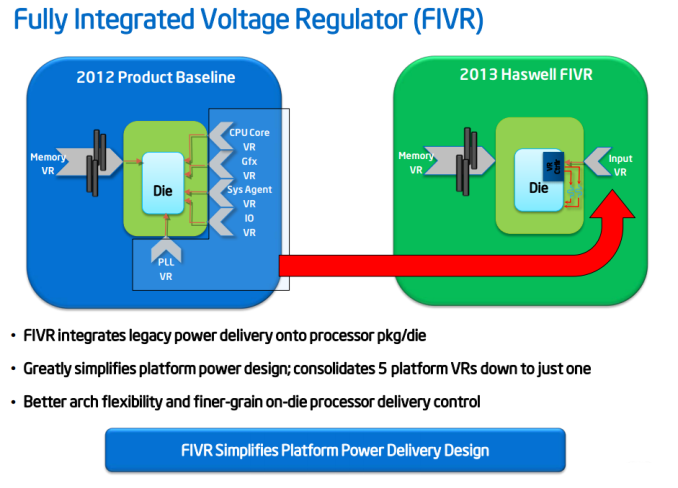
As part of the consolidation, Intel is moving the voltage regulators onto the CPU to deal with various parts of the system onto the CPU itself. This means from a user perspective there should be less variation from the motherboard aspect in dealing with voltage inputs and quality, as only voltage needs to be pushed into the CPU for all the CPU features. Nonetheless it still means users will have to negotiate the internal voltages such as VCore in order to provide good overclocks. For extreme overclock users, it adds another element into potential CPU variation, meaning that searching for a good CPU may be a little bit more difficult.
Anand has gone into greater detail in his Haswell coverage, but this also means that the integrated GPU can increase its speed and voltage without having to ‘wake’ the CPU part of the system up from a low power state unless needed.
Enough Already, Where Are The Motherboards?
For our first Haswell motherboard review, I asked the main manufacturers of such wondrous items to supply me with a motherboard around the $200 mark which would form the cornerstone of the high-end mainstream sales. Both our Sandy Bridge and Ivy Bridge initial coverage worked very well at this price point, and I begged the manufacturers to send samples to me as early as possible to we could pass more details on to our readers. While deadlines are tight, we managed to take on the following:
- Gigabyte Z87X-UD3H (MSRP $180, US Sale to $170)
- MSI Z87-GD65 Gaming (MSRP $190)
- ASRock Z87 Extreme6/AC (MSRP $220, US $20 Rebate for June)
- ASUS Z87-Pro (MSRP $210)
We also have another set of ASRock motherboards in to test, including the OC Formula and mini-ITX models, but unfortunately time to review these before launch day ran out, so they will be covered over the coverage.
First up to review is the motherboard that arrived in our offices first for testing – the Gigabyte Z87X-UD3H!






58 Comments
View All Comments
ShieTar - Thursday, June 27, 2013 - link
Is there a special reason not to test the POST times and DPC latency of the Gigabyte Board? Its power consumption is quiet impressive, and whatever design measures have been used to achieve it do not seem to negatively affect the overall performance. So it would be interesting to complete the picture with the two measurements which are missing.IanCutress - Thursday, June 27, 2013 - link
DPC Latency on the Gigabyte during testing was jumping around a fair bit, hitting 800+, though that is more likely due to the early BIOS revision. I need to run the POST test (as the results are strangely missing from my database) as well as the DPC test on a newer BIOS. Since I started testing almost every manufacturer has released newer BIOSes (as is always the way coming up to a launch) and I really have to lay the hammer down as testing a whole new BIOS takes a good 30 hours or so start to finish, so when I'm locked in that's it. That in a way does give an unfair advantage to the board I test last, but there's not a lot else I can do. I am still getting emails of BIOS updates for these boards as of yesterday.Ian
tribbles - Thursday, June 27, 2013 - link
Am I wrong in thinking that Gigabyte hasn't been doing well in the DPC Latency Test since Z77? If so, that's kind of surprising, since Gigabyte seems to be a "go-to" brand for digital audio workstation builders.IanCutress - Wednesday, July 10, 2013 - link
I retested the UD3H on the F5 (public) BIOS, and it scored 164. The two next boards I have in for review got 160 and 157, which points fingers to the DPC on Haswell being 150+ regardless of motherboard. This might be a fundamental issue.Timur Born - Saturday, July 27, 2013 - link
Run Prime95 (or turn off CPU power features) while measuring DPC latencies to see how much CPU power saving features affect DPCs.jhonabundance - Thursday, August 28, 2014 - link
great share http://asus.comjhonabundance - Thursday, August 28, 2014 - link
this is the best share http://asus.comRick83 - Thursday, June 27, 2013 - link
Maybe a bad choice to use two different ways of graphing the Rightmark results.Being consistent with regard to cutting off the irrelevant bit of the graph makes it a much easier read.
Now it appears at first glance as though the Gigabyte board is much better in THD+N, simply because the differences were so minuscule in the dynamic range bit.
On another note: Shouldn't it be more interesting to use a standardized input instead of the input of the board? In the current protocol a good output could be handicapped by a bad input, and conversely. For most users the output is much more important than the input, so it might be better to test it independently? I would recommend using a USB soundcard as an easy means of doing this test on the same machine, without changing the setup protocol too much.
And finally - I seem to remember Rightmark results for earlier reviews - it would be interesting to have those (or maybe a reference soundcard?) as comparison in the same graph. After all, for DPC you maintain a large cross-platform table as well.
Nice thorough initial review, those nitpicks withstanding.
IanCutress - Thursday, June 27, 2013 - link
Unfortunately I can't adjust the engine to represent from 0 for negative values, I don't have access to the low level options. I forwarded it on as an issue.I'd love to use a standardized input with RMAA. I guess it would be good to get a sound card with an input that supercedes the output of the motherboard and put it through that way, and hopefully there won't be a driver conflict along the line. I'll see what I can do to get in the hardware for that, although many soundcards are designed more for output and the input dynamic range/distortion might be the limiting factor as is the case on motherboards. Something like the Xonar Essence STX has a 118 dBA input with -113 dBA THD+N which might be a good starting point.
Our RMAA testing for Z87 has changed a little from Z77 to make it more of an efficiency test rather than an out-the-box test as audio is such a varied playing field. RMAA is very sensitive to certain windows settings and volumes for example such that with the right combination it was very easy to show A>B or B>A depending on how the OS felt it should be set up. The new testing regimen for RMAA should iron out those issues but the results are not exactly comparable to Z77 for that reason. There are so many wrong ways to set up RMAA it can be difficult (and a learning experience) to get it right.
Ian
popej - Thursday, June 27, 2013 - link
Nice to see you are planning steps in right direction. Using reference card for measurements is a proper solution. Be aware, that separate card add complications to the test, for example you will have to take care about ground loops and signal level matching. Professional card with balanced input could help a lot.