
Original Link: https://www.anandtech.com/show/2677
If you're one of those people in search of the holy grail of audio fidelity, there's no doubt that using a PC as a complete front-end solution has probably crossed your mind at one time or another. Saving your entire music library to a hard drive and having all your favorite tracks just a few clicks away is certainly appealing, but what about the sound playback quality? Can it compete with dedicated disc transports costing thousands of dollars?
If you haven't made the move to using a PC as your front-end player, perhaps you've been deterred by the fact that PC's lack the dedicated audio engineering that we find in high-end disc spinners. Or, like me, you brought a cheap CD player and modified it to the nines and are now reluctant to invest your time in starting afresh. Such was my case until a couple of months ago when my aging Pioneer PD-S801 gave up the ghost, leaving me scrambling to find a suitable replacement.
I'd invested so much time into the PDS-801; just about every aspect of the machine had been changed somehow. Modifications to the unit included a directly heated triode output stage, fitting a low jitter master clock, replacing all audio critical electrolytic capacitors with ultra low ESR types, and replacing the stock power circuitry with ultra low noise wide bandwidth voltage regulators. Most of the inspiration for these modifications came from cruising DIY audio forums, where other obsessive-compulsive audio crazed folk like me tend to hang out.
Frequenting such places again in my time of need, I noticed that the buzzword in audiophile circles regarding ultimate digital playback now revolves around using PCs to store and playback music rather than the very best standalone transports that money can buy. It seems the buzz is primarily about three things. The first is the prospect of bit perfect data retrieval when using a suitable lossless format to burn your compact discs to a hard drive. The second is using DRC (digital room correction) to help compensate for listening room resonance and reflections. The third, using software based digital crossovers, thus overcoming passive crossover insertion losses and allowing for a more cohesive integration of drive units in multi-driver speakers.
My previous experiments using a PC with mid-budget consumer grade soundcards fell short of providing the resolution, sound staging, and detail retrieval of the modified Pioneer player. I'd put the differences down to the rampant levels of noise present inside of a PC case. After all, when it comes to soul-stirring audio reproduction, ultra low noise clean DC power is a must, and that's not something that we associate with your typical computer PSU. Computer PSUs are primarily designed to supply huge amounts of current on demand, within a certified noise band of course, but nowhere near the quality we find in a dedicated linear power supply. Hence, serious audio playback requires a soundcard designed to deal with the shortcomings of the PC's internal environment.
This leads us back towards pro audio gear used by recording engineers such as the M-Audio and Lynx range of soundcards. Most of the physical differences between pro audio solutions and your basic consumer oriented product can be put down to better components, trace routing, voltage regulation, and power supply decoupling. In addition, the pro cards feature low latency drivers that bypass Microsoft's K-Mixer and can be used with specialized software allowing all sorts of signal rerouting and manipulation. This adds up to making the pro audio offerings flexible enough for people wanting to engage DRC in a fully customized multichannel setup.
Although user reports on some of the internal pro soundcards are very favorable, my interests are stoked by external affairs. An external box presents far more interesting possibilities and flexibility to me when it comes to power supply and output stage modifications. Both are things that I'm too twitchy to leave alone and unchanged until the unit either dies under the knife or gives me what I want in terms of sonics.
One such solution revolves around using the Texas Instruments 270* range of USB - I2S and S/PDIF converter chips, which are used in several commercial outboard DACs that are rumored to be capable of upstaging even the most expensive standalone players. Better still, a range of attractively priced DIY DAC kits based on the Texas Instruments receiver chips are available that utilize levels of engineering found in commercial products costing much more. The unfortunate upshot with the TI 270* family of converters is that they're designed for two-channel use only. Those demanding external multichannel audio units will have to look towards Pro FireWire audio boxes or standalone units like the Behringer DCX2496, which has more functionality than most of us will ever need. If two-channel playback is sufficient then Logitech's Squeezebox music streamer also deserves a mention. Both the DCX2496 and Squeezebox are products that have been thoroughly adulterated by DIY masterminds and there are plenty of commercial or DIY modification packages available for both units that elevate their performance.
We aim to put some of these products to the test in the coming months while also focusing on commercial loudspeakers, disc players, and amplifiers for a range of budgets from pocket friendly to the spare-no-expense league. Today, we will take a brief look at two DIY DAC kits that we've built up and have been subjectively listening to for the past few weeks. We'll also be looking at PC-based DRC in the form of a software package called Audiolense 3.0 using some open baffle single driver speakers from 3D Sonics. If any of this tomfoolery interests you, read on....
The Test System
Before we go on to look at some of the PC software and hardware out there, I'll offer up a quick overview of the test system. Some of the components used really are out on a limb with price tags that are not for the faint of heart. In audiophile currency, I probably have what amounts to a mid-budget system. If your interest is in low budget products, be warned that the rest of this page will probably make your stomach churn. However, you've not been forgotten and we will add a few suggestions here and there should you have champagne tastes on beer budgets - as most of us probably do, especially in this time of credit crunch.
Speakers
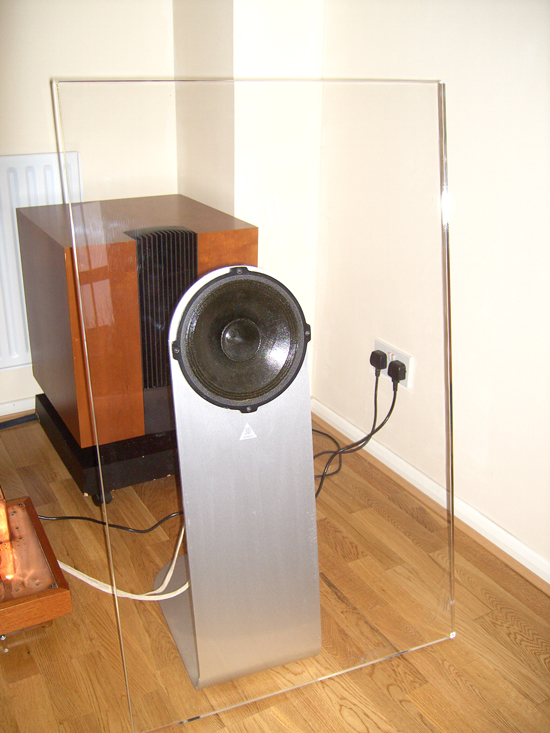 |
Real Hi-Fi owner and Supravox distributor Matthew Jameson was kind enough to provide us with a pair of test speakers based upon Supravox Signature Bicone Drivers known as the Transparence from a company called 3D Sonics. The Bicone Signature driver is a high efficiency (claimed 96dB sensitive) wide bandwidth design featuring a whizzer cone to supplement high frequency reproduction while the main cone takes care of the rest. The parameters of these drivers make them eminently suitable for an open baffle design like the Transparence.
If you keep your ear to the ground in loudspeaker circles, you'll know that open baffle loudspeakers have made a marked resurgence over the last five years or so. One of the chief perpetrators of this revival was a fellow named Throsten Loesch. Thorsten publicized his build of the Supravox Bicone Sig's using the very design that went on to become the 3D Sonics commercial venture. The remarkable simplicity was just what many in the DIY audio community were looking for: an easy to build high performance loudspeaker that could use a variety of drivers according to budget. I had the pleasure of listening to these speakers around five years ago at Thorsten's house; needless to say, it was an experience I never forgot. The absence of a walled cabinet allows the sound to fly out in all directions creating a soundstage that simply makes the loudspeaker drivers disappear.
All good things come with a slap around the cheeks and here's the part that the standard "boom 'n tizz" audio loving public won't like: the price tag is around £2400 UKP for a pair of these beauties. In audiophile markets, a price tag like this is hardly sweat inducing as there are plenty of high-end designs that cost multitudes more. If you are worried about the price, there's no reason to fret as DIY'ing a pair yourself that should get within 95% of the commercial model is not out of the question.
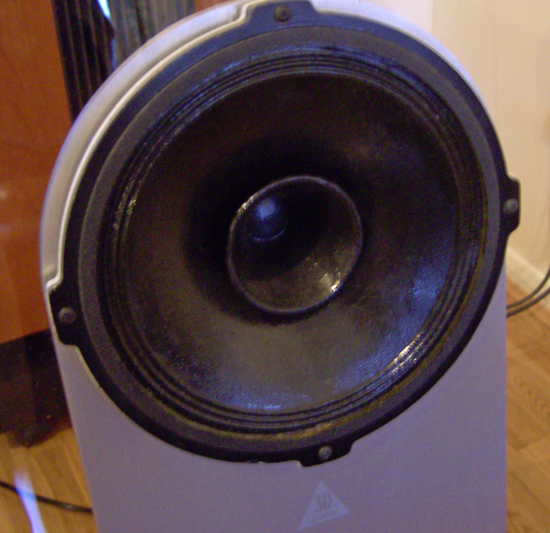 3D Sonics makes an in-house change to the drivers that involves coating them with a few layers of C37 lacquer to humanize the sound. |
Stock signature Bicone drivers are available for DIY endeavors from Supravox USA, Supravox France for the EU, and direct from Real Hi-FI for the UK at around a third of the cost of the "ready to go" Transparence. If that's still too much for you, another door is open by using the budget friendly Visaton B200 driver with suitable baffle adjustments to suit its parameters.
The Transparence design is fiendishly simple: a single driver in a 6'x4' acrylic baffle that uses an aluminum L-bracket as a stand and as a means of providing additional rigidity to the baffle. There's no crossover as the driver covers the range of 50 Hz to 15 KHz on its own. That's most of the audible range covered by a single point source. While the top-end extension is enough even for super ears, the low-end obviously needs augmenting with a subwoofer for bass heavy music. For this purpose I use a Linn AV 5150 subwoofer crossed over at around 48 Hz that integrates very well with these speakers, especially when we use DRC to level some of the room response abnormalities.
Whether or not you have the financial clout to buy the fully fledged 3D Sonics Transparence, it's certainly worth investigating the sonic landscape that open baffle designs can create. The availability of drivers for just about every budget leaves the onus of their use squarely in the hands of the DIY'er. Don't pass up the chance to try them out.
Amplifiers
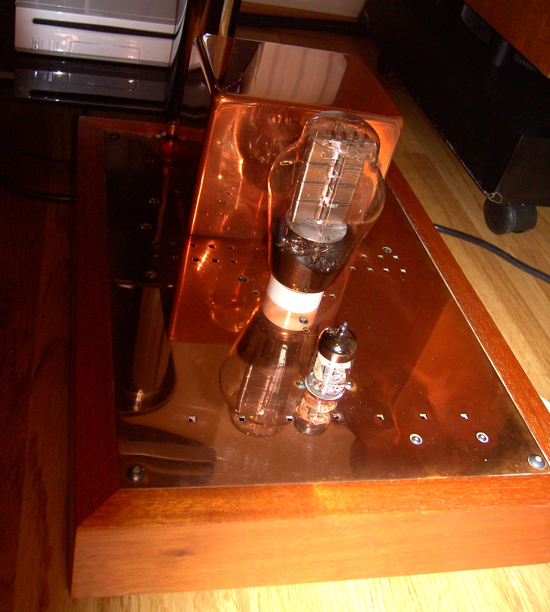 Again a little out on a limb, I'm a fan of Single Ended Triode amplifiers. |
Welborne Labs had a pair of Yote 300B amplifiers in need of a little TLC listed in their bargain bin at $1000. The simple addition of tubes and a couple of plate chokes was enough to get them both working again and they sound sublime. The 96dB sensitivity of the Supravox driver marries in well enough with the 8W output of the 300B tubes. While 8W does not sound like a lot compared to the power output of most solid state amps, it's more than enough to drive the Supravox drivers to ear splitting levels. I seldom need more than 85dB or so at the listening position, so can barely account for 1W of power from the amps.
The remarkable simplicity of SET amplifiers means that they reveal every nuance of detail from the source and throw an utterly convincing soundstage that's full of texture and tone. While SETs are not everyone's cup of tea, partnered with the right speakers they manage insight and dynamics that other topologies seem to smear. I have found the addition of these amplifiers driving the 3D Sonics speakers to be revealing of almost every change I have made to upstream components, making them a perfect base to use as a test system.
A Stevens & Billington transformer volume control provides volume attenuation rather than using software level volume controls in Vista. Unfortunately, software based volume controls attenuate the signal in the digital domain by dropping bits, which can lead to a loss of resolution as soon as the volume is moved below maximum output. I've found transformer based volume controls to be very close to sounding neutral, even outperforming shunt volume control made up entirely of 0.1% tolerance laser-cut metal film resistors.
Lastly, I suppose I should mention cables. Despite my attitude towards other components, I don't do funky high-cost cables and all the fuzz associated with them. For speakers, I use a single strand of solid core 24-gauge silver covered in a simple cotton jacket. The whole shebang costs a few dollars per foot from most good audio DIY outlets and sounds fine to my ears. Interconnects are made up using either Cat 5 cable or suitable solid core coax. Power cords are all generic off the shelf types, no special plugs or dielectrics needed.
The PC
There's nothing remarkable here: a Gigabyte X48T, 4GB of OCZ Platinum DDR3, a Corsair modular PSU, and an X6800 dual-core processor. A 250GB Western Digital Caviar hard drive stores audio files in WAV format. The operating system is Vista 64, which is not ideal for audio due to some of the open source software failing to function properly if at all. There have to be compromises somewhere and current study requirements keep me on the Vista coach just to keep up to speed with its administration. Anything using a dual-core processor running at over 2GHz is likely more than sufficient for an audio server. 4GB of memory is pretty much mandatory for Vista 64 to work efficiently when placed under any kind of load. Another caveat is that I have not managed to locate any USB-ASIO drivers for the Vista 64 platform. ASIO drivers are preferred to help lower latency by routing signals directly to hardware where possible. Vista 32 and XP are fully supported by USB-ASIO, so that's something to bear in mind if you'd like to keep latency as low as possible.
Outboard DAC solutions
Scouring DIY audio forums proved beneficial as I found plenty of attractively priced DAC kits based upon some of the most revered DAC chips available. The availability of USB to I2S and S/PDIF converter boards opens the doors to team commercial outboard DAC solutions as well as complete DIY kit builds to provide a high-end sound experience. DIY solutions are still confined to 16-bit 44.1KHz-48KHz resolution via USB due to hardware/software limitations in the DIY small scale market. It is expected that 2009 will see the availability of 24-bit USB to I2S and S/PDIF chips while Vista should provide native output support for these formats. For now, 16-bit resolution and two-channel playback is adequate for most audio seeing as practically all of our music is recorded with CDs in mind.
Two kits stood out from the pack and present complete solutions that are available in either a modular approach or a single PCB with all components in place to convert data from the digital realm to an audiophile grade audio output. The first is the Doede Douma USB to I2S converter. Doede's solution uses the Texas Instruments 2707 USB to I2S and audio out chip. The venerable TDA1543 is the centrepiece of this kit, favoring a purist mindset as it does not use any kind of oversampling of the digital signal. Audio output from the TDA1543 is configured to use a minimalist passive I/V approach with a final output of 0.6V, which may be a little low for power amplifiers that require higher input voltage to reach full output power. PCM2707 audio output is also available if required, although most people put its subjective abilities behind the TDA1543. Pricing options start at the €49 for the basic kit, while dropping an additional €29 will allow you to experiment with a low jitter master clock based upon a 12MHz VCXO from Tentlabs.
The best two features on this particular kit (aside from cost) are the asynchronous clocking that frees us of the sonic confines imposed by CPU and system loads at the USB end of things. Secondly, Doede does not rely on the USB bus to power any of the circuitry on the PCB. This leaves us with the chance to explore various low noise linear PSUs and batteries with relative ease. Either way, the sonic performance should be in excess of designs that rely solely on internal PC power. Also worthy of a mention here is that the I2S output allows us to try out various DAC kits in the future. For example, we could use the Doede kit solely to provide the USB to I2S conversion and proceed to add a separate I2S input DAC kit as an alternative to the TDA1543. This element of flexibility is especially important to me as I already have the outboard tube stage that I used to provide the audio zest from the Pioneer player. Most modern DAC chips available today feature balanced voltage or current outputs. In my case, a balanced voltage output DAC chip allows me to transplant the tube based audio output stage and enjoy its sonic merits at my leisure.
Doede's kit is available either pre-stuffed and ready to go, or with all of the thru-hole parts loose, leaving you to stuff the PCB and do the soldering. As the PCM2707 is an SMT device, it comes pre-mounted and pre-soldered regardless of the kit option you choose. I decided to purchase the kit without the thru-hole components soldered in, as I felt confident enough to tackle this element of construction myself. I must note that there are no part-by-part instructions supplied with the kit. However, basic instructions and pictures on the DDAC homepage are clear enough to provide a good point of reference should you wish to confirm device orientation or placement in some situations.
If you've never built or soldered a kit before you're best advised to go for the pre-built option at additional cost. Either way, you'll have to provide a suitable case to house the kit. Do make sure to buy a case large enough to house additional PCBs for discrete regulated power supplies or additional DAC boards should you get the bug to upgrade things later. Audio output from Doede's module is configurable via the TDA1543 or from the output of the PCM2707 chip itself. In either configuration, the audio performance is quite good, although the TDA1543 is clearly the better performer in most situations (there will be more subjective stuff later).
Twisted Pear Audio Opus
The second of our picks comes from Twisted Pear Audio's Opus DAC. Twisted Pear Audio is the collaborative effort of Russ White and Brian Donegan, who are both capable engineers and audio enthusiasts. The benefit of this teaming is that we find a number of kits ranging from volume control, selection controllers, DACs, voltage regulators, and even amplifier modules based upon some of the latest technology and at prices that blow the world of high-end audio wide open.
The Opus is based on Wolfson's WM8741, a differential voltage output DAC that supports up to 24-bit 192KHz resolution (source permitting). Dedicated output stages and power supply kits are available from Twisted Pear, designed from the ground up to compliment the Opus DAC. For those of you wishing to drive into single ended inputs on your preamps or amplifiers, the Ballsie converter/buffer module is the way to go. Total price including the Ballsie modules will range from $200~$350, on par with the price range of Doede's kits mentioned earlier. The Opus is available in a variety of configurations, from a bare PCB to a fully soldered and ready to go kit. There are no components to solder in any of the full kit format options, apart from the input/output terminal blocks depending upon individual configuration requirements.
USB to I2S input modules are also available, although Twisted Pear's design powers the PCM2707 from the USB bus. An asynchronous clock module is available that allows the I2S stream to be re-clocked, thus lowering jitter to aid high fidelity audio reproduction. Another option, rather than using the USB to I2S converter, is to opt for the MUX receiver module. Up to four S/PDIF inputs can be connected while a control switch allows you to select the preferred input. The MUX module is capable of outputting 24-bit PCM in I2S format for those who wish to playback recordings of this resolution.
I decided to use the Doede USB converter and go with a dual differential Opus DAC configuration requiring two PCBs both switched to mono mode supporting stereo left and right respectively. In my case, audio output feeds into a 3A5 dual triode per channel, followed by a Sowter 8650a balanced to a single ended 9:1 ratio output transformer. This is probably not a setup that will appeal to those immersed in the merits of signal to noise ratios and accurate square waves, but it's a solution that sounds very appealing to my less than golden ears.
Case and Power
My preferred PSU is a high-speed ultra low noise regulator based on a design by Walt Jung. Again, this is a partial DIY kit that is provided by Peranders Sjöström and known as the JSR-03 regulator. The JSR-03 is used as a pre-regulator, outputting around 9V to the I2S and WM8741 modules. Although a 12V relay is present on the Doede PCB to select from PCM2707 or TDA1543 output, I found a 9V input perfectly capable of making the relay switch. The USB to I2S DAC has an onboard 6V regulator circuit that requires around a 2V margin to regulate effectively, so I'm within its bounds.
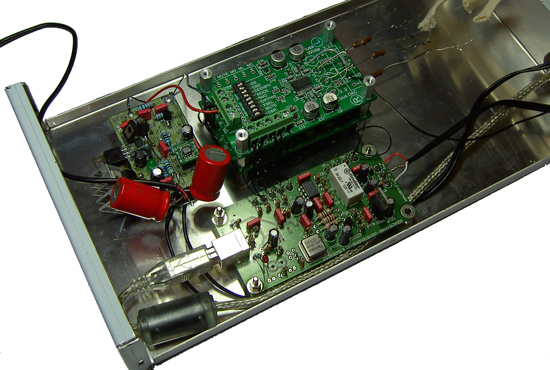 A Maplin KR56L Aluminum case provides ample room to house all the PCBs, with enough room left to add modules at a later date if required. |
To provide the raw or pre-regulated DC, I use either a 12V Wal-Wart PSU or an 1800mAh 12V Li-On battery pack. Total current draw of all combined parts is in the region of 500mA, so the battery pack allows for around three hours of listening before needing a recharge. An alternative would be to buy a high capacity sealed lead acid battery, though I decided against that mainly due to the additional shelf room it would require. I only use the battery packs for critical listening and component comparisons. For normal everyday use, the battery pack is simply removed and input switched over to the Wal-Wart PSU. Subjectively, I find the battery input to provide cleaner, tighter bass notes, more perceived air throughout the mid-band and high frequency range, and better stereo imaging. It's not a smack in the face difference compared to the Wal-Wart PSU, as pre-regulation by the JSR-03 offers superlative noise rejection throughout the audible frequency range. Still, the difference is enough for me to accept the hassle of changing out and charging batteries for that last ounce of playback clarity.
If you're not interested in going to the nth degree of audio resolution, the Wal-Wart solution is probably the best way to go. You'll also find some discrete regulator solutions offered in package deals with these DAC kits on the DDDAC and Twisted Pear pages. Either of these options should lead to a very satisfactory performance, although the Jung based regulators have superlative paper specifications.
Digital Room Correction - Friend or Foe?
Room interaction plays a huge part in how sound is perceived at the listening position. Even the best speakers are hampered by in-room resonance and reflections that bloat or obscure the sound at certain frequencies. In an ideal world, our rooms would be capable of a reasonably flat line audio response between 20Hz-15KHz (the audible range for most of us); the reality however is often far from this proposed optimum. Digital correction software works by playing a full-range frequency sweep, recording the response with a measurement microphone, and then inverting the measured response, thus smoothing room response artifacts.
Initial experiments were performed on the free open source DRC program called ACXO that unfortunately does not appear to support Vista 64 properly. The measuring aspect works fine on the Vista 64-bit OS; however, attempting to apply correction causes the program to hang without ever making a change. If you're using Vista 32 or XP 32-bit, we'd recommend you check it out.
As attempts to use ACXO with Vista 64 failed, I decided to go with the full version of Audiolense 3.0 for two-channel setups. The cost for the basic single user license is around $190, which is not exactly cheap for most of us, but we must recognize the level of work that goes into creating and supporting such products. There are a few alternatives to Audiolense varying in complexity, ease of use, and of course cost. For example, Acourate is a standalone package which seems to have more complexity to its GUIs than Audiolense, although there are video tutorials available on the Acourate website to help users get started.
The beauty of both Audiolense and Acourate is that both companies are new budding enterprises, which leads to support being handled directly by the authors of the software. We hope this continues as emails are currently handled within hours of being sent. Another software option is Art Teknika's Console that can be used with the Voxengo Curve Eq plug-in and used for DRC. The expansion possibilities with Console are huge, with plug-ins supporting digital crossovers and rerouting of input and output signals as long as the hardware used is capable.
Note that all of the software mentioned here features 30 day trial versions with limited functionality to give you a taste of what DRC is all about, so if you're interested but don't want to plunk down hundreds of dollars on something you might not like that's a nice option. You'll also need a measurement microphone and preamplifier. We're using the affordable Behringer ECM8000 and UB802 (now discontinued) to take room response measurements. In all, expect to fork out an additional $150 for these two components. The microphone preamp needs to support "Phantom 48V power" if you're using the ECM8000, so make sure you buy one that's compatible with this requirement.
Subjective Listening - Arrrgh!
For audio playback, we use Foobar 2000 alongside Windows Media Player. All music is transferred first to the hard drive in WAV format using Exact Audio Copy at a 4x read speed. Before we continue with subjective listening impressions, let's take a look at the measured room response of both DACs and listen to a couple of tracks without any DRC engaged.
The lowish output voltage of the passive I/V configured TDA1543 means we have to attempt to balance volume as best we can with the 2V output of the tube/transformer output of the Opus DAC for comparison purposes. After some adjustment and re-attempted measurements, we get a close enough match to see how the room responds to the Opus. Microphone gain and placement was kept at exactly the same point throughout the course of taking measurements. Each measurement was taken a number of times to see if any drastic changes could be observed.
Doede DAC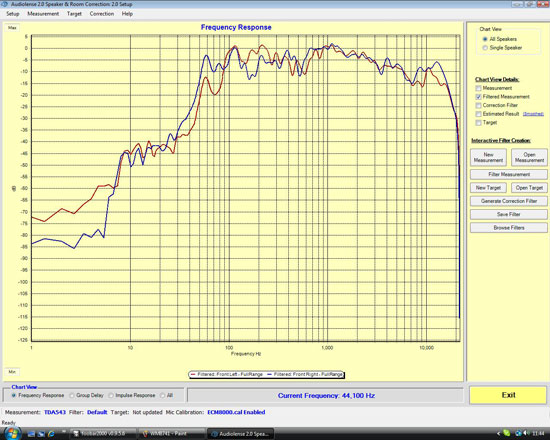 Red=Left speaker, Blue=Right. Due to furniture placement, there is a 10dB offset between the channels at around 162Hz. |
The response is of the Transparence speakers with the TDA1543 is pretty much as expected, rolling off sharply under 60Hz and over 13.5k.
Opus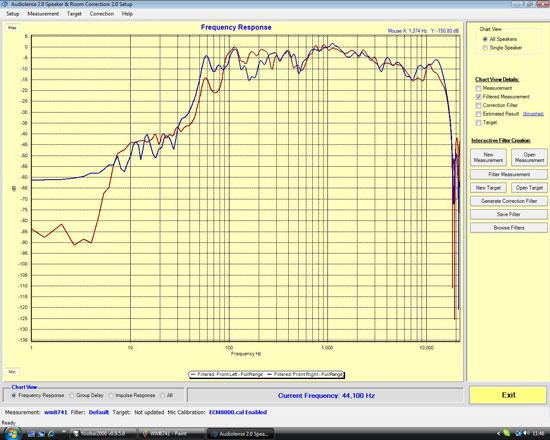 |
Unsurprisingly, there's little to divide the two room sweep responses. The question is how both DACs sound when compared subjectively, both with and without DRC.
Listening tests are conducted using tracks from Maxwell's Urban Hang Suite and Embrya albums. Both albums feature music containing deep articulate bass lines, with vocals and instruments that should stress every part of the Bicone Signature frequency response.
Firing up "Til The Cops Come Knocking" on the Doede DAC first, the thing that strikes me is its directness. Soundstage height and depth can be best described as compact with a focused central image. This creates the perception of the vocalist sitting a couple of feet in front of the speakers. Instruments also have a "hang in the air" factor, without any real overemphasis on the finer details or decay of sounds. If "in your face" reproduction of micro details is important to you, you'll find you'll have to concentrate on hearing them with this unit in the loop. Everything's there, but you don't get buckets of spatial information that enhances micro-detail presence. Maybe that's the way it's supposed to be?
Rendition of high frequency sounds such as cymbals is on the smooth side compared to what I can recall from the Legato DACs of the Pioneer. I guess this may be a trait of non-oversampling. Overall, I'm quite impressed by the sound, considering the uncomplicated approach of Doede's implementation of the TDA1543. Subjectively, the sound has a very neutral character yet still manages to present itself without a fatiguing nature.
Now it's time to check out how the Opus fares in comparison. Both DACs are connected to the preamp simultaneously so that I can switch over quickly between the two while memory is still fresh. I spin up the same tracks from Maxwell and I'm amazed to find the perceived difference in presentation is far more apparent than I'd expected. The vocal forwardness of the TDA1543 is gone; the same vocal rendition sits further back between the speakers but has gained the impression of extending past the height of the baffles, and background instruments seem to have shifted back by a good few feet. The compact soundstage impression that the TDA1543 gave has been replaced with something far more expansive and spatial and the focus is now on all the elements of the recording. The finer details are readily apparent with the Opus; everything is projected in its own space and draws your attention. Mid-bass does not sound as prominent as it did on the TDA1543, the notes seem to be a little leaner and perhaps more analytical. Vocals and cymbals are especially alluring, something that we can put down to the sonic traits of the 3A5s on the output of the WM8741 DACs. To confirm the perceived differences I keep switching back and forth between the two units, each time amazed that the change is so apparent.
Decisions, Decisions
Okay, let's apply room correction based upon the measurements taken earlier. I use a slight slope with 5dB of gain towards sub bass. I did try a flat line approach but found that the bass becomes too thin with the filter applied. Reading over the Audiolense guide, I noticed that there is a suggestion to slope things downward somewhat from low frequency to high frequency and I've found this to be my preference.
Let's have a quick look at the estimated room response for both DACs before we continue further. Unfortunately, Audiolense does not provide an option to record a frequency sweep after the correction has been applied. We've contacted Juice Hi-Fi about this and they've told us they're looking at providing this option in a future update. They did tell us that the estimated result is remarkably accurate based upon tests they've conducted themselves. If such an update is made available, we'll be sure to use the feature to present data in the future if the need arises.
Doede DAC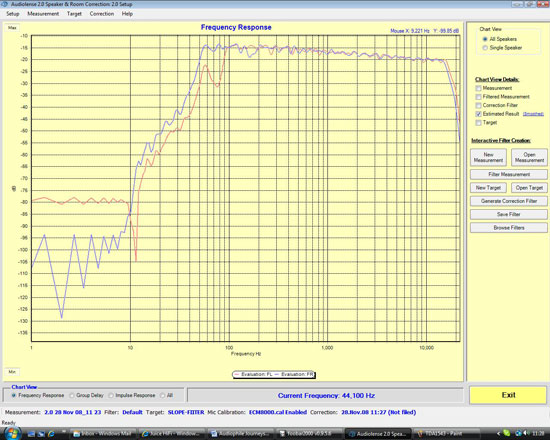 |
Opus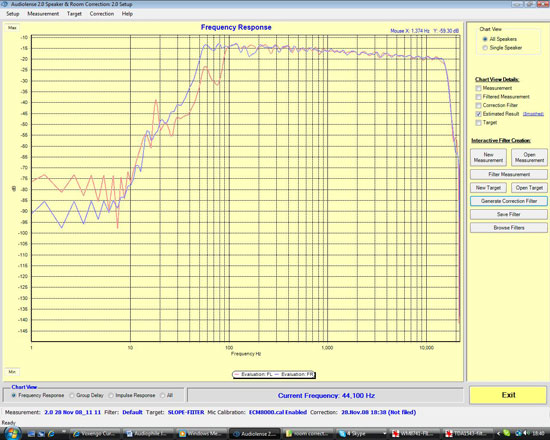 |
There is an unfortunate side effect at this point once the correction is applied to the TDA1543 DAC. The 20dB or so of attenuation applied by the filter means I have to turn the volume control to near maximum to get anywhere near the test volume I was using prior to applying the filters. A 6dB gain switch on the TVC does give me headroom of a couple of clicks, but it's far from optimal. To use this DAC with DRC, you'll either need to stack a number of TDA1543s in parallel or use some kind of gain stage on its output. Still, there's just about enough volume on tap for me to get an idea of its sonic signature in comparison to the earlier sound and in comparison to the WM8741.
With DRC engaged, instruments become far easier to pick out and subtle details are more noticeable at the listening position. The best word to describe the effects of DRC is balance. The other shocker is that the basic nature of both DACs remains the same. The TDA1543 midrange gains more edge definition especially on vocals (not that it needed them). The Opus soundstage gains pinpoint precision with lots of air. Complex passages of music are rendered without any perceivable congestion on both DACs.
Adding in the Subwoofer
The next step is to add in the subwoofer. As I'm feeding the I2S output from the PCM2707 to the TDA1543 and both Opus PCBs simultaneously, it's possible to use the TDA1543 output solely to drive the subwoofer. The Opus DACs will be used with the 300Bs and Transparence speakers maintaining a crossover-less setup for the midrange and highs.
The Linnn Isobarik 5150 is configurable to crossover between 41-81Hz in variable steps. I started off at 41Hz initially, but found that the sub gave away its corner of the room location frequently when rendering sub bass. I'm out of space in my main living room and with the Linn being quite the behemoth, there really is nowhere else for me to put it. Crossing over at 48Hz seemed better to my ears, so we'll proceed to look at the room response with the sub in place.
Opus plus Sub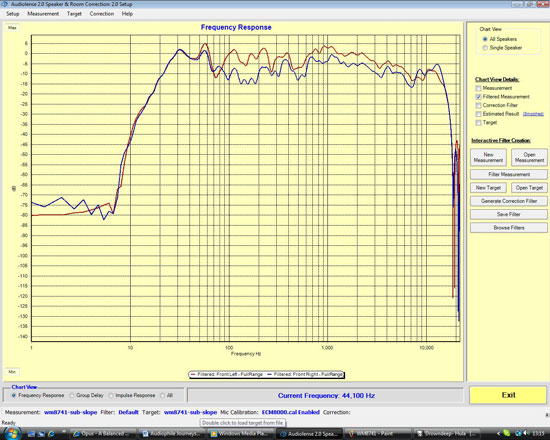 |
That's better; we now have a decent response to around 25Hz. The nature of the Linn sub in my room is quite "boomy" and the bass lacks definition, even with a minimal amount of gain (possibly due to placement). Crossing the unit in a little higher does help with this, but then things get lumpy around 60Hz where there's already a peak from the main speakers. It'll be interesting to see how applying DRC will level things out.
Opus plus Sub with DRC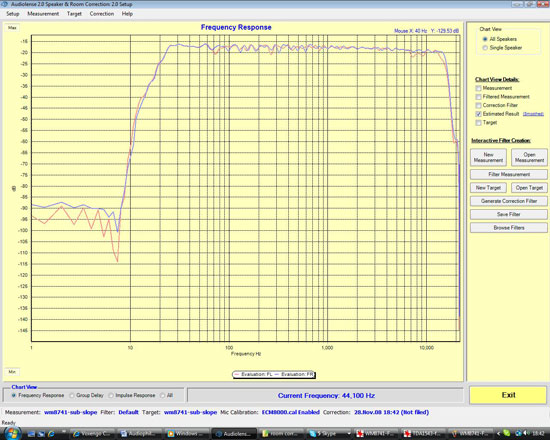 The wonders of DRC - a predicted near flat in room response between 25 Hz and 15 KHz. |
Now we're talking! A predicted response most of us dream of at the listening position. The correction file was hastily loaded into Convolver and a few tracks played to see how things sounded. At the risk of sounding like a salesman, I can tell you I was pretty knocked out by the results. The integration of the subwoofer is almost seamless, only hinting at its location on the very lowest notes. All the perceived boom factor from the bass is gone. What remains is the tightest, most articulate bass I've heard outside using my Sennheiser headphones. I already knew the Supravox drivers in open baffles had real promise, but armed with DRC and a subwoofer, they simply move up to another league.
Switching DRC on and off is pretty much a day and night change. Listening without the filters is almost torturous when you've been subjected to what is possible. It's not that things get fatiguing; it's just that everything sounds chaotic and bloated without DRC to correct the abnormalities. The sonic quality of both DAC kits combined with a PC as the feed has surpassed my expectations, far in excess of what I can recall from the HDA Xplosion card I dismissed as lackluster in my previous attempts of using a PC based front end.
Final Words
Without DRC, the Doede USB to I2S converter gets my vote as a fantastic all in one solution. It's neutral, balanced and almost defies logic with its simplistic approach. The detraction against it is that using a single TDA1543 results in an output level that is simply too low when DRC is applied. Doede's solution to this is to stack up to eight TDA1543s in parallel to boost output current. I'm not sure if that approach appeals to me, but it may be worth a shot if you'd like to try this DAC out.
The Opus's strengths are in its spatial presentation and rendering of distance between instruments. The tubes do add a touch of warmth to the presentation, which is probably needed as this DAC pretty much strips everything from a recording and throws it into the soundscape. It's great if you've got a high quality recording, but on discs that have been butchered by recording engineers or those containing low quality digital samples the presentation is ruthless. Things may be different with the Ballsie output stage, though I'd expect the spatial element to remain prominent. I don't miss the modified Pioneer at all though, the Opus is far better when using the PC as a transport.
It is remarkable how little has changed in the audio world over the last 50 years or so. Some of us are still beguiled by vacuum tubes and open baffle speakers and trying to keep signal path complexity to a bare minimum (not mentioning any names). Others think that vinyl playback will never be surpassed by the ones and zeroes of digital. If ever there was a case against that argument, DRC has to be it. Yes, the PC is not only great for data storage and retrieval but also a device that can apply all manner of room adjustments while enhancing the listening experience rather than detracting from it.
Tie the USB DAC kits together with DRC and it all becomes the real deal. While PC based correction is not as easy to use as the offerings from Behringer and TacT, the PC software is scalable providing greater potential for expansion at a later date. Multi channel digital crossover integrated DRC is still out of reach for the masses though - especially if you want to apply correction to movie playback. You'll need all manner of plug-ins and the patience to set everything up properly as it's certainly not easy. Moreover, the cost of an entire system to cater to all this still falls in the "buy now, pay forever" territory for many.
For two-channel playback though, given the choice between purchasing a new audio component or the chance to buy something that can perform DRC, I'd pick DRC every single time. It's that darn good.


