The Neophyte's Custom Liquid Cooling Guide: How To, Why To, What To Expect
by Dustin Sklavos on September 30, 2013 12:01 AM ESTNow that you understand what the fittings are, the rest of it is just a matter of going by the plan and adapting as unforeseen issues materialize. There isn't any order you have to connect the individual parts in, just as long as they make a complete loop and you're careful to tighten (but not overtighten) all of the seals. My suggestion is to just connect whatever's easiest and take your time. That said, the easy part and one of the most fun parts is installing the waterblocks.
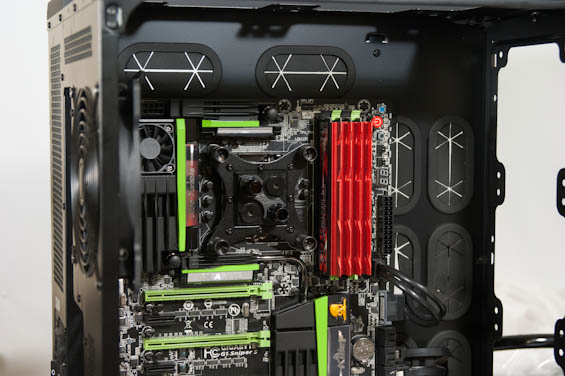
The CPU waterblock goes on pretty much like any conventional CPU cooler, but without a massive heatsink array getting in the way or even the tubing from a CLC. Because the Apogee HD's two barbs both stick straight up and the area surrounding the CPU socket is typically pretty clear, this is actually fairly easy to install early and connect late.
Installing the GPU waterblock is more involved, but not actually that bad. Disassembling a GeForce GTX 780 (or 680/770/Titan) is simple; the hardest part really is saying farewell to that beautiful stock cooler. The back of the card is going to be nothing but screws; four larger Philips head, one smaller one, and then ~15 small torx screws. You'll have to remove all of them. The stock cooler has two different connectors plugged into the PCB that you'll also need to disconnect.
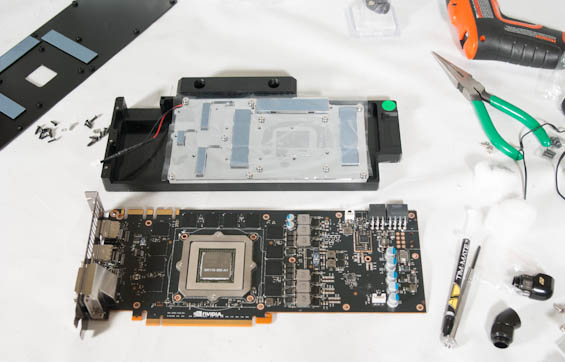
Once the cooler is removed, use a cotton ball and some rubbing alcohol (90% pure or better) and gently remove the thermal grease from the surface of the GPU die. From there, the included instructions for the waterblock will be very clear and straightforward. The benefit of using a specially designed waterblock like the KOMODO-NV is that the assembly is extremely easy. It's contingent upon your card being a reference board, but the block is designed specifically to fit that board and cool all of the surface components. From the photo above you can even see the thermal padding for the power circuitry and GDDR5 chips.
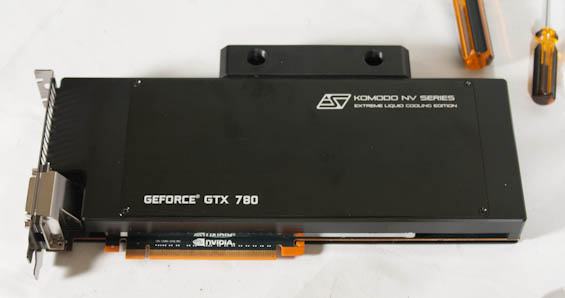
In my opinion, the video card waterblocks are the biggest upshot of a custom liquid cooling loop. Everything gets cooled properly, the blocks look nice, and you'll see load thermals that are maybe half what the card ran at under air.


106 Comments
View All Comments
meacupla - Tuesday, October 1, 2013 - link
The only thing this article proves is...1: corsair cube case can't mount enough radiators
2: poor radiator choices
ShieTar - Tuesday, October 1, 2013 - link
Yeah, despite the description by Corsair, this case is most certainly not designed to work well with water cooling. I mean, it has a 330mmx460mm foot print, that should be enough for 6x120mm or even 6x140mm radiators on top. Set it up like that, add 360mm worth of intake fans to the bottom front, and you will look at much more cooling power than the current solution.On the other hand, the air flow looks great for the air cooled solution, with the drive cages nicely out of the way. Thats probably hurting the comparison number in the above review, the fact that we compare a great air cooling case with a mediocre water cooling case.
HisDivineOrder - Tuesday, October 1, 2013 - link
"The last problem I ran into had to do with Swiftech's PWM splitter. While it's supposed to take the PWM signal from the motherboard and split it among all of the fans connected to it, the fans all wound up just running at full speed. It's tough to figure out exactly where the blame lies or if it's just an incompatibility. Honestly, I think a rig like this is pretty much the ideal situation for a Corsair Link kit, where extremely tight and flexible software control of multiple PWM channels is vital. Gigabyte has made a fantastic motherboard here in the G1.Sniper 5, but their fan control is still woefully lackluster."Sounds like you were trying to split a (supposed) PWM fan port other than your main CPU PWM port. On my P8Z77-V I had this brilliant idea to split the PWM fan ports I needed and let the motherboard run the rest, including the CPU separately. To let some fans go up and down more frequently than others.
Asus and other motherboard makers will tell you that all their 4 pin fan ports are PWM, but that's only half-true. Because they want them to be compatible with 3 pin fan control mechanisms, they are not true PWM controlled, so when you try to use a PWM splitter with them (all but that single 4 pin PWM fan port they have dedicated to CPU (and not the extra one either)), then they go full speed.
I had to wind up splitting all my fans off of just the main CPU 4 pin. This works, but it's not ideal because ALL my fans go up and down with what my CPU fan is doing. That's more noise than I'd like, but it's still less than the alternative.
All this to say, it's the motherboard maker's fault and you guys have been letting them get a free pass for years now on this. Perhaps you should start testing it and take them to task over it. I wouldn't blame the 8 pin splitter as I have it and it works fine.
The Von Matrices - Wednesday, October 2, 2013 - link
That's exactly what was true with my previous ASUS P6X58D Premium board. My new ASRock Z87-Extreme6 has only two PWM fam connectors, but both are wired correctly and are independently controlled. I agree that reviewers should test for this issue, but it seems that people who specifically want PWM fans are a minor component of the fan buying market and most will settle for 3-pin voltage controlled fans.mohamed Siran - Wednesday, October 2, 2013 - link
pls can you tel first photo corsair Case model ?Kathrine647 - Wednesday, October 2, 2013 - link
like Gregory said I am alarmed that a stay at home mom able to earn $5886 in 1 month on the internet. visit their website............B u z z 5 5 . com open the link without spacesdon_k - Friday, October 4, 2013 - link
"The reason is that watercooling necessitates using a water pump, and while they can be tuned down for efficiency, they're never going to be dead silent. An air cooler will always be a fan plus heatsink; watercooling adds a pump."Excellent article, very thorough, one thing though, I would beg to differ on this point. Pump noise rather obviously depends on the pump. The MCP35X that you chose, while a very good pump, is not the most silent. A D5 on the other hand can be completely, note not relatively but completely, silent when decoupled meaning not sitting or attached directly to the case so it does not cause vibrations on the case, even on its highest setting.
Similarly, how much fan noise you have depends on the fans you get and how fast you run them. The benefit with watercooling is you have a much larger surface area from which to dissipate heat, which gives you the option of several slow fans without sacrificing cooling capability.
Sure, you would get an few less points Celcius with higher RPMs but why bother when you're already at such a cool temperature and you need to double your fan speed and go from silent to noisy to do it.
To give you some concrete numbers from my own testing, a 3x120/140 radiator with a low FPI that is designed for low speed fans and 3 good quality fans at 700RPM is near silent. At 500RPM or less, completely silent. Pump noise is a non-issue, a D5 can be completely silent as I mentioned earlier.
Going from 500RPM to 1300RPM, the max on my fans, gives me a max of 5-7C decrease in water temperature under continuous load on both CPU and GPU, meaning running at 100% load for as long as necessary until temperatures stabilise at their maximum point.
Some watercoolers like to run high RPM fans and high FPI radiators so they can get really good temperatures at the expense of noise. Others do the opposite to get a silent system and still get better temps than on air. The choice is yours.
Shelbino - Monday, October 7, 2013 - link
Dustin, thanks very much for this article. I'm glad you supplied so much detail. My only big problem with the specific design here is the cost. I did a tally of the liquid cooling parts you used, and came up with a total of nearly one thousand dollars! IMHO, that's w-a-y too much for the relatively modest performance gains. Despite that, thanks for this detailed piece on liquid cooling.Volnaiskra - Friday, October 11, 2013 - link
So.......three days of work and hundreds of dollars for more noise, more power consumption, more maintenance, and about a 2% performance increase?I was seriously considering watercooling before, but you have thoroughly talked me out of it!!
expatswe - Saturday, October 12, 2013 - link
hmm, I liked the article and how the system was put together. Except I can not understand why it was so important to put the pump in the crammed space behind the powersupply when half the case was empty anyway.I was though really disappointed on how the over clocking was done and the results being shown. To me it looks like the writer ran out of steam and thus simply settled on the basic results on overclocking with liquid compared to air. It would be easy to get the system up to atleast 4.7GHz in that setup. I doubt it was the processor (which was given the blame)
30 db is the "noise" level in a quiet bedroom at night. 40db is a quiet library. Thus in the test it would be more interesting to know what the temperature levels seen on for example the water with CPU over clocked at different speeds without the GPU's being overclocked and then with one overclocked vs 2 overclocked to max level. Since the system was in series the water was effectively pre-heated before going into the GPU's. This is a common solution and since the article is written for beginners that is what would be interesting. Temperatures then also shown at no load vs full load at the relevant speeds would have been relevant.
This was not really a test of game speeds and software speeds as such but that of a build of cooling systems.