The Neophyte's Custom Liquid Cooling Guide: How To, Why To, What To Expect
by Dustin Sklavos on September 30, 2013 12:01 AM ESTNow that you understand what the fittings are, the rest of it is just a matter of going by the plan and adapting as unforeseen issues materialize. There isn't any order you have to connect the individual parts in, just as long as they make a complete loop and you're careful to tighten (but not overtighten) all of the seals. My suggestion is to just connect whatever's easiest and take your time. That said, the easy part and one of the most fun parts is installing the waterblocks.
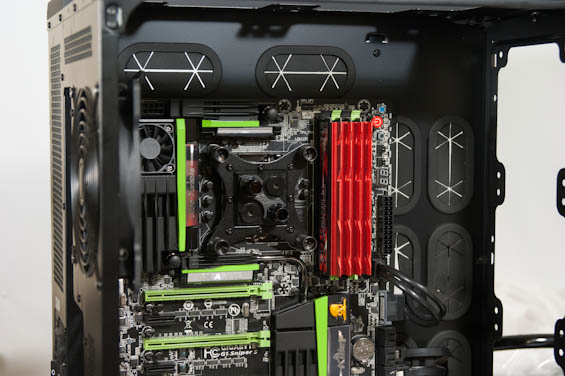
The CPU waterblock goes on pretty much like any conventional CPU cooler, but without a massive heatsink array getting in the way or even the tubing from a CLC. Because the Apogee HD's two barbs both stick straight up and the area surrounding the CPU socket is typically pretty clear, this is actually fairly easy to install early and connect late.
Installing the GPU waterblock is more involved, but not actually that bad. Disassembling a GeForce GTX 780 (or 680/770/Titan) is simple; the hardest part really is saying farewell to that beautiful stock cooler. The back of the card is going to be nothing but screws; four larger Philips head, one smaller one, and then ~15 small torx screws. You'll have to remove all of them. The stock cooler has two different connectors plugged into the PCB that you'll also need to disconnect.
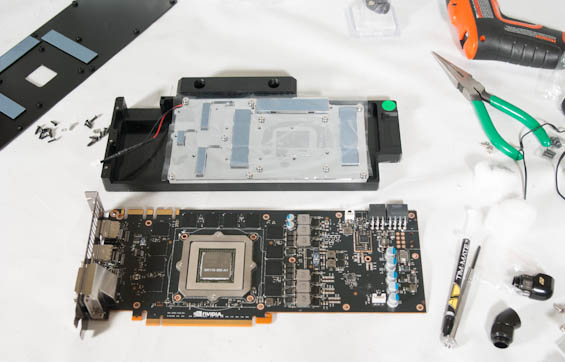
Once the cooler is removed, use a cotton ball and some rubbing alcohol (90% pure or better) and gently remove the thermal grease from the surface of the GPU die. From there, the included instructions for the waterblock will be very clear and straightforward. The benefit of using a specially designed waterblock like the KOMODO-NV is that the assembly is extremely easy. It's contingent upon your card being a reference board, but the block is designed specifically to fit that board and cool all of the surface components. From the photo above you can even see the thermal padding for the power circuitry and GDDR5 chips.
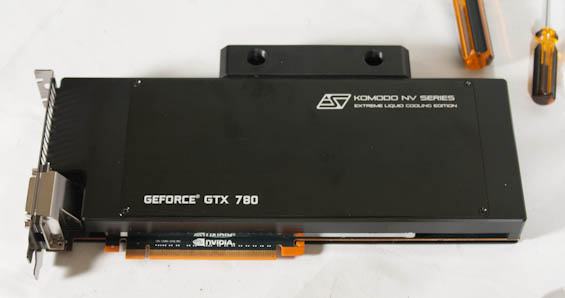
In my opinion, the video card waterblocks are the biggest upshot of a custom liquid cooling loop. Everything gets cooled properly, the blocks look nice, and you'll see load thermals that are maybe half what the card ran at under air.


106 Comments
View All Comments
hot120 - Monday, September 30, 2013 - link
Awesome article!blanarahul - Monday, September 30, 2013 - link
Hmm.. Can you try cooling those 780s alone? Overclocking the CPU seems pointless on Haswell.valkyrie743 - Monday, September 30, 2013 - link
overclocking haswell is not pointless. just is a pain (same with ivy bridge) cause intel decided to be cheap and not solder the IHS to the cpu. if you do a mild overclock its fine give or take how bad the tim on the cpu/ihs is. but if you plan on doing high overclocks and water cooling like this. you might as well de-lid the cpu and apply your own tim. temps on air (if done right) drop a good 15 to 20C under load. I've seen people hitting 90 C and go down to 70 or less underload. and thats on air.the reason why i have no upgraded from my sandy bridge 2600K. @4.5ghz right now at 1.28 volts and my max temp running intel burn test was 70C (air)
The Von Matrices - Monday, September 30, 2013 - link
Please read my post in response to NeatOman. The result is correct but the reasoning is incorrect.gandergray - Tuesday, October 1, 2013 - link
For information about removing the cpu lid or integrated heat spreader, see the work performed by Idontcare: http://forums.anandtech.com/showthread.php?t=22618... .iTzSnypah - Monday, September 30, 2013 - link
You are cooling way too much with only 600mm worth of radiators and your deltaT is obscene. Take out 1x GTX780 and retest if possible.NeatOman - Monday, September 30, 2013 - link
I think the thermal paste between the cpu and the lid are the limiting factor here, i believe that not only will 4770K do better with better thermal paste in between the lid and cpu on just air cooling alone but also might have a larger difference between the air and water cooling.And of course there is also a full delid which i think wont be much of a threat because with water cooling you don't need the motherboard to support a large heavy cooler.
NeatOman - Monday, September 30, 2013 - link
Sorry, i meant that you wont need to put a lot of pressure like if you where supporting a large air cooler with the motherboard.The Von Matrices - Monday, September 30, 2013 - link
The issue is not the composition of the thermal paste between the die and the lid; it is the thickness of the thermal paste between the die and the lid. It's widely reported that in Ivy Bridge and Haswell there is way too much of a gap between the die and the lid due to the thickness of the glue used to secure the lid to the package. You can solve this by removing the lid, using a razor blade to remove all the glue, then put on new TIM and place the lid back on the package. No matter what new TIM you use you will get drastically reduced temperatures.Either way, Haswell runs hot due to its FIVR, and there's nothing that can be done through beefier heatsinks, delidding, or changing thermal paste that will make it cooler than an equivalently modified Ivy Bridge.
dragosmp - Monday, September 30, 2013 - link
Still, it is incomplete. The thermal transfer formula is simply Rth=rho*L/S, more thermal resistance (Rth) more the temperature delta is high between the source and ambient: deltaT=Power*RthAsuming the power is constant, to decrease deltaT you need to decrease the thermal resistance, so:
*S is the die surface, can't change that
*L is the thickness of paste - you're right, it needs to be as thin as possible; put 2x too much and you have twice the deltaT
*rho - thermal resistivity (1/lambda) - it depends on the material; Intel does use cheap paste with a conductivity around 3; were they to use fluxless solder or at least some AS5 they'd decrease the thermal resitance by a factor of 2 easily, thus offsetting a thicker than needed layer of paste.
My 2 cents: for performance the paste must be removed and replaced with something better plus as you say remove the glue to reduce the thickness. Of course one should be careful not to chip the die, but these two things really help.