The Neophyte's Custom Liquid Cooling Guide: How To, Why To, What To Expect
by Dustin Sklavos on September 30, 2013 12:01 AM ESTBefore you start assembling your loop, you'll really want a clear idea of how everything is going to route together. It will help to physically draw a diagram, even a hastily scribbled one, so you have some idea of how everything will connect. For the Corsair Carbide Air 540, I knew the cubby next to the power supply was where I wanted to put the reservoir and pump assembly. That meant that two lines were going to be routing back behind the motherboard: the line that flowed into the reservoir, and the line exiting the pump.
Below is the sequence I used for my loop, and it shouldn't be too hard to use it as a basic blueprint. This is undoubtedly going to create contention; I spent hours and hours reading posts on different watercooling forums before concluding that the simplest layout would be the best and easiest.
- Reservoir and pump assembly.
- Top radiator (240mm).
- Motherboard voltage circuitry.
- CPU waterblock (Apogee HD).
- First GeForce GTX 780 (KOMODO-NV).
- Second GeForce GTX 780 (KOMODO-NV).
- Front radiator (360mm).
- ...and back to the reservoir and pump assembly.
I spent a lot of time playing Tetris with the radiators, attaching and detaching the fans, trying to figure out exactly how everything would fit into the case and how everything would get connected. While the entire assembly probably could've taken only a couple of hours, my work on it went on over the course of three nights. Clearance issues reared their ugly heads a couple of times, necessitating the use of 45 degree and 90 degree adapters, sometimes even in sequence.
Compression in the foreground, worm clamp in the background.
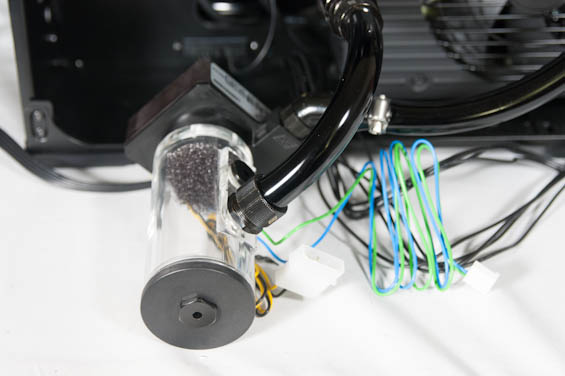
At this point I'm also going to admit the one thing I was most worried and ignorant about when I started this project specifically for those of you out there who are wondering about it, because I couldn't find any instructions in any of the tutorials I read for how to assemble a loop: how to actually connect the tubing to the individual blocks, radiators, reservoir, and pump.
The reservoir, waterblocks, radiators, and pump all have ports which fittings screw into (and screwing in those fittings is what you need the wrenches for). There are essentially two types of fittings I had to worry about: barbs and compressions. Barbs are the conical ports I mentioned earlier; the end of the tubing fits around the barb (typically pretty snugly and requiring a healthy amount of force), and then you use either a nylon clamp or a worm clamp. The nylon clamp snaps around the tubing and should be tightened with a pair of pliers, and is...adequate. The worm clamp needs to be loose and around the tubing before you affix it to the barb, and it's a royal pain to completely tighten because they all use flathead screws, but once it's on secure it's not going anywhere.
Compression fittings start with a barb you have to fit the tubing around, but before that there's a circular piece that goes around the tubing similar to the way you start with a worm clamp. The difference is that there's a set of threads below the barb, and the circular piece screws on to those. The lip in the circular piece squeezes the tubing, compressing it into place and sealing it. These can be extremely difficult to apply if you don't have a good grip and decent forearm strength, but they're tight, much easier to remove than worm clamps, and comparatively easy to connect.


106 Comments
View All Comments
egotrippin - Monday, October 14, 2013 - link
I'm about to nerd out so forgive me...
Some of the conclusions from this article aren't representative of what you can truly do with water cooling but rather the limitations of the equipment you selected.
For starters, the addition of a pump doesn't automatically mean more noise. The pump you selected can sound like an angry wind up toy and it generates a lot of heat and vibration. A Laing D5 Vario/MCP 655 pump is whisper quiet, especially with a Koolance PMP450 top on it. It can be running at full speed pushing 4.6 liters per minute through the system and so long as it's decoupled properly from any hard surface in the computer case then you wouldn't be able to hear it if it was 6 inches from your ear.
I run a 3930k overclocked typically to 4.4 GHz although I've done higher and if I'm running prime 95 or Intel burn-test my temps are about 66C TOTAL and not 66 DELTA?! If your room is a comfortable 24 C does that mean your CPU temps are 84C on water? Something isn't right. I don't know that chip but maybe it needs to be Delidded and Lapped. I had that same Apogee HD block before on a 3930k which is a much hotter chip and my temps never reached that high.
The fans you are using have a familiar style... because they look just like the Scythe Gentle Typhoons which have the best noise/static pressure of any radiator fan I've seen tested. If you used Gentle Typhoons, temps would be lower and the whole thing would be quiet.
The coolant you used is probably less efficient than distilled water. The only coolant I've used that delivers lower temperatures is Ice Dragon which is heavy and expensive and cuts your flow rate in half. Distilled water works great and it's $1
I can't tell for sure but it looks like small diameter tubing was used. Using 1/2" inner diameter tubing delivers higher flow which means lower temperatures.
Those radiators are anorexic. I don't think they come much thinner than that. Use something with a bit of heft. My rad is 80mm thick which is twice the thickness of those Swiffys. This allows for substantially more cooling and also higher flow rate which, again, increases cooling and lowers noise.
My 3930k + my GTX 690 dual GPU card can both be overclocked and Folding or benching with all cores/gpus at 100% and it can be silent enough that if it weren't for the power light, you wouldn't know it was on. I briefly used air on my GTX 690 and it sounded like a hair dryer and filled the room with the scent of charred air much like the smell of turning your heater on for the first time in winter.
If anybody reads this, you can expect better results if you buy better components. I started off with Swiftech because they were cheap and also they were carried at my local MicroCenter. I quickly graduated to better parts. The Apogee HD is an excellent water block and the Swiftech MCP35X2 and MCP655 pumps are both excellent pumps (but neither were used here).
prismatics - Wednesday, October 16, 2013 - link
Why did you only post OC Liquid benchmarks? I'm interested in Non-OC liquid numbers. I have no interest in overclocking, I just want the quietest, most efficient system.mc2k4 - Tuesday, December 31, 2013 - link
Terrible article, would put off anyone from watercooling. Those results are horrendous.woogitboogity - Wednesday, January 22, 2014 - link
I did a custom build CPU/Northbridge/GPU with the cooling loop going outside the case to the reservoir about 5 years ago...I will admit that when the thing ACTUALLY worked for a while it was insane... granted it was 5 years ago but even then seeing lukewarm temperatures on essentially every component at full load was pretty impressive.
BUT... I feel that one thing missing from this article is a reality check: I work in experimental physics and I have had to work water cooling and even liquid helium cooling for magnets. 5 years ago the vendors of water cooling hardware implied a LOT more than they could back up in practice... since then their claims have only gotten more extravagant. At least in the days when people did water cooling from scratch they did not have marketeers offering false assurances in the form of warranties that clearly do not cover damage due to other hardware.
BOTTOM LINE: I think the subtext of this entire article that needs to be clear is that custom water cooling should be treated as a VERY expensive hobby. Expect to lose every component... period. If that is not an acceptable outcome don't do it. I say this because I deal with experimental cooling all the time and I got burned by the sub-par cooling hardware offered not too long ago (same hoses and cooling block designs... still using water).
Drittz121 - Friday, February 28, 2014 - link
Just do yourself a favor. STAY AWAY from this company. Yes they look good. But when it breaks and it WILL. All they do is give you the run around. They have had my system for over 2 months trying to fix the garbage they sell. Worse company out there for support. DONT BUYalpha3031 - Sunday, June 22, 2014 - link
What about these new Devils Canyon chips?