The Neophyte's Custom Liquid Cooling Guide: How To, Why To, What To Expect
by Dustin Sklavos on September 30, 2013 12:01 AM ESTBefore you start assembling your loop, you'll really want a clear idea of how everything is going to route together. It will help to physically draw a diagram, even a hastily scribbled one, so you have some idea of how everything will connect. For the Corsair Carbide Air 540, I knew the cubby next to the power supply was where I wanted to put the reservoir and pump assembly. That meant that two lines were going to be routing back behind the motherboard: the line that flowed into the reservoir, and the line exiting the pump.
Below is the sequence I used for my loop, and it shouldn't be too hard to use it as a basic blueprint. This is undoubtedly going to create contention; I spent hours and hours reading posts on different watercooling forums before concluding that the simplest layout would be the best and easiest.
- Reservoir and pump assembly.
- Top radiator (240mm).
- Motherboard voltage circuitry.
- CPU waterblock (Apogee HD).
- First GeForce GTX 780 (KOMODO-NV).
- Second GeForce GTX 780 (KOMODO-NV).
- Front radiator (360mm).
- ...and back to the reservoir and pump assembly.
I spent a lot of time playing Tetris with the radiators, attaching and detaching the fans, trying to figure out exactly how everything would fit into the case and how everything would get connected. While the entire assembly probably could've taken only a couple of hours, my work on it went on over the course of three nights. Clearance issues reared their ugly heads a couple of times, necessitating the use of 45 degree and 90 degree adapters, sometimes even in sequence.
Compression in the foreground, worm clamp in the background.
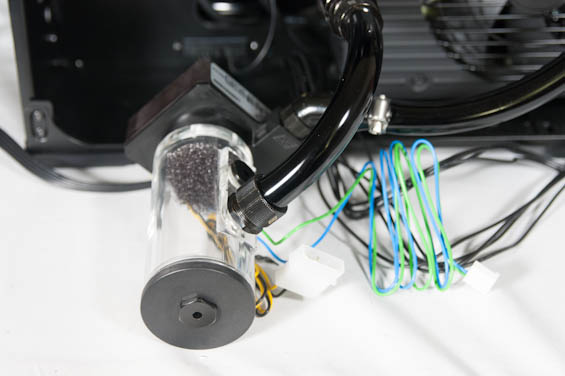
At this point I'm also going to admit the one thing I was most worried and ignorant about when I started this project specifically for those of you out there who are wondering about it, because I couldn't find any instructions in any of the tutorials I read for how to assemble a loop: how to actually connect the tubing to the individual blocks, radiators, reservoir, and pump.
The reservoir, waterblocks, radiators, and pump all have ports which fittings screw into (and screwing in those fittings is what you need the wrenches for). There are essentially two types of fittings I had to worry about: barbs and compressions. Barbs are the conical ports I mentioned earlier; the end of the tubing fits around the barb (typically pretty snugly and requiring a healthy amount of force), and then you use either a nylon clamp or a worm clamp. The nylon clamp snaps around the tubing and should be tightened with a pair of pliers, and is...adequate. The worm clamp needs to be loose and around the tubing before you affix it to the barb, and it's a royal pain to completely tighten because they all use flathead screws, but once it's on secure it's not going anywhere.
Compression fittings start with a barb you have to fit the tubing around, but before that there's a circular piece that goes around the tubing similar to the way you start with a worm clamp. The difference is that there's a set of threads below the barb, and the circular piece screws on to those. The lip in the circular piece squeezes the tubing, compressing it into place and sealing it. These can be extremely difficult to apply if you don't have a good grip and decent forearm strength, but they're tight, much easier to remove than worm clamps, and comparatively easy to connect.


106 Comments
View All Comments
Sadrak85 - Monday, September 30, 2013 - link
And one more thing is the addition of onboard voltage regulation, which is a lossy process almost by definition. Meaning, even with the better TIM, I seriously have my doubts that the thermals could hit the level of IVB or SB. Unless Intel somehow has some magic way of using the voltage and amperage they're scrubbing off.*small note, a good motherboard input, in terms of electricity, would pass through the filters pretty cleanly, but because Intel sets the specifications for the input, I have my doubts that they require such a thing, since the feature they added to their chip was to save money for the motherboard vendor.
leafonwind - Monday, September 30, 2013 - link
The thermal interface material is minor compared to the interface distance. Thermal resistance is L/kA. Going from a millimeter of thermal paste to an 10 micron gap (typical of paste when applied correctly) will give a 50x improvement. The difference in k between a good thermal paste and a bad thermal paste is typically a 5x difference unless you get into exotic materials like cadmium. http://forums.anandtech.com/showthread.php?t=22618...gandergray - Tuesday, October 1, 2013 - link
To bolster Von's point, see the work performed by Idontcare: http://forums.anandtech.com/showpost.php?p=3405318... .merikafyeah - Monday, September 30, 2013 - link
Super tiny correction: While it is true that liquids draw away heat much better than air, one must be cautious not to mistake water as a good CONDUCTOR of heat, aka something that "transfers" heat very well. Water is in fact an INSULATOR of heat, aka something that "absorbs" heat very well.merikafyeah - Monday, September 30, 2013 - link
Note wording on first page, third paragraph.ShieTar - Monday, September 30, 2013 - link
Correct, but to be precise, neither air nor water will conduct heat quickly enough for PC cooling purposes, both are only used to absorb the heat before being transported away from the heat source.Which makes you wonder how a closed-loop, compressed air cooling system would fare against a water-cooling system. Heat capacity might still be lower for air than for water, even at increased pressures, but I assume that you can produce higher flow rates for a compressed gas than for a liquid. And you could use the required compressor in order to:
1) Reduce the air temperature below room temperature before sending it to the heat sources.
2) Increase radiator temperature over the CPU/GPU temperatures, thus achieving the same heat transfer with lower air flow rates through the radiator. Though temperatures above 100°C may be unsafe in a consumer device for several reasons.
Does anybody know if such a system has been considered and tested anywhere?
Death666Angel - Monday, September 30, 2013 - link
Considered? Probably. Used? Not to my knowledge. If you have a compressor it makes more sense to cool the water used in the loop to just above freezing or even below freezing with the right additives. Of course, if you cool it that much, you have to worry about condensation, so most people I read about who use compressor cooling for their liquid (instead of large radiators) keep the water around room temperature and have the cooler in another room, to not be bothered by the noise.The stuff that is used to conduct heat away from the components inside the PC is the metal heatsink. In the case of pure air cooling you then push air through the metal heatsink fins. Because of the delta T you have the air warming up, the metal cooling and being able to absorb heat from the CPU/GPU etc. again. In case of water cooling, you have the water running through the heatsink (usually some very fine canals inside that increase surface and flow rate) which absorbs the heat from the heatsink and gets transported to (large) radiators where air is again pushed/pulled through the radiator fins in order to cool it.
Sadrak85 - Monday, September 30, 2013 - link
Used all the time; Nitrogen is the most common component of air; it is compressed so much as to become a liquid. Then, thanks to the Carnot cycle, cooling the liquid to room temperature results in it boiling and becoming ultra-cold air, which cools a processor.A similar thing happens with your refrigerator.
These coolers, however, require massive power to get them to that level, so they're only really useful for very niche-applications, but the equipment isn't really that hard to find. An evaporator will cost you something like $200 to $300, and then the Nitrogen.
Now, if you're talking about keeping the air gaseous, then what you'll find is it just isn't possible. Cooling it very much with pressure on it will result in it condensing to liquid. If you just compress it, without the cooling, you'll heat it up, of course, which is how your diesel engine works.
ShieTar - Monday, September 30, 2013 - link
Fair enough. I am fully aware of the cooling concept via liquid nitrogen boiling itself, but I was considering a much simpler concept. Maybe I should describe it in a bit more detail.Imagine a closed air (or just nitrogen) system where the air pressure is about 3 bar within a radiator and about 2 bar when it circulates within the cooling blocks. You can have temperatures around 200K at 2 bar without liquifying, and not that much higher at 3 bar.
So you offer your GPU/CPU coolers 2bars of air at 200K, maybe heat it to 220K, compress it to 3bar/330K, cool it back down to 300K (close to room temperature), decompress back to 2bar/200K.
What needs a little more math is, just how much volume of gas do I need for this to transport 600W or so of power by this concept. And how much additional energy do I waste on the compression process. And probably, just how horribly noisy will this setup get with 2bars of air at high velocities getting pressed through the cooling blocks at high velocities.
Yeah, the more I think about it, the worse the whole concept sounds. Nevermind it.
UltraWide - Monday, September 30, 2013 - link
Excellent article, I enjoyed reading this journey into water cooling. Keep up the great work!