The Neophyte's Custom Liquid Cooling Guide: How To, Why To, What To Expect
by Dustin Sklavos on September 30, 2013 12:01 AM ESTBefore you start assembling your loop, you'll really want a clear idea of how everything is going to route together. It will help to physically draw a diagram, even a hastily scribbled one, so you have some idea of how everything will connect. For the Corsair Carbide Air 540, I knew the cubby next to the power supply was where I wanted to put the reservoir and pump assembly. That meant that two lines were going to be routing back behind the motherboard: the line that flowed into the reservoir, and the line exiting the pump.
Below is the sequence I used for my loop, and it shouldn't be too hard to use it as a basic blueprint. This is undoubtedly going to create contention; I spent hours and hours reading posts on different watercooling forums before concluding that the simplest layout would be the best and easiest.
- Reservoir and pump assembly.
- Top radiator (240mm).
- Motherboard voltage circuitry.
- CPU waterblock (Apogee HD).
- First GeForce GTX 780 (KOMODO-NV).
- Second GeForce GTX 780 (KOMODO-NV).
- Front radiator (360mm).
- ...and back to the reservoir and pump assembly.
I spent a lot of time playing Tetris with the radiators, attaching and detaching the fans, trying to figure out exactly how everything would fit into the case and how everything would get connected. While the entire assembly probably could've taken only a couple of hours, my work on it went on over the course of three nights. Clearance issues reared their ugly heads a couple of times, necessitating the use of 45 degree and 90 degree adapters, sometimes even in sequence.
Compression in the foreground, worm clamp in the background.
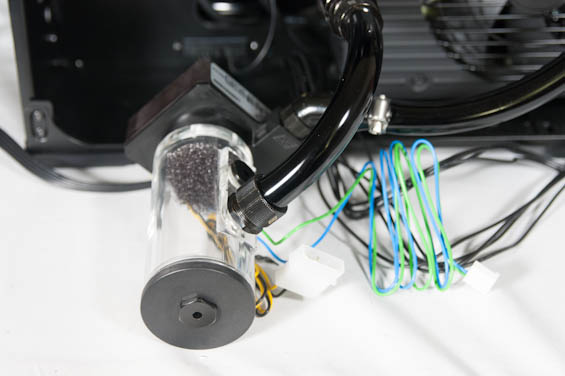
At this point I'm also going to admit the one thing I was most worried and ignorant about when I started this project specifically for those of you out there who are wondering about it, because I couldn't find any instructions in any of the tutorials I read for how to assemble a loop: how to actually connect the tubing to the individual blocks, radiators, reservoir, and pump.
The reservoir, waterblocks, radiators, and pump all have ports which fittings screw into (and screwing in those fittings is what you need the wrenches for). There are essentially two types of fittings I had to worry about: barbs and compressions. Barbs are the conical ports I mentioned earlier; the end of the tubing fits around the barb (typically pretty snugly and requiring a healthy amount of force), and then you use either a nylon clamp or a worm clamp. The nylon clamp snaps around the tubing and should be tightened with a pair of pliers, and is...adequate. The worm clamp needs to be loose and around the tubing before you affix it to the barb, and it's a royal pain to completely tighten because they all use flathead screws, but once it's on secure it's not going anywhere.
Compression fittings start with a barb you have to fit the tubing around, but before that there's a circular piece that goes around the tubing similar to the way you start with a worm clamp. The difference is that there's a set of threads below the barb, and the circular piece screws on to those. The lip in the circular piece squeezes the tubing, compressing it into place and sealing it. These can be extremely difficult to apply if you don't have a good grip and decent forearm strength, but they're tight, much easier to remove than worm clamps, and comparatively easy to connect.


106 Comments
View All Comments
Razorbak86 - Wednesday, October 2, 2013 - link
No problem. I'm pretty familiar with the voltage range, so I understood what you meant. I have a de-lidded 3770K OCed to 4.8 Ghz (offset) under water, and my voltage maxes out at 1.40V at load.Gigaplex - Monday, September 30, 2013 - link
The power/temp/sound results aren't particularly useful without a comparison of OC air vs OC liquid at the same OC levels. We can't tell if the CPU is hotter on liquid vs air due to higher voltages or the GPUs heating the liquid.prophet001 - Monday, September 30, 2013 - link
I thought this too. It would be nice to see metrics for identical OC settings on air and liquid. Seems like that would give more of an indication about how the cooling setup itself is performing.The Von Matrices - Monday, September 30, 2013 - link
I enjoyed reading your article. I have owned a custom loop for three years, and after recently upgrading to Haswell, I can say that my overclocking experience mirrors yours. There is just no advantage to using a custom liquid cooling system versus a good air cooler or closed-loop liquid cooling system.I have also had the same experience with PWM splitters, and I think the blame comes down to the splitter itself. The splitter I have (it looks very similar to the one you tested) doesn't have the pins fitting very tightly in their connectors. Frequently, inserting the female connector into the male socket will result in the pins of one or the other pushing themselves out of the connector instead of mating with the other side, and you have to push the pins (or wires if the pins are just slightly out) back into the connector in order to establish the electrical connection.
Two note as well is that are is worth mentioning: First, all video card full cover water blocks are designed with a particular PCB layout in mind, usually the reference PCB, so you have to be very careful which video cards you buy since they are not all compatible with the full cover blocks available. For example, for about the past six months there have been no more reference design AMD HD 7970s available on the market, so if you wanted to water cool the new 7970 you bought then you were out of luck (unless you wanted a MSI lightning, which one or two manufacturers make water blocks for). Second, while clear tubing looks great at first, it usually does not age well and begins to either turn yellowish or show water cooling fluid as it gradually gets dirtier over time. i would recommend solid color tubing if you want a system to look good with minimal maintenance.
The biggest issue with this article is that you never stated the costs of the water cooling components. The system you built I estimate has about $800-$1000 in water cooling components. It is important to note that the system does not have to be that expensive, particularly if you're not especially concerned with aesthetics. Barbs cost about half the price of compression connectors, and if you have 10 of them in the system that's about $100 saved right there. If you frequently upgrade graphics cards, you can use core-only water blocks and separate VRM and memory heatsinks. The initial cost is about the same as a full cover water block (~$120 for a good full-cover block versus $80 for a MCW82 + $40 for the VRM/RAM heatsink plate) but every time you replace the graphics card you only have to replace a $40 VRM/RAM heatsink plate instead of a $120 full cover water block. And you can eliminate all the quick disconnect fittings for another $80 savings.
I appreciate you documenting your experience!
DanNeely - Monday, September 30, 2013 - link
Unfortunately Swiftech has stopped selling monolithic plates for vram/vrm cooling on nVidia cards (allegedly due to their deal to make OEM watercoolers for eVGA). They still sell them for AMD cards; but on the nVidia front you're back to taping/gluing individual sinks onto each component.r3loaded - Monday, September 30, 2013 - link
I enjoyed reading this article, but I'd add that you'll see a huge drop in CPU temperatures (like, 20 degrees) if you're able to delid your 4770K and apply a good quality paste under the heatspreader. It's risky but worth it if you're careful.If only Intel hadn't decided to cheap out and abandon soldered heatspreaders as on Sandy Bridge and earlier.
kasakka - Monday, September 30, 2013 - link
Those load temps seem awfully high for the CPU. I can't help but think that maybe the CPU waterblock isn't properly mounted, has too much or too little TIM between it etc. Back when I was overclocking a watercooled C2Q 9550 the idle and load temps didn't change much and were around 40-50 degrees. Surely the current Intels would provide better temperatures?I stopped watercooling mainly because it would've been expensive to upgrade all the blocks when I went to Ivy Bridge. Turns out there is barely any noise difference between the water cooling and today's best air coolers, meaning I'm very happy with the near-silent setup I have now (3570K @ 4.5 GHz, Phanteks PH-TC14PE, Asus GTX660Ti w/ stock cooler) so purely from a noise level point of view water cooling isn't necessary anymore.
Jackie60 - Monday, September 30, 2013 - link
Well that was a very informative monumental waste of time and effort and would have been money too if it wasn't for Anandtech. This tells me don't even ever think about water cooling unless in a small prison cell for a long time.Death666Angel - Monday, September 30, 2013 - link
I'm glad you finally tackled custom water cooling in an article here on Anandtech! :D And for the first one, it wasn't half bad.There are a few things I would add though. It is highly unlikely in my experience that someone investing the time and money into a custom water cooling rig would not delid the CPU or use a IVB-E CPU. That should help increase OC headroom quite a bit and bring down temperatures. That doesn't mean that it can't be done with air cooling, but since that is infinitely easier to do, fewer people would invest the time/money to delid a high price CPU or get a high price platform like IVB-E.
But then again, watercooling just for the CPU has been dead since we stopped having 100+W CPUs. If you ask in any WC forum whether to custom cool the CPU, you will always get the response "It's not worth it just for that".
I also think that people have a wrong idea about custom WC. If you are not interested in the challenge it poses, then it isn't for you. The benefits (quieter running while providing better performance) are there, but they aren't great enough to change from air cooling if you don't enjoy the risk and the building and selection process.
If you plot a chart with performance/noise ratio, the water cooling rig can always be better than any air cooling that is available. It can also run components cooler at the same overclock, which increases their potential life span. However, these things come at a steep cost and may not be as necessary for many.
But it is very nice to have my AMD 7970 run at 1250/1650 at ~44°C and barely have any high noise than in idle. :D
Gigaplex - Monday, September 30, 2013 - link
IVB-E are 100+W CPUs.