The Neophyte's Custom Liquid Cooling Guide: How To, Why To, What To Expect
by Dustin Sklavos on September 30, 2013 12:01 AM ESTBefore you start assembling your loop, you'll really want a clear idea of how everything is going to route together. It will help to physically draw a diagram, even a hastily scribbled one, so you have some idea of how everything will connect. For the Corsair Carbide Air 540, I knew the cubby next to the power supply was where I wanted to put the reservoir and pump assembly. That meant that two lines were going to be routing back behind the motherboard: the line that flowed into the reservoir, and the line exiting the pump.
Below is the sequence I used for my loop, and it shouldn't be too hard to use it as a basic blueprint. This is undoubtedly going to create contention; I spent hours and hours reading posts on different watercooling forums before concluding that the simplest layout would be the best and easiest.
- Reservoir and pump assembly.
- Top radiator (240mm).
- Motherboard voltage circuitry.
- CPU waterblock (Apogee HD).
- First GeForce GTX 780 (KOMODO-NV).
- Second GeForce GTX 780 (KOMODO-NV).
- Front radiator (360mm).
- ...and back to the reservoir and pump assembly.
I spent a lot of time playing Tetris with the radiators, attaching and detaching the fans, trying to figure out exactly how everything would fit into the case and how everything would get connected. While the entire assembly probably could've taken only a couple of hours, my work on it went on over the course of three nights. Clearance issues reared their ugly heads a couple of times, necessitating the use of 45 degree and 90 degree adapters, sometimes even in sequence.
Compression in the foreground, worm clamp in the background.
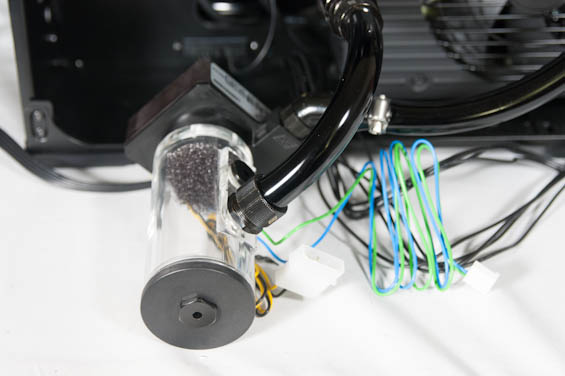
At this point I'm also going to admit the one thing I was most worried and ignorant about when I started this project specifically for those of you out there who are wondering about it, because I couldn't find any instructions in any of the tutorials I read for how to assemble a loop: how to actually connect the tubing to the individual blocks, radiators, reservoir, and pump.
The reservoir, waterblocks, radiators, and pump all have ports which fittings screw into (and screwing in those fittings is what you need the wrenches for). There are essentially two types of fittings I had to worry about: barbs and compressions. Barbs are the conical ports I mentioned earlier; the end of the tubing fits around the barb (typically pretty snugly and requiring a healthy amount of force), and then you use either a nylon clamp or a worm clamp. The nylon clamp snaps around the tubing and should be tightened with a pair of pliers, and is...adequate. The worm clamp needs to be loose and around the tubing before you affix it to the barb, and it's a royal pain to completely tighten because they all use flathead screws, but once it's on secure it's not going anywhere.
Compression fittings start with a barb you have to fit the tubing around, but before that there's a circular piece that goes around the tubing similar to the way you start with a worm clamp. The difference is that there's a set of threads below the barb, and the circular piece screws on to those. The lip in the circular piece squeezes the tubing, compressing it into place and sealing it. These can be extremely difficult to apply if you don't have a good grip and decent forearm strength, but they're tight, much easier to remove than worm clamps, and comparatively easy to connect.


106 Comments
View All Comments
madisoncarter127 - Monday, September 30, 2013 - link
himadisoncarter127 - Monday, September 30, 2013 - link
My last pay check was $11000working 10 hours a week online. My brothers friend has been averaging 17k for months now and she works about 18 hours a week. I can't believe how easy it was once I tried it out.dgingeri - Monday, September 30, 2013 - link
You've sold me on the case, and convinced me to not try water cooling for a while longer, and possibly never. It looks like a lot of hard work for little to no reward. I'll stick to my H100. The case looks great, though.Shinobi_III - Monday, September 30, 2013 - link
If you put the pump in a reservoir, you will no longer have a "noisy" pump.Noisy being a rather absurd wording, considering how incredibly little noise a EHEIM 600l/h pump produces.
That pump you used in the article is ridiculous, what is that, a pump for ants?
And compression fittings are complete suicide, they fail sooner or later.
Perfectly regular ridged slide-over fittings, and a zip tie if you're nervous, will never fail.
And the coolant is ridiculous too, get "long life" automotive coolant, mix it 1:10 and you will never need to worry again. Those bottles are just rebranded, ready-mixed glycol with a giant price tag.
HisDivineOrder - Monday, September 30, 2013 - link
Watercooling GPU's makes sense, but how long before CLC is common on those? It can't be long since everyone's used to CLC's on CPU's where you don't even need water cooling at all. I imagine it won't be long before GPU's too don't need watercooling anymore since they'll be integrated into the CPU.Given that Intel will make its own version of Mantle in short order that they'll pay entire publishers to use, I'm pretty sure we can kiss any advantage discrete cards have goodbye. I'm sure Intel will send AMD a fruit basket for both the idea and making everyone okay with it.
ImSpartacus - Monday, September 30, 2013 - link
Hot damn, this is comprehensive as fuck.Good article!
livingplasma - Monday, September 30, 2013 - link
Thanks for the great article, it's good to see a major tech site like Anandtech cover the often misunderstood art of water cooling. Just skimmed through the comments and a lot of my fellow water cooling guys/gals made some very important points. From my experience it is most important for radiator fan orientation to act as INTAKES. Flipping those top fans to intake can decrease your load temps ~8 degrees celcius from my experience as the way it's currently set up the top 2x120 radiator is using the air from the 3x120 radiator (which is already saturated with heat). Properly decoupled pumps will minimize noise/vibration transmission to the case and with the MCP35X's PMW control it can run very quietly when slowed down 50% which is more than enough flow for most setups. Radiators themselves are low flow resistance, full cover gpu blocks are probably next and CPU blocks tend to have the most but even maxing out a pump only decreases temperatures CPU by a degree or two (plus now the pump is dumping in more heat as well). Removing the stock GPU cooling setups is probably the biggest contributions to water cooling being more quiet than a regular air setup and even with a modest setup the temperature differences are huge as shown with the author's setup.1Angelreloaded - Monday, September 30, 2013 - link
Dustin, Do you know the difference between a Serial and Parallel loop? or how the High flow and Low Flow pressures effect heat dissipation on certain blocks? I understand this may be your first time setting this up; however, in the computer field research is everything, you already know this just like modifying a car without research you end up with an underperforming and underwhelming creation. This is not how a liquid cooled setup should be set up at all, and BTW your Proc temps are higher because the Air source feeding it is already heated from your GPU Rad outlet, try reversing the flow on intake to exit Flow and your CPU temps will be better, CPUs on average run at lower temps on full loads compared to GPUs that can average 70-80 C especially while gaming.hot120 - Tuesday, October 1, 2013 - link
Man, there are quite a few fake 'experts' critiquing this fine article. It seems everyone wants the article done their way. Delid this CPU, change that fan, move this radiator, use that Kill Coil. Enough is enough. It is a basic article on watercolling, and is not meant to cover EVERY SINGLE POSSIBLE configuration. Only the most extreme of the extreme computer users will consider delidding their CPU's. Only the most insane of the extreme computer users will spend $800 on a custom loop to shave 5-10 degrees off their CPU/GPU temps. I'll take my $100 and by a CLC and live happily ever after with my CPU that is +10 degrees (over custom) and my air-cooled GPU. Some of you are tripping!pandemonium - Tuesday, October 1, 2013 - link
Thanks for the introduction article to watercooling. To me - verified according to the results - this says it's still not worth it for a general user and gamer. The cost of increased power, thermals, and noise do not appear to outweigh the performance increase. I know other setups produce better results, but this is a good sample for not bothering with it.Watercooling is still for benchmarking...and that's about it.